
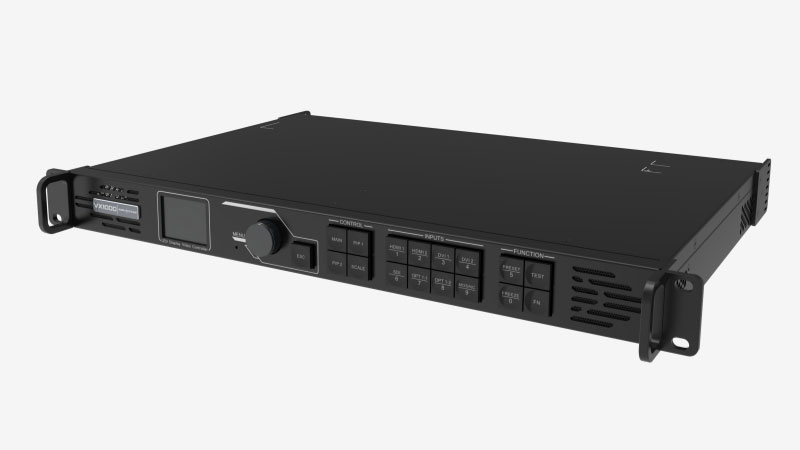
The NovaStar VX1000 is an all-in-one LED controller. It handles video processing and signal sending in one box — no separate sending card needed.
This guide covers specs, setup, firmware update, software, price, and how it compares to the VX1000 Pro.
Table of Content
1. What Is the NovaStar VX1000 Video Processor?
2. NovaStar VX1000 Specifications: Ports, Pixels & Interfaces
3. Compatible Software & Free Download
4. How to Set Up the NovaStar VX1000?
5. NovaStar VX1000 Firmware Update Guide
6. NovaStar VX1000 vs VX1000 Pro
7. NovaStar VX1000 Price Guide
8. Download: Manual, Datasheet, Firmware & Software
9. FAQs
10. Conclusion
1. What Is the NovaStar VX1000 Video Processor?
Most LED setups need two devices: a video processor plus a sending card. The VX1000 replaces both.
It takes your video input, processes it, and sends the signal directly to your LED panels via 10 Gigabit Ethernet ports. One box, one connection.
The NovaStar VX1000 processor supports three working modes:
● Video Controller — standard mode, processes and sends video to the LED screen
● Fiber Converter — receives data via OPT 1 and forwards it through the Ethernet ports, for long-distance setups
● Bypass — pixel-to-pixel pass-through with minimal processing; only the main layer is available, PIP 1 and PIP 2 are disabled
It works with NovaLCT for screen configuration and V-Can for real-time control.
2. NovaStar VX1000 Specifications: Ports, Pixels & Interfaces
The VX1000 drives up to 6.5 million pixels across 10 Gigabit Ethernet ports. Here’s the full breakdown.
| Parameter | Specification |
| Max loading capacity | 6.5 million pixels |
| Max output width | 10,240 pixels |
| Max output height | 8,192 pixels |
| Max input resolution | 4K×1K @ 60Hz |
| Ethernet output ports | 10 × Gigabit RJ45 |
| Pixels per Ethernet port | 650,000 |
| Video inputs | 2× HDMI 1.4, 2× DVI (HDMI 1.4), 1× 3G-SDI, 1× OPT 1 |
| Monitoring output | 1× HDMI 1.3 (fixed 1920×1080@60Hz) |
| Optical fiber ports | 2× OPT (10G) |
| Layers | 3 (Main + PIP 1 + PIP 2) |
| Genlock | Bi-level & tri-level |
| 3D support | Yes (requires EMT200 emitter) |
| Calibration | Pixel-level brightness & chroma |
| Image engine | SuperView III |
| Rated power | 35W |
| Input voltage | 100–240V~, 1.5A, 50/60Hz |
| Operating temperature | 0°C to 45°C |
| Dimensions | 483.6 × 351.2 × 50.1 mm |
| Net weight | 4 kg |
| Form factor | 1U rack-mount |
2.1 Pixels per port
Each Ethernet port carries up to 650,000 pixels. Across all 10 ports, that’s 6.5 million total. If your screen goes beyond that, you can link up to 4 VX1000 units in image mosaic mode to expand capacity.
One thing to note: when the main layer uses a mosaic source, PIP 1 and PIP 2 are automatically disabled.

2.2 Video inputs
The VX1000 takes 2× HDMI 1.4, 2× DVI, and 1× 3G-SDI. The SDI input is handy for live camera feeds — max resolution is 1920×1080@60Hz.
OPT 1 is self-adaptive, working as either a video input or a fiber output depending on what’s connected.
2.3 Monitoring output
The HDMI 1.3 port on the rear is for monitoring only. Its resolution is fixed at 1920×1080@60Hz. Don’t manually change this via Advanced Settings — it will affect the LED screen output.
Download the official NovaStar VX1000 datasheet and specifications PDF from our NovaStar Software page.
3. Compatible Software & Free Download
The VX1000 works with three NovaStar software tools. Each one does a different job.
3.1 NovaLCT
NovaLCT is the main configuration tool. You use it to set up your screen layout, map Ethernet ports to cabinet positions, run pixel-level brightness and chroma calibration, push firmware updates, and import cabinet configuration files (RCFG).
First time setting up the VX1000? Start here. Go to User → Advanced Synchronous System User Login to unlock the full set of functions — without this step, several options stay hidden.
3.2 V-Can
V-Can handles real-time on-site control. Once your screen is configured, you switch to V-Can for live operations — switching input sources, managing layers, loading presets, and pushing firmware updates.
It’s also where you rename presets. The new names show up on the VX1000’s front panel LCD after saving.
3.3 VICP
VICP is NovaStar’s cloud monitoring platform. It lets you check device status and manage screens remotely without being on-site. Not every project needs it, but for multi-venue setups it saves a lot of time.
All three tools are available free on our download page — no registration needed.
4. How to Set Up the NovaStar VX1000?
Setup runs through NovaLCT. Here’s the full walkthrough.
Step 1 — Connect the hardware
Plug your video source into one of the HDMI 1.4 or DVI inputs on the rear panel. For live camera feeds, use the 3G-SDI input instead. Run Cat6 cables from the RJ45 output ports to your LED cabinets.
Then connect the VX1000 to your PC. Use the USB Type-B port for the initial connection — it’s more stable than Ethernet for first-time setup.

Step 2 — Install NovaLCT and log in
Download and open NovaLCT from LedInCloud. Go to User → Advanced Synchronous System User Login. This unlocks the full configuration options. Without this step, several menus stay hidden.

Step 3 — Import the cabinet configuration file
If you have an RCFG file for your LED panels, go to Tools → Controller Cabinet Configuration File Import. Click Add Configuration File, select your file, then click Save the Change to HW.
No RCFG file? Use Quick Configuration instead — go to Screen Configuration → Quick Configuration, set your cabinet row and column quantities, then set Port 1 Cabinet Qty. Note: total pixels per port cannot exceed 650,000.

Step 4 — Send the configuration file to cabinets
Go to Screen Configuration → Send RCFGx Files. Select your file and confirm. The VX1000 automatically pushes it to all receiving cards in the screen.
After sending, go to Screen Configuration → Save to RV Card to save the configuration. This prevents data loss after a power failure.
Step 5 — Set input resolution
Go to Input Settings, select your input source, then open EDID.
Choose Standard or Custom resolution mode and set the resolution to match your video feed exactly. A mismatch here causes scaling problems.
Note: the 3G-SDI input does not support manual resolution settings.

Step 6 — Configure layers
Open the layer settings from the front panel — press MAIN, PIP 1, or PIP 2 in the CONTROL area. Or go to Layer Settings in the menu. Set Status to On, select your input source, then adjust size, position, and priority as needed.
By default, the main layer is open and both PIP layers are closed.

Step 7 — Save a preset
Go to Preset Settings, select a slot, press the knob, and choose Save. The preset stores your layer status, input source, size, position, priority, input crop, opacity, and color settings.
To load a preset on-site, select it and choose Load. The VX1000 supports up to 10 user-defined presets.

Step 8 — Run a test pattern
Before going live, press the TEST shortcut button on the front panel to run a test pattern. Check every corner of the screen for dead zones or misaligned cabinets. Once everything looks clean, press TEST again to exit.
Most setups are done in under 30 minutes with a good RCFG file and a clean cable run.
5. NovaStar VX1000 Firmware Update Guide
Keeping the firmware up to date fixes bugs and adds new features. The NovaStar VX1000 firmware update can be done in two ways — through V-Can or through NovaLCT.
5.1 Before you start
Connect the VX1000 to your PC via Ethernet cable. Download the latest firmware package from LedInCloud.

Method 1 — Update in V-Can (recommended)
- Step 1 — Decompress the downloaded firmware package.
- Step 2 — Open V-Can, go to System → Firmware Update.
- Step 3 — Click Browse in the Update Program area and select the firmware package.
- Step 4 — If you’re updating multiple devices, check the boxes next to each device in the Device List.
- Step 5 — Click Update to start. Wait for the process to finish.
- Step 6 — After the update, check the Device List to confirm the device is on the latest version.

Method 2 — Update in NovaLCT
- Step 1 — Open NovaLCT, go to User → Advanced Synchronous System User Login. The default password is “admin”.
- Step 2 — After login, enter “admin” again to open the program loading window.
- Step 3 — Click Browse to select the firmware package, then click Update.
- Step 4 — The VX1000 restarts automatically after the update.
- Step 5 — Click Refresh under Hardware Program Version Information to confirm the update succeeded.
A few things to keep in mind
The VX1000 does not support firmware updates via USB drive — only via Ethernet connection. Don’t power off the device during the update process. If the version doesn’t match after updating, contact LedInCloud technical support.
6. NovaStar VX1000 vs VX1000 Pro
Both share the same pixel capacity and Ethernet output structure, but there are some meaningful differences.
| Spec | VX1000 | VX1000 Pro |
| Release Year | 2021 | 2025 |
| Max Input Resolution | 4K×1K@60Hz | 4K×2K@60Hz |
| HDMI Input Version | HDMI 1.4 | HDMI 2.0 |
| Input Connectors | HDMI×2, DVI×2, SDI×1, OPT1 | HDMI 2.0×1, HDMI 1.3×2, SDI×1, OPT1, USB 3.0 |
| Layers | 3 (1 main + 2 PIP) | Up to 6 (flexible 2K resources) |
| Max Presets | 10 | 256 |
| Low Latency | 20 lines (Bypass mode) | 0 frame (Bypass mode) |
| USB Playback | No | Yes |
| Independent Audio Jack | No | Yes (3.5mm in/out) |
| OSD Function | No | Yes |
| RS232 Port | No | Yes |
| Control Software | NovaLCT, V-Can | NovaLCT, Unico, VICP app |
| Remote Control | No | Optional |
| Rated Power | 35W | 44W |
| Net Weight | 4 kg | 3.9 kg |
| Dimensions (mm) | 483.6 × 351.2 × 50.1 | 482.6 × 302.2 × 50.1 |
Go with the VX1000 if:
- Your input sources are HDMI 1.4 or DVI
- You’re running straightforward LED wall setups without complex multi-layer requirements
- Budget is a key factor and the advanced features aren’t needed
Go with the VX1000 Pro if:
- You need 4K×2K full resolution input
- You want USB playback for standalone operation
- Your show requires more than 3 layers or more than 10 presets
- You need RS232 for control system integration
- You’re working in environments where 0-frame latency or device restoration matter
- You want the newer Unico and VICP app control workflow
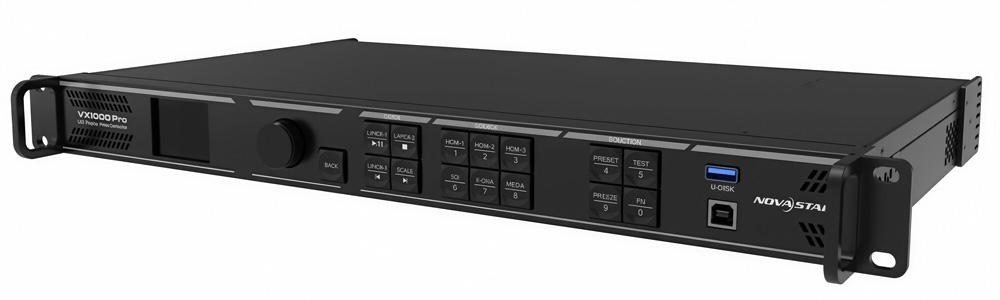
Both devices share the same core output capacity and overall form factor. The VX1000 Pro is essentially a redesign that adds flexibility, better signal handling, and more control options. For most new installations today, the Pro is the stronger long-term choice. The VX1000 still does a solid job in simpler rental or fixed-install scenarios where its existing feature set covers everything you need.
7. NovaStar VX1000 Price Guide
The NovaStar VX1000 price varies depending on the reseller, region, and whether you need additional accessories like optical modules.
The VX1000 typically sells between $1,800 and $2,500 on the open market. This is a reference range — actual pricing depends on your supplier and order quantity.
Looking for the VX1000 price or comparing it with other controllers? Register a free account on LedInCloud – LED Screen Cloud Platform — you can check real-time pricing on NovaStar, Colorlight, Huidu controllers, and LED panels all in one place.
8. Download: Manual, Datasheet, Firmware & Software
Everything you need for the novastar vx1000 is available free on our resource page — no registration required.
Looking for VX1000 Pro resources, or other NovaStar downloads? Head to LedInCloud — we also carry Colorlight and Huidu software downloads in the same place.
9. FAQs
How many pixels can the NovaStar VX1000 load per Ethernet port?
Each port supports up to 650,000 pixels. Across all 10 ports, one unit drives up to 6.5 million pixels total. For larger screens, you can link up to 4 units in image mosaic mode.
How many VX1000 units do I need for my screen size?
It depends on your pixel pitch. A P3.91 panel at 500×1000mm has around 64,000 pixels per cabinet — one port handles roughly 10 cabinets. For finer pitch panels like P1.25, you'll hit the per-port limit faster. Not sure? Contact us.
Does the VX1000 need a separate sending card?
No. It combines video processing and LED signal sending in one device. Connect it directly to your LED panels via the 10 Ethernet ports.
What software works with the VX1000?
NovaLCT for screen configuration and calibration. V-Can for real-time on-site control. VICP for cloud-based remote monitoring.
How do I update the VX1000 firmware?
Connect via Ethernet, then update through V-Can (System → Firmware Update) or NovaLCT. Download the firmware package free from our website.
10. Conclusion
The NovaStar VX1000 is a solid choice for rental stages, fine-pitch installs, and large fixed screens. It replaces your video processor and sending card in one box, drives up to 6.5 million pixels, and works with NovaLCT and V-Can right out of the box.
If your project needs 4K×2K input, more layers, or higher preset storage, the VX1000 Pro is worth the upgrade.
Either way, the controller is only part of the system. If you’re also sourcing LED panels, register a free account on LedInCloud — check real-time pricing on controllers and panels, get instant quotes, and download free VX1000 configuration files.