
NovaStar VX600: Specs, Price, Software Download & Setup Guide
NovaStar VX600 is a 6-port all-in-one LED display controller. If you’re looking for specs, pricing, setup steps, or firmware update instructions — it’s all on this page.
1. What Is the NovaStar VX600?
NovaStar VX600 is an all-in-one LED display controller. It integrates a video processor and a sending card into a single 2U rack-mount device.
In most LED display setups, those are two separate pieces of hardware. But with the VX600 NovaStar, you get both in one box. That’s the core idea — fewer devices, simpler signal chain, same level of control.
The VX600 processor supports three working modes: Video Controller, Fiber Converter, and ByPass. Each one suits a different installation type. On top of that, it connects to NovaStar’s own software — NovaLCT and V-Can — so you can configure and manage everything from a PC.
NovaStar designed the Nova VX600 for medium to high-end rental, stage LED walls, and fine-pitch displays. It works with LED screens only — not projectors or LCD panels.

2. NovaStar VX600 Specifications
The table below comes from the official NovaStar VX600 datasheet.
| Category | Item | Spec |
| Loading Capacity | Max pixels | 3.9 million |
| Max output width | 10,240 pixels | |
| Max output height | 8,192 pixels | |
| Input | HDMI 1.3 | 2× (one with loop-through), max 1920×1200@60Hz |
| DVI | 1× (with loop-through), max 1920×1200@60Hz | |
| 3G-SDI | 1× (with loop-through), max 1920×1080@60Hz | |
| Optical fiber | 1× OPT1 (self-adaptive: input or output) | |
| Output | Ethernet ports | 6× Gigabit |
| Optical fiber | 2× (OPT1 adaptive, OPT2 output only) | |
| HDMI monitor | 1× HDMI 1.3 (fixed 1920×1080@60Hz in Video Controller mode) | |
| Layers | Total | 3 (1 main + 2 PIP) |
| Presets | User-defined | Up to 10 |
| Working Modes | — | Video Controller / Fiber Converter / ByPass |
| Control | Software | NovaLCT, V-Can |
| Hardware | Front panel knob + buttons | |
| Power | Input | 100–240V~, 1.5A, 50/60Hz |
| Consumption | 35W | |
| Environment | Operating temp | –10°C to 45°C |
| Storage temp | –20°C to +70°C | |
| Humidity (operating) | 20%–90% RH, non-condensing | |
| Physical | Dimensions | 483.6 × 351.2 × 50.1 mm |
| Net weight | 4 kg | |
| Noise level | 45 dB(A) at 25°C |
A few things the spec sheet doesn't spell out clearly, but are worth knowing:
(1) The 3G-SDI input does not support custom resolutions or bit depth settings. It only accepts standard ST-424 (3G), ST-292 (HD), and ST-259 (SD) signals. So if your source needs custom resolution support, use HDMI or DVI instead.
(2) OPT1 is self-adaptive. When you connect it to a fiber converter, it works as an output. When connected to a video processor like a Pixelhue device, it automatically switches to input mode. You don’t need to configure this manually — the port detects the connected device on its own.
(3) In Video Controller mode, the HDMI monitor output runs at a fixed 1920×1080@60Hz. NovaStar specifically warns against changing this via Advanced Settings > HDMI Output — doing so will affect what’s displayed on the LED screen.
3. NovaStar VX600 Price
The NovaStar VX600 price varies depending on where you buy it and what region you’re in.
LedInCloud works directly with NovaStar and can source the VX600 at competitive pricing. Register LedInCloud and our team will get back to you with a quote based on your actual project requirements — screen size, quantity, and destination all affect the final number.
4. Key Features
The VX600 packs a lot into one device:
(1) Three Working Modes
This is probably the most important thing to understand about the VX600. Depending on how your system is wired, you switch between three modes:
✔ Video Controller Mode
Video Controller mode is the default. The VX600 handles both video processing and LED display control. OPT1 is self-adaptive in this mode — it works as an output when connected to a fiber converter, and switches to input when connected to a video processor like a Pixelhue device. All front panel menus are available in this mode.
✔ Fiber Converter Mode
Fiber Converter mode is for long-distance signal transmission. Here, both OPT1 and OPT2 act as inputs, and the 6 Ethernet ports handle output. If OPT1 loses signal, the system automatically switches to OPT2 — and switches back when OPT1 recovers. One limitation though: in this mode, only the Working Mode, Communication Settings, and Language menus are accessible on the front panel.

✔ ByPass Mode
ByPass mode turns the VX600 into a standalone LED controller. Video processing is disabled completely in this mode. Only the main layer works — PIP layers are not available. But the upside is latency. With ByPass and Low Latency both enabled, the delay from input to receiving card drops to as low as 20 lines. And if you also turn on synchronization with data running vertically on the screen, it can go down to 1 frame. That makes ByPass the right choice for live events where audio-video sync matters.

(2) Layer Management
The VX600 supports three layers: one main layer and two PIP layers. Each layer can have its own input source, size, position, priority, and opacity setting. You can crop the input source per layer, scale it, or run it pixel-to-pixel.
That said, there are a few limitations worth knowing upfront. When a PIP layer is open, the main layer transition fade effect becomes unavailable. And if the main layer is using a Mosaic source, PIP layers cannot be opened at the same time. These aren’t deal-breakers, but they matter during live event setup.
(3) Mosaic Input Source
The VX600 supports a Mosaic source composed of two input signals accessed through OPT1 — either one 4K×1K@60Hz signal or two 2K×1K@60Hz signals. This lets you combine two sources into one wider composite input for the main layer.
But keep in mind: only the main layer can use the Mosaic source. When Mosaic is active, the full-screen scaling and pixel-to-pixel display options for that layer become unavailable.

(4) Image Mosaic — Cascading Multiple Units
When your LED screen exceeds 3.9 million pixels, a single VX600 won’t cover it. In that case, you can cascade up to 4 VX600 units together using the Image Mosaic function. Each unit loads a section of the screen, and synchronization keeps all units in sync.
Before using this, make sure synchronization is turned on across all units and that they all share the same sync source. Once Image Mosaic is enabled, full-screen scaling and pixel-to-pixel display become unavailable on the layer.

(5) Pixel-Level Calibration
The VX600 supports brightness and chroma calibration at the individual pixel level. Working together with NovaLCT and NovaStar calibration software, it can correct color inconsistencies across the entire screen. This is especially useful for fine-pitch LED displays where uniformity is critical.
(6) Hot Backup
The VX600 supports three types of redundancy:
✔ Device backup — one VX600 acts as primary, another as backup. If the primary fails, the backup takes over seamlessly.
✔ Ethernet port backup — a backup port takes over if the primary port or its cable fails.
✔ Input source backup — HDMI1 and HDMI2 form a hot backup pair. If one loses signal, the other takes over automatically.

(7) Output Synchronization
When cascading multiple VX600 units, synchronization keeps all outputs in sync. You can use an internal input source or an external Genlock signal as the sync source. One rule: all units must use the same sync source.
Note that in ByPass mode, Low Latency and Genlock cannot be enabled at the same time.
(8) Automatic Screen Brightness Adjustment
The VX600 has a Light Sensor connector on the rear panel. Connect a compatible light sensor, and the device can automatically adjust screen brightness based on ambient light levels. This requires NovaLCT V5.4.4.6 or later.
5. NovaStar VX600 Setup Guide
Whether you’re setting up for the first time or reconfiguring for a new project, this is the process.
Step 1: Prepare Your Cables
Before powering anything on, get these cables ready:
✔ Power cord (included)
✔ CAT5e or CAT6 Ethernet cables — one per LED cabinet chain
✔ HDMI or DVI cable — from your video source to the VX600
✔ USB Type-B cable — from VX600 to your control PC
✔ HDMI cable — for monitor output (optional, but useful during setup)
If you’re using long-distance fiber transmission, you’ll also need compatible SFP optical modules and fiber cables (OS1/OS2 for single-mode, OM3/OM4 for multi-mode).

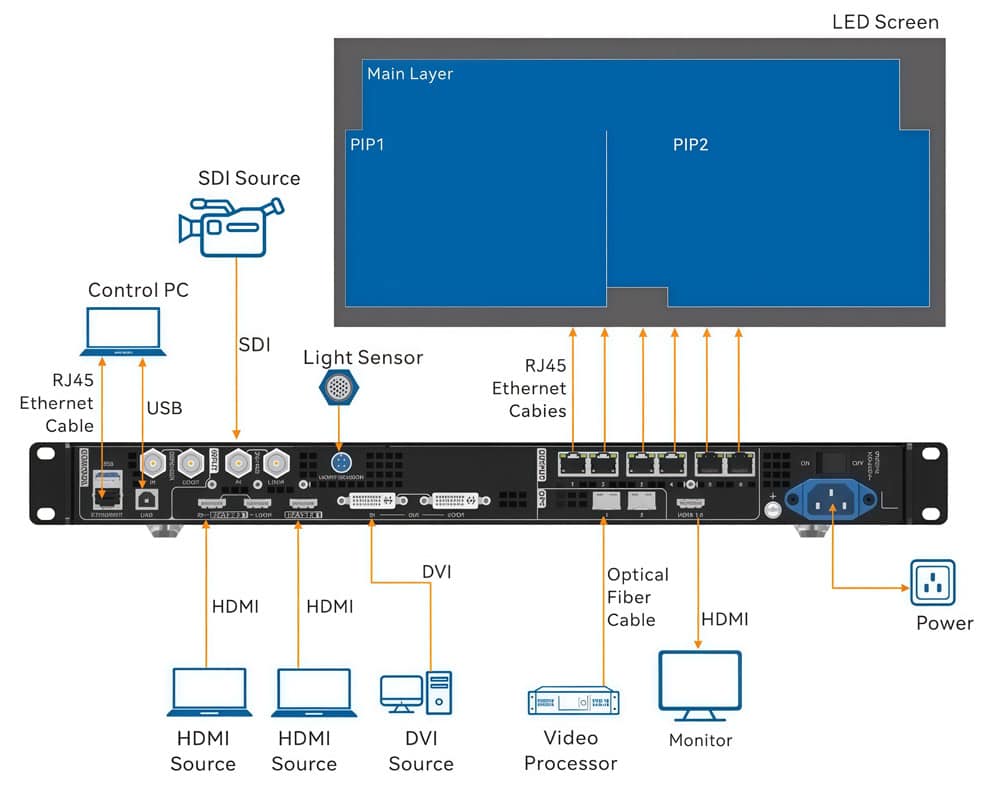
Step 2: Connect the Hardware
Start from the rear panel:
● Connect your video source (laptop, media server, camera) to the HDMI or DVI input.
● Run Ethernet cables from the VX600’s 6 output ports to your LED cabinet receiving cards.
● Connect the USB Type-B cable to your control PC.
● If you’re monitoring output, connect an HDMI cable from the VX600’s HDMI output to a monitor.
● Plug in the power cord and power on the device.
One thing to double-check: Ethernet Port 1 should be at the beginning of your physical cabinet chain. The quick configuration function depends on this.
Step 3: Select Your Working Mode
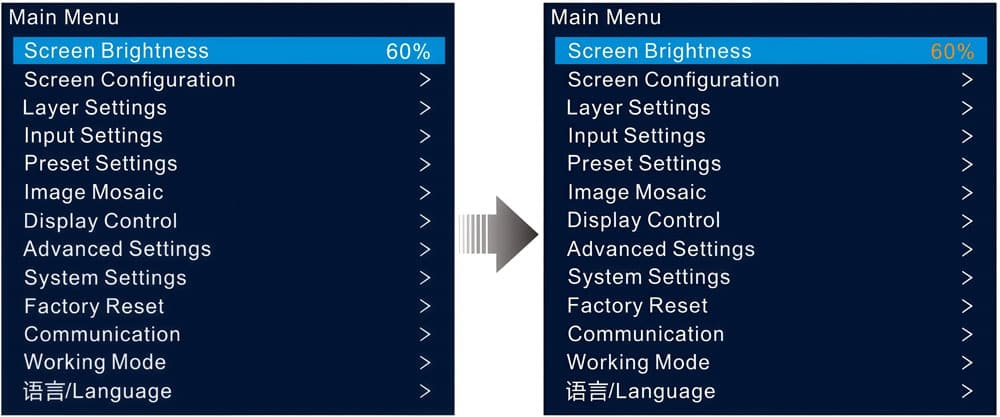
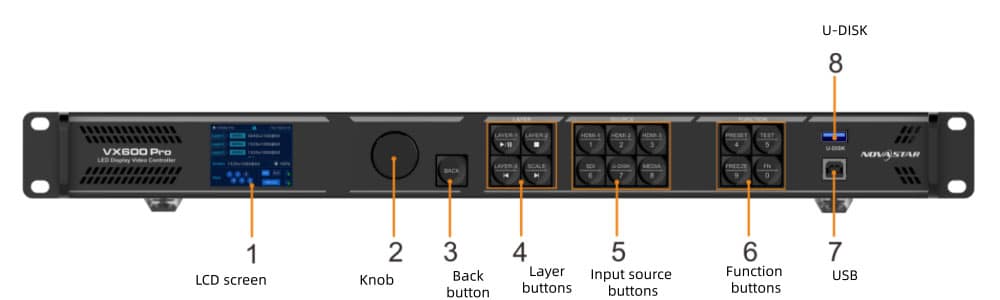
On the front panel, press the knob to enter the main menu. Go to Working Mode and select the mode that matches your setup:
● Video Controller — standard mode for most installations
● Fiber Converter — for long-distance transmission via fiber
● ByPass — for low-latency setups where video processing is not needed
If you’re unsure, start with Video Controller. It’s the default and gives you access to all menu functions.

Step 4: Configure the Screen in NovaLCT
This is where the NovaStar VX600 setup really happens. Download and install NovaLCT from LedInCloud – LED Screen Cloud Platform, then connect to the VX600 via Ethernet.
If your cabinets are all the same model and in a regular layout, use Quick Configuration:
● On the VX600 front panel, go to Screen Configuration > Quick Configuration.
● Set Cabinet Row Qty and Cabinet Column Qty to match your physical screen layout.
● Set Port 1 Cabinet Qty — this is the number of cabinets loaded by Ethernet port 1. Note that each port’s cabinet count must be equal to or less than the previous port’s count.
● Select Data Flow (Front View) — choose the direction that matches how your cabinets are physically cabled, typically Left to Right, Top to Bottom.
● Watch the LED screen in real time. If the full screen displays correctly with no overlapping or repetition, press the knob to save.
If your cabinets have irregular layouts, use Advanced Configuration instead. Go to Screen Configuration > More Settings > Advanced Configuration, enable it, and configure each Ethernet port individually — including row/column counts, horizontal and vertical offsets, and data flow direction.

Step 5: Send the Cabinet Configuration File (If Needed)
If a cabinet or section of the screen won’t light up after configuration, you may need to push a configuration file to the receiving cards.
In NovaLCT, go to User > Advanced Synchronous System User Login, then Tools > Controller Cabinet Configuration File Import. Add your .rcfgx file and click Save the Change to HW. Then on the VX600 front panel, go to Screen Configuration > Send RCFGx Files and select the file.
Once done, go to Screen Configuration > Save to RV Card to make sure the configuration survives a power cycle.

Step 6: Set Up Your Layers
By default, the main layer is open and both PIP layers are closed. To add a layer:
● Press the MAIN, PIP 1, or PIP 2 button in the CONTROL area on the front panel.
● Press the corresponding input source button in the INPUTS area to assign a source.
● Adjust size, position, priority, and opacity as needed — either from the front panel or through NovaLCT.
If you want to use the Mosaic source, assign two signals through OPT1 first. But remember — when the main layer is using a Mosaic source, PIP layers cannot be opened.

Step 7: Save a Preset
Once everything looks good, save the configuration as a preset. The VX600 supports up to 10 user-defined presets. On the front panel, go to Preset Settings, select a slot, press the knob, and choose Save.
Next time you load this preset, the system restores all layer settings — input source, size, position, priority, crop, opacity, and input color.

Step 8: Adjust Screen Brightness
Go to Screen Brightness from the main menu and rotate the knob to adjust. You’ll see the change on the LED screen in real time. Press the knob to confirm.
If you have a light sensor connected to the rear panel LIGHT SENSOR port, you can set up automatic brightness adjustment in NovaLCT (V5.4.4.6 or later) under Settings > Brightness > Auto Adjustment.
6. NovaStar VX600 Firmware Update
There are two ways to update the NovaStar VX600 firmware — through V-Can or through NovaLCT (V5.4.2 or later). Both work fine, so use whichever software you already have installed.
Step 1: Download the Firmware Package
● Go to LedInCloud NovaStar Software page
● Navigate to: > VX600 > Firmware
● Click to download and save the package to your PC. Don’t extract it yet — V-Can handles that in the next step.

Step 2: Connect the VX600 to Your PC
Use an Ethernet cable to connect the VX600 to your control PC. Make sure V-Can or NovaLCT is already installed before you start.
The VX600 does not support firmware updates via USB drive — Ethernet is required.
Option A: Update via V-Can
● Decompress the downloaded firmware package.
● Open V-Can.
● Go to System > Firmware Update.
● In the Update Program area, click Browse and select the firmware file.
● If you’re updating multiple devices at once, check the boxes next to each device in the Device List.
● Click OK to add the package, then click Update to start.
● Once it’s done, check the Device List to confirm the version number matches the latest firmware.
● Click Exit to close the update window.

Option B: Update via NovaLCT
● Open NovaLCT.
● Go to User > Advanced Synchronous System User Login. The default password is admin.
● After logging in, enter admin again to open the program loading window.
● Click Browse and select the firmware package.
● Click Update to start the process.
● The VX600 will restart automatically after the update completes.
● Click Refresh under the Hardware Program Version Information area to verify the device is now running the latest version.
● Close the window when done.

Step 3: After the Update
Once the firmware update is complete, it’s worth doing a quick check:
Confirm the firmware version in V-Can or NovaLCT matches what you downloaded.
If the version doesn’t match, contact LedInCloud for technical support . Run a quick screen test to make sure the output is normal.
If you recently updated and something looks off with your screen configuration, a partial factory reset can help.
7. VX600 vs VX600 Pro
Both devices share the same pixel capacity and 6-port Ethernet output. But beyond that, the VX600 Pro is a meaningfully different product.
| Specification | VX600 | VX600 Pro |
| HDMI Input | HDMI 1.3 ×2 | HDMI 2.0 ×1 + HDMI 1.3 ×2 |
| Max Video Input Resolution | 1920×1200@60Hz | 4096×2160@60Hz (4K×2K) |
| DVI Input | Yes (1×, with loop) | No |
| USB Playback | Not supported | Supported (USB 3.0, up to 4K) |
| Number of Layers | 3 (Main + 2× PIP) | 6 (6×2K×1K layer resources) |
| Max Layer Resolution | Up to 4K×1K | Up to 4K×2K |
| Max Presets | 10 | 256 |
| OSD Function | Not supported | Supported (Text & Image OSD) |
| 3D Function | Not supported | Supported (dedicated 3D connector) |
| Dual Receiving Card Backup | Not supported | Supported |
| Device Restore Points | Not supported | Up to 5 |
| Remote Control | Not supported | Optional |
| Control Software | NovaLCT / V-Can | NovaLCT / Unico / VICP App |
| Rated Power | 35W | 43W |
| Operating Temp | –10°C to 45°C | 0°C to 50°C |
Which one should you choose?
The VX600 covers most rental and fixed installation scenarios. If your signals are 1080p or below, you run 3 layers or fewer, and you don’t need USB playback or OSD — it does the job.
The NovaStar VX600 Pro makes more sense if you’re running true 4K sources, managing complex multi-layer layouts, or working on touring productions where preset flexibility and redundancy matter.
8. NovaStar VX600 Software & User Manual Download
All downloads are free:
Can't find the right file?
Contact LedInCloud can point you to the right resources for your project.
9. FAQ
Is the NovaStar VX600 a video processor or an LED controller?
It's both. The VX600 integrates a video processor and a sending card into one device. You don't need separate hardware for each function.
What is the maximum loading capacity of the VX600?
One VX600 unit drives up to 3.9 million pixels, with a maximum output width of 10,240 pixels and height of 8,192 pixels.
Can I use multiple VX600 units for one screen?
Yes. Up to 4 units can be cascaded using the Image Mosaic function. All units must share the same sync source.
Does the VX600 support 4K input?
Not full 4K×2K. The standard VX600 supports a maximum input resolution of 1920×1200@60Hz on HDMI and DVI. If you need true 4K×2K@60Hz input, you need the VX600 Pro.
What's the difference between ByPass mode and Video Controller mode?
In Video Controller mode, the VX600 processes the signal — scaling, color correction, and layer management are all active. In ByPass mode, video processing is disabled and the output is pixel-to-pixel. Latency drops to as low as 20 lines, which makes ByPass the better choice for live events where audio-video sync matters.
10. Conclusion
The NovaStar VX600 is a well-established all-in-one controller that covers most rental and fixed installation scenarios. For standard signals, 3-layer setups, and budget-conscious projects.
If your project needs true 4K input, more layers, or advanced backup options, the VX600 Pro is worth the upgrade.