
HD2018 LED Software: Free Download, Password & Tutorial (2026)
Huidu HD2018 is a powerful and versatile LED display software designed to configure, edit, and manage your LED screens easily. Whether you’re displaying simple text, images, or more complex content like animated characters, Excel sheets, or live weather data, this software makes it possible to handle all your LED display needs with efficiency.
In this article, we will explore how to use HD2018 LED Software effectively. From basic display settings to advanced features, this guide provides all the necessary steps to help you maximize the potential of your LED screens using HD2018.
1. Huidu HD 2018 Introduction
HD 2018 Huidu is a specialized software developed by Huidu Technology for configuring and debugging single- and dual-color LED control cards. As an essential tool for setting up LED displays, HD2018 supports a wide range of content types, including images, text, 3D text, animations, videos, and more. It allows users to display various elements such as time, countdowns, lunar calendar, temperature and humidity, and weather updates.
The software offers flexible control options, including serial ports (RS232/485), network connections, Wi-Fi, and USB drives, making it adaptable to various applications and environments. HD2018 also integrates several redundant control functions to streamline the user experience, with updated control ranges that cater to the growing demand for tall, long, and diversified bar-style displays.
1.1 Main Interface
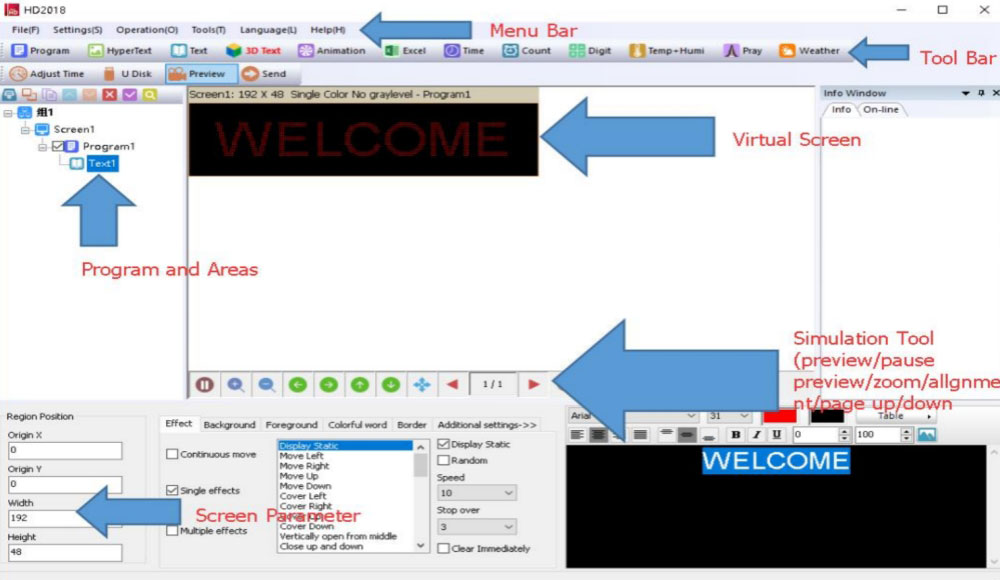
Upon opening the HD2018 software, the main interface provides an intuitive layout.
1.2 Features
HD2018 covers the full range of what a single or dual-color LED sign owner needs.
✔ Supported content types:
Text, static or scrolling · HyperText (JPG, BMP, PNG, GIF, SWF, animated characters) · Excel spreadsheets · Video · Digital clock and dial clock · Countdown and count-up timers · Digit display · Temperature and humidity (with sensor) · Weather forecast · Prayer times
✔ Program scheduling:
Each screen supports up to 1,000 programs. You can schedule each one by date range, time range, day of the week, or fixed interval. Border effects can be added per program.
✔ Display layout:
Up to 20 display areas per program. Areas can overlap — so you can layer a clock over a background image, for example. Text can be rotated 90°, 180°, or 270°, which matters for vertical or upside-down sign installations.
✔ Brightness control:
Three modes: manual (set a fixed value), automatic adjustment, and time-based scheduling. You can also set a timer switch to turn the display on and off at set times each day.
✔ Connection options:
Wi-Fi · LAN (Ethernet) · RS232 · RS485 · U-disk. Supports direct connections, same-network LAN, cross-network connections, and DHCP for multi-controller switch setups.
✔ Group and multi-screen management:
From Operation → Multiple Sending, choose Multi-screen mode (each screen file maps to one specific controller) or Copy mode (pushes the same content to all connected devices at once).
✔ Language support:
The interface supports 21 languages, including Arabic, Spanish, Portuguese, Russian, and Vietnamese. Arabic and Persian users can enable right-to-left text in System Settings.
✔ Boot animation:
Set a startup image (BMP, JPG, or PNG) that plays when the display powers on. Configure it under Operation → Boot Animation.
2. HD2018 LED Software Free Download
To get started with the HD2018 LED control software, simply visit our Huidu Software Download page, where you can access all available Huidu resources, including the HD2018 software. Whether you need the latest version of the software, user manuals, or additional tools, LED Screen Cloud Platform offers everything you need to efficiently set up and manage your LED displays.
System requirements for HD2018 LED software:
● Windows 2000 / XP / Vista / Win7 / Win8 / Win10 / Win11
● 32-bit and 64-bit both supported
● Windows 7 or Vista users: Do not install to your C:\ drive. Choose a non-system drive like D:\ to avoid permission conflicts.
3. Compatible Controllers
Not every Huidu card works with HD2018. Below is the full compatibility list from the official operation manual. Find your card model and confirm it’s here before downloading.
3.1 E Series — Ethernet + U-disk
Model | Single Color | Dual Color | RGB | Memory |
HD-E62 | 1024×64 | 512×64 | 672×32 | 8M |
HD-E62+ | 4096×64 | 2048×64 | 2720×32 | 32M |
HD-E63 | 1024×128 | 512×128 | 672×64 | 8M |
HD-E64 | 1024×256 | 512×256 | 672×128 | 8M |
HD-E66 | 2048×512 | 1024×512 | 1344×256 | 8M |
3.2 W Series — Wi-Fi + U-disk
Model | Single Color | Dual Color | RGB | Memory |
HD-W60 | 512×32 | 256×32 | 320×16 | 2M |
HD-W60-75 | — | — | 640×64 | 8M |
HD-W61 | 1024×32 | 512×32 | 640×16 | 8M |
HD-W6B | 1024×48 | 512×48 | 672×24 | 8M |
HD-W62 | 1024×64 | 512×64 | 672×32 | 8M |
HD-W62-75 | — | — | 640×160 | 8M |
HD-W63 | 1024×128 | 512×128 | 672×64 | 8M |
HD-W64 | 1024×256 | 512×256 | 672×128 | 8M |
3.3 U Series — U-disk
Model | Single Color | Dual Color | RGB | Memory |
HD-U6A | 320×32 | — | — | 1M |
HD-U60 | 512×32 | 256×32 | 320×16 | 2M |
HD-U60+ | 4096×32 | 2048×32 | 2720×16 | 32M |
HD-U60-75 | — | — | 640×64 | 8M |
HD-U61 | 1024×32 | 512×32 | 640×16 | 8M |
HD-U62 | 768×64 | 384×64 | 512×32 | 8M |
HD-U62+ | 4096×64 | 2048×64 | 2720×32 | 32M |
HD-U63 | 512×128 | 256×128 | 320×64 | 8M |
HD-U64 | 512×256 | 256×256 | 320×128 | 8M |
HD-U6BN | 1024×48 | 512×48 | 640×16 | 8M |
HD-G62 | 1024×64 | 512×64 | 672×32 | 8M |
3.4 S Series — Serial port + U-disk
Model | Single Color | Dual Color | RGB | Memory |
HD-S62 | 1024×64 | 512×64 | 672×32 | 8M |
HD-S63 | 1024×128 | 512×128 | 672×64 | 8M |
3.5 How to find your card model?
The label is on the back or side of the controller. The model number starts with “HD-“. If your card isn’t in this list, it’s likely a full-color model — download HDPlayer from the HuiDu Resource Download page instead.
4. HD2018 Password Reference
Here are all the passwords in one place — no hunting through menus.
Purpose | Password |
Create a new screen file | 168 |
Update controller firmware | 168 |
Default Wi-Fi connection | 88888888 |
Three passwords. That’s the full list.
Most confusion comes from mixing up the two: 168 is for software-side setup, and 88888888 is for the Wi-Fi hardware connection.
4.1 How the Wi-Fi password works?
When you open Settings → Communication Settings → Wi-Fi tab, HD2018 automatically fills in 88888888 as the default password. You don’t type it manually — just click Link and the software connects.
If the controller’s SSID appears in the format {W64_26882}, only verify the Wi-Fi password field in HD2018. No other changes are needed.
4.2 How the screen setup password works?
Go to File → New Screen. A password prompt appears. Enter 168. The same password applies when you go to Operation → Update Firmware.
4.3 What if the Wi-Fi password was changed and you don't know it?
Do a hardware factory reset. Here’s how:
- Power off the controller.
- Press and hold the TEST button.
- Power the controller back on while still holding the button.
- Keep holding for 6 seconds, then release.
The controller returns to factory defaults. The Wi-Fi password goes back to 88888888.
5. HD2018 Installation & Setup Tutorial
Now let’s walk through the actual installation and setup.
5.1 Installation
To begin using Huidu HD2018, first download the software from LedInCloud. During installation, please note that if your operating system is Windows 7 or Vista, it’s recommended to choose a non-system disk as the installation path to avoid potential issues.
Once the installation is complete, you can easily access the HD2018 software. Navigate to Start → Programs, where you’ll find the HD2018 program group. Simply click on it to launch the software. Alternatively, you can also access the program directly by clicking the HD2018.exe shortcut icon on your desktop.
5.2 Setting up Screen and Program File
5.2.1 Setting Up a New Screen File
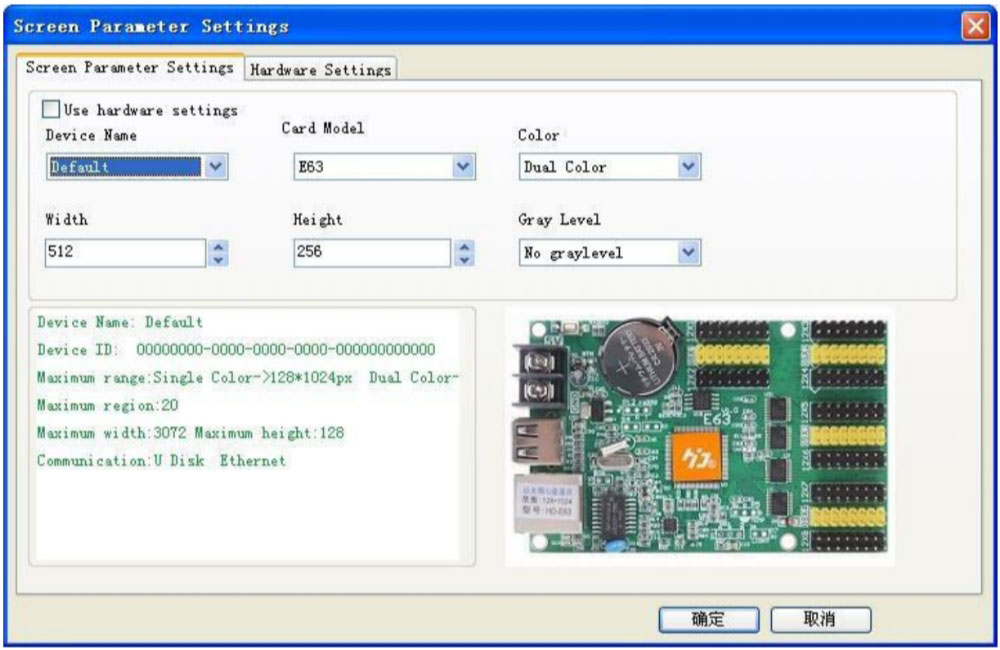
To create a new screen file, click File → New Screen and enter the password (168) to proceed with the setup. Follow these steps based on the status of your control card:
- If the control card is properly configured (Display working normally):
Select Using the Hardware Setting, choose the device (e.g., HD-E63), and click Yes to complete the screen setup. - If the control card is not configured correctly (Display working abnormally):
Do not select Using the Hardware Setting. Instead, manually select the device type and color, then adjust settings such as width, gray level, etc.
Next, proceed to the Hardware Settings to fine-tune the screen’s configuration. If the Commonly Smart setting is missing the LED module scan, make sure to connect via Ethernet, serial port, or Wi-Fi to complete the smart setup.
5.2.2 Setting Up a New Program (Up to 1000 Programs Per Screen)
Click the Program button (first click File → New Screen):

Or set up new Program as bellow picture set:
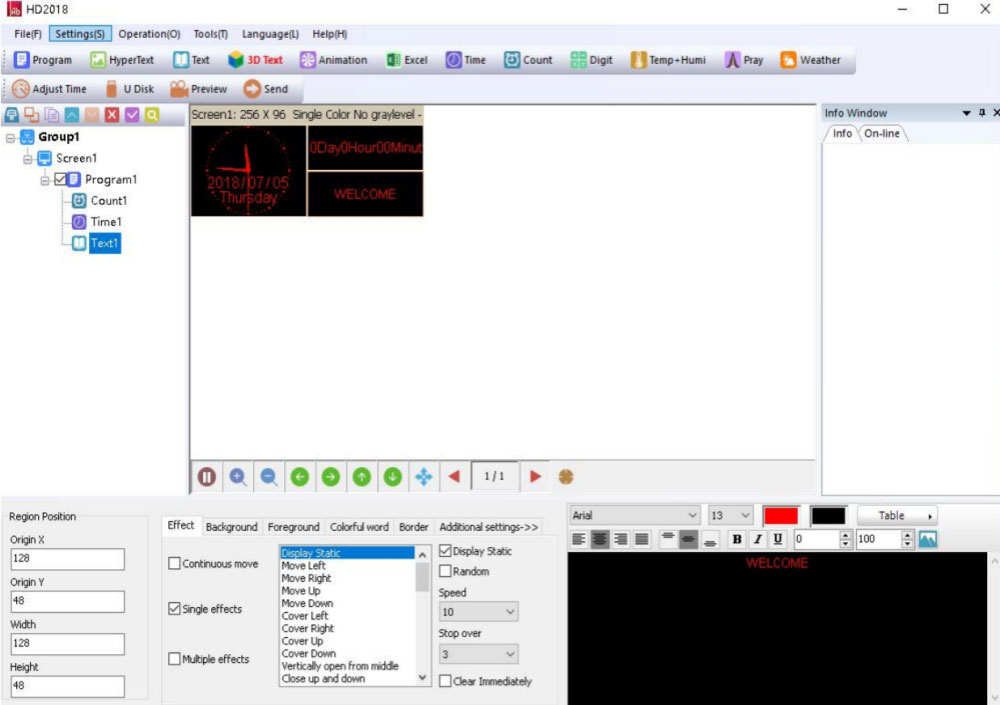
Note: Up to 1000 programs can be set, with each program supporting attributes such as:
- Specified dates and times
- Fixed time intervals
- Borders and more
5.2.3 Setting Up Areas (Each Program Supports 20 Areas)
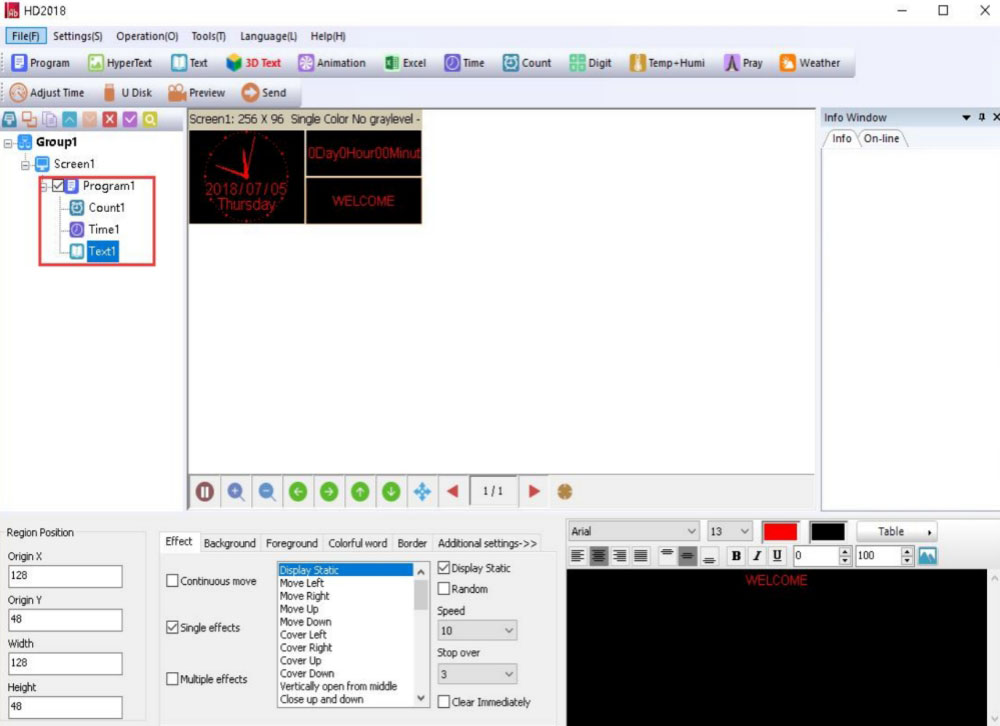
After selecting a program, you can set up various areas by clicking on Hypertext, Text, and other options. These areas can be customized to display different content types, as shown in the image below.
5.2.4 Program Editing Complete
- After completing sections 3.3.1, 3.3.2, and 3.3.3, the screen file is successfully set up. To add more programs, simply repeat steps 3.3.2 and 3.3.3.
- If you’re using one software to control multiple screens, you will need to create separate screen files for each and repeat steps 3.3.1, 3.3.2, 3.3.3, and 3.3.4 for each screen.
Once the program setup is finished, you can save the configuration. By default, the saved file is located at: C:\Users\Administrator\AppData\Roaming\HD2016\ProjFile
Alternatively, you can save the file to a different location through the File menu.
To preview your program, use the software interface to check the synchronization and display settings. If you’re satisfied, click Send to display the content on your screen.
5.3 Display Different Content
5.3.1 Displaying Text
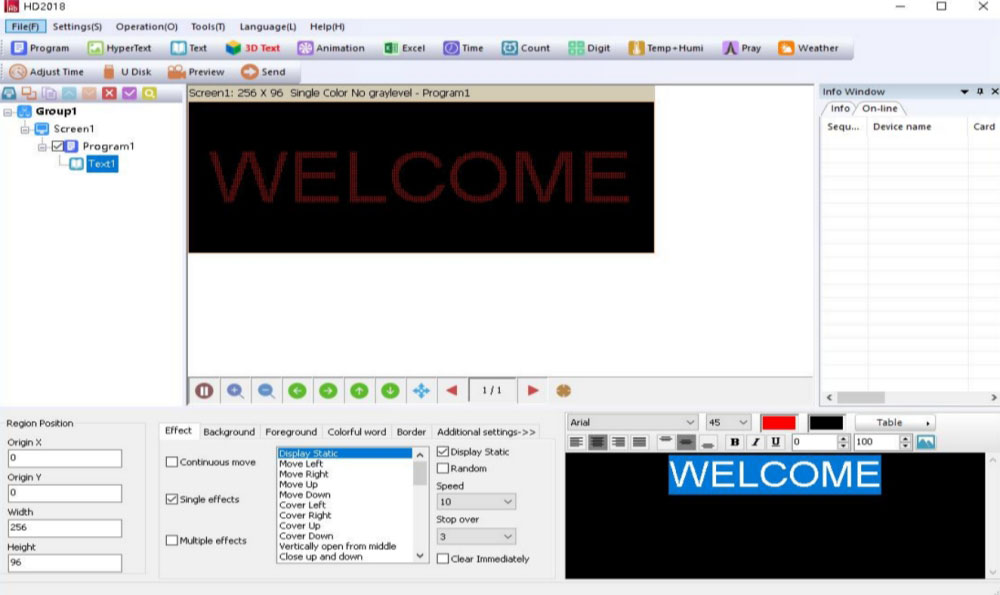
To display text on your LED screen, simply add a Text Area in the program setup. HD2018 offers flexibility with text display, allowing for left and right scrolling, and rotation options (90°, 180°, and 270°). You can also import text from Excel files, add backgrounds, and apply special effects.
Procedure:
- Follow the setup steps outlined in sections 3.3.1 and 3.3.2 to configure the screen and program.
- Click Text, and freely adjust the coordinate, length, and width of the text area.
HD2018’s editing tools are highly versatile, allowing users to modify even a single character. You can adjust text alignment (left, right, or center), control word spacing, and line spacing to achieve the desired appearance.
5.3.2 Adding HyperText (Images, GIFs, etc.)
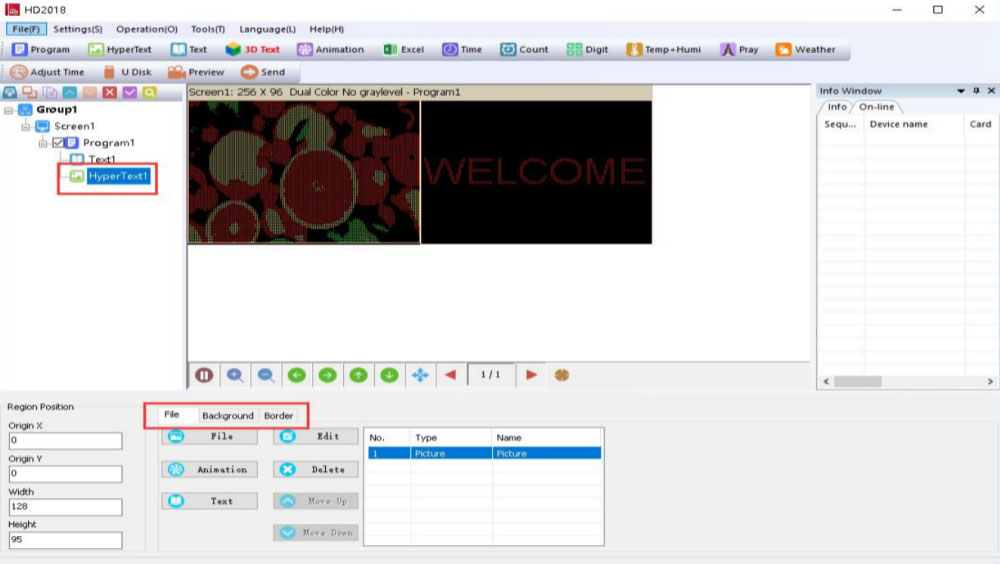
To display logos, pictures, or GIFs on your LED screen, HD2018 supports formats such as JPG, BMP, PNG, and GIF.
Procedure:
- As with the text setup, follow the steps from sections 3.3.1 and 3.3.2 to configure the screen and program.
- Click the HyperText subtitle, where you can set the coordinate, length, and width of the image area.
You can also edit multiple images at once and incorporate various media types, including SWF files, animated characters, and GIFs, to create rich, dynamic displays.
5.3.3 Animated Characters
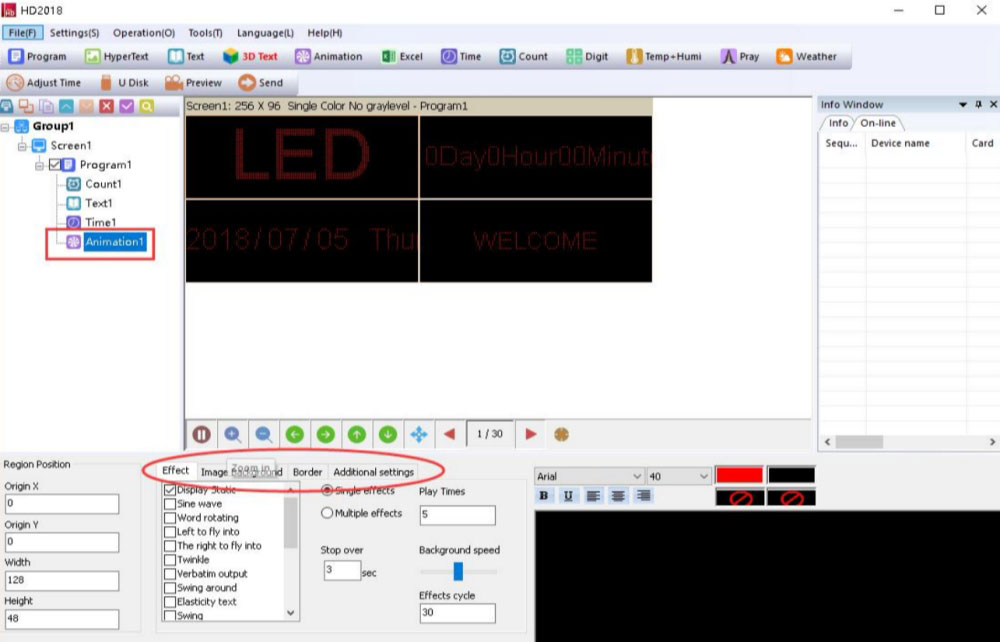
HD2018 allows you to display animated characters, which can include special effects, background images, and overlapping areas for a more complex visual presentation.
Procedure:
- Refer to sections 3.3.1 and 3.3.2 for screen and program setup.
- Click the Animated Characters subtitle to begin adding these effects.
- Customize the character appearance with image backgrounds and overlapping area effects, and apply additional settings like Hollow and Stroke for further design flexibility.
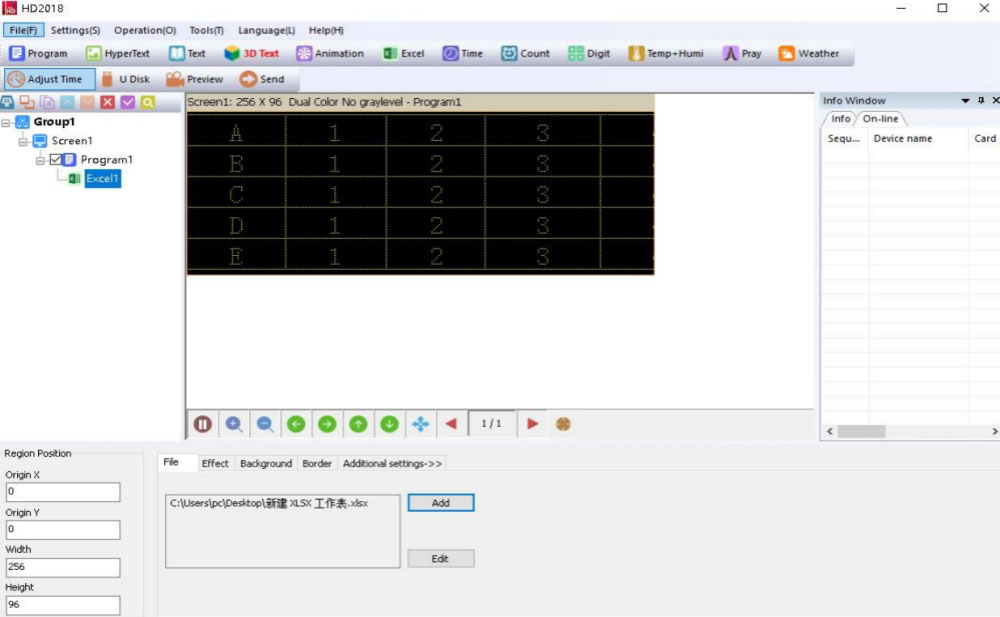
5.3.4 Excel Display
You can also display Excel spreadsheets directly on your LED screen. To do this, ensure you have the full version of Microsoft Excel installed.
Procedure:
- Set up the screen and program as described in sections 3.3.1 and 3.3.2.
- Click the Excel subtitle to select the spreadsheet. Adjust the coordinate, length, and width of the Excel area as needed.
HD2018 supports both horizontal and vertical screen orientations for Excel sheets, providing flexibility for different display layouts.
5.3.5 Time Display (Calendar and Dial Plate)
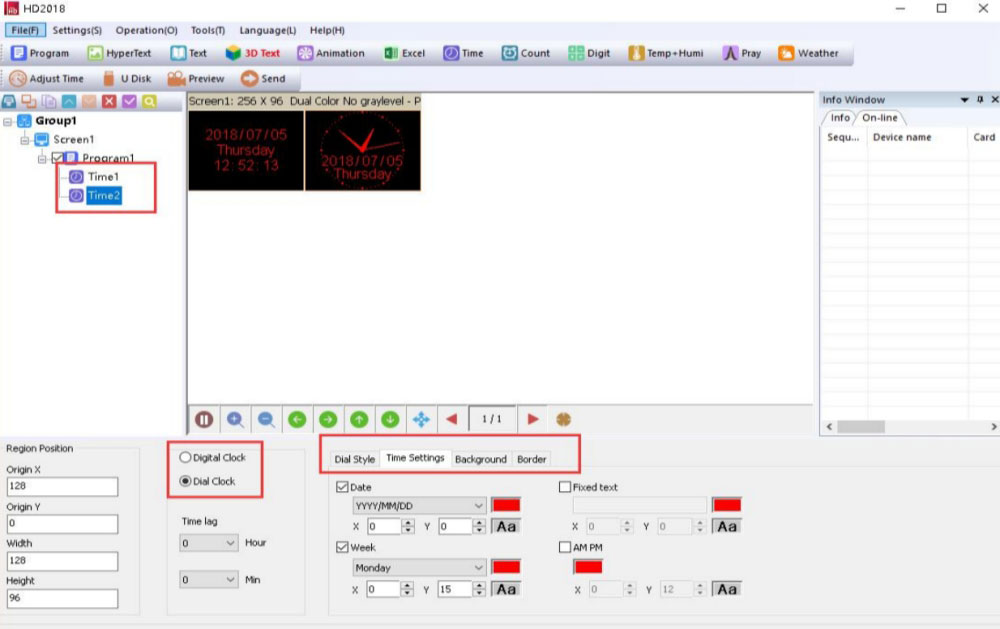
Displaying the current time is easy with HD2018, which supports both calendar time and dial plate formats.
Procedure:
- Follow the setup steps in 3.3.1 and 3.3.2 to configure the screen and program.
- Click the Time subtitle to set the time area and adjust its coordinate, length, and width.
This feature is simple to set up, as shown in the accompanying image.
5.3.6 Count Up and Count Down
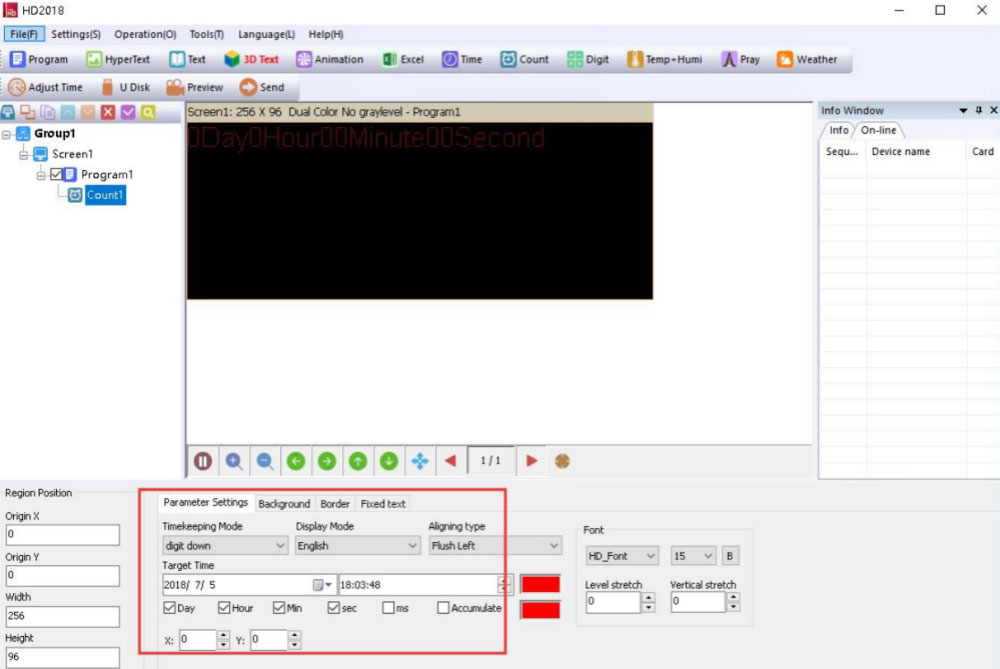
For applications that require counting, such as parking displays or event timers, HD2018 allows for both count up and count down functionality.
Procedure:
- Follow steps in 3.3.1 and 3.3.2 to set up the screen and program.
- Click the Timing subtitle to add a Count area. You can freely adjust the coordinate, length, and width.
HD2018 also supports circular counting, where the countdown resets and starts over automatically once completed.
5.3.7 Digit Display
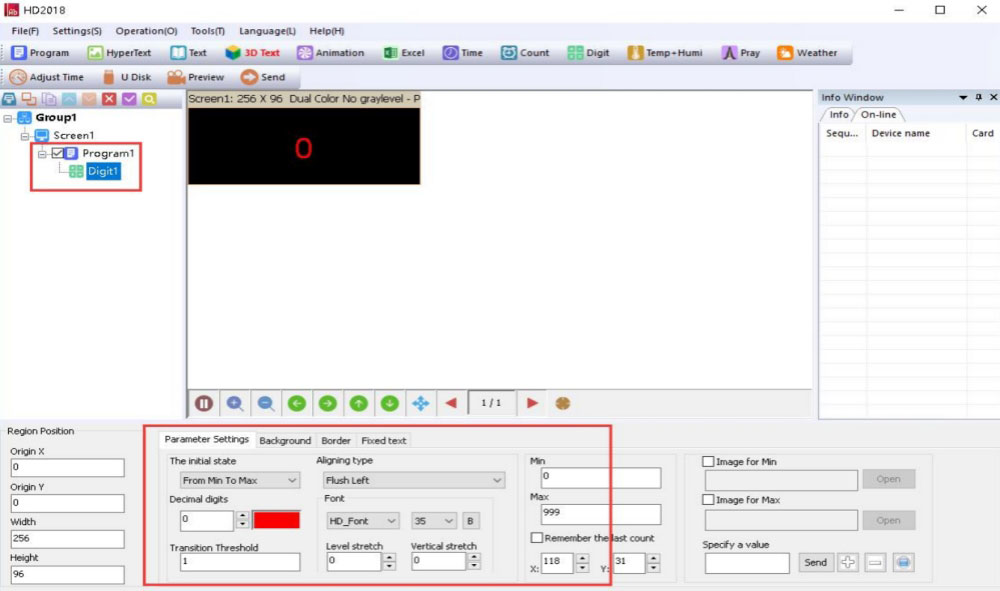
If you need to display numeric values, such as for parking spaces or counters, HD2018 can show digit numbers.
Procedure:
- Set up the screen and program as 3.3.1 and 3.3.2.
- Click Digit to add a Digit Area, where you can adjust the coordinate, length, and width.
The digit display supports both ascending and descending orders, with a maximum value of 9,999,999 and the option for up to 3 decimal places.
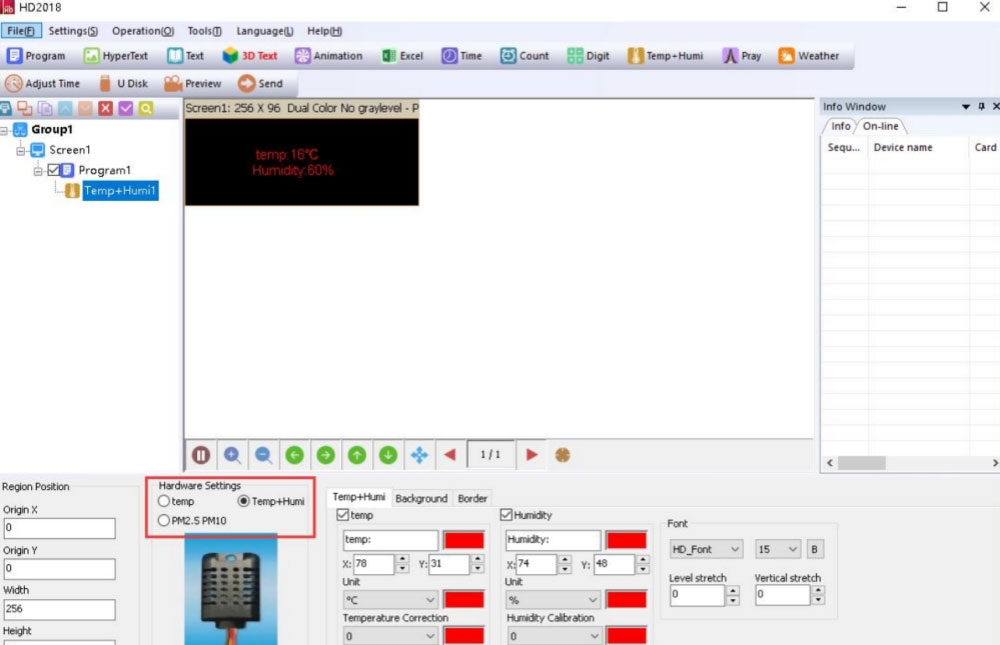
5.3.8 Temperature and Humidity (Requires Sensor)
For environmental displays, HD2018 can show temperature and humidity data, provided a compatible sensor is connected.
Procedure:
- Follow the screen and program setup steps in 3.3.1 and 3.3.2.
- Click Temp + Humi to set the temperature and humidity area.
- Connect the appropriate sensor (detailed settings are available in the appendix) for proper data display.
5.3.9 Prayer Times
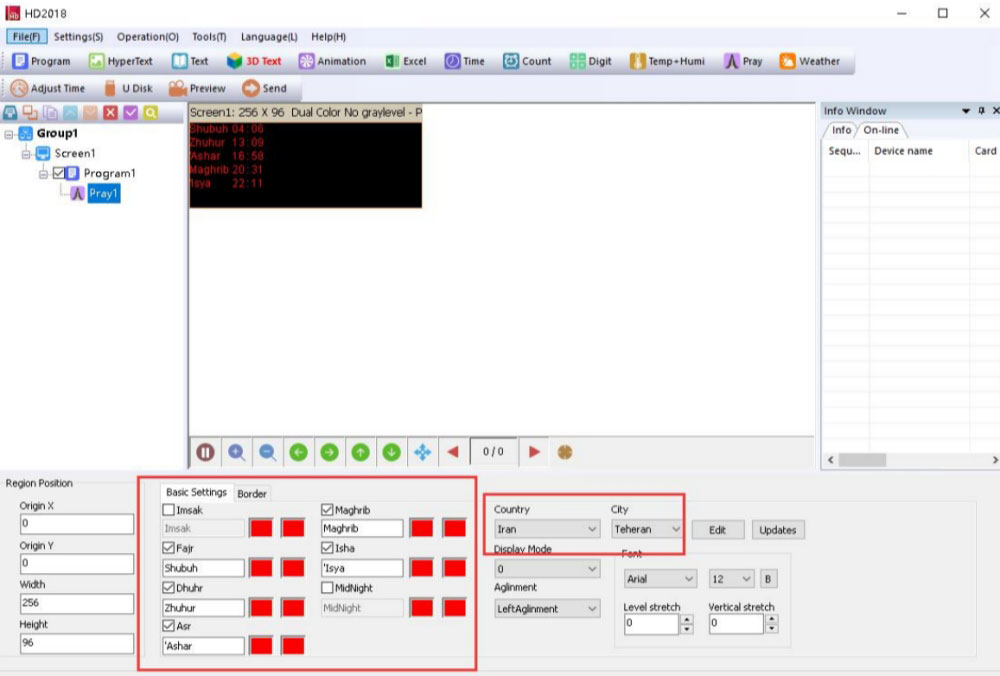
HD2018 includes support for displaying prayer times, which is especially useful for public spaces like parking areas.
Procedure:
- Set up the screen and program following sections 3.3.1 and 3.3.2.
- Click Pray to create a prayer time area on the display.
Currently, HD2018 supports prayer times for four countries, with two display modes available.
5.3.10 Weather Forecast
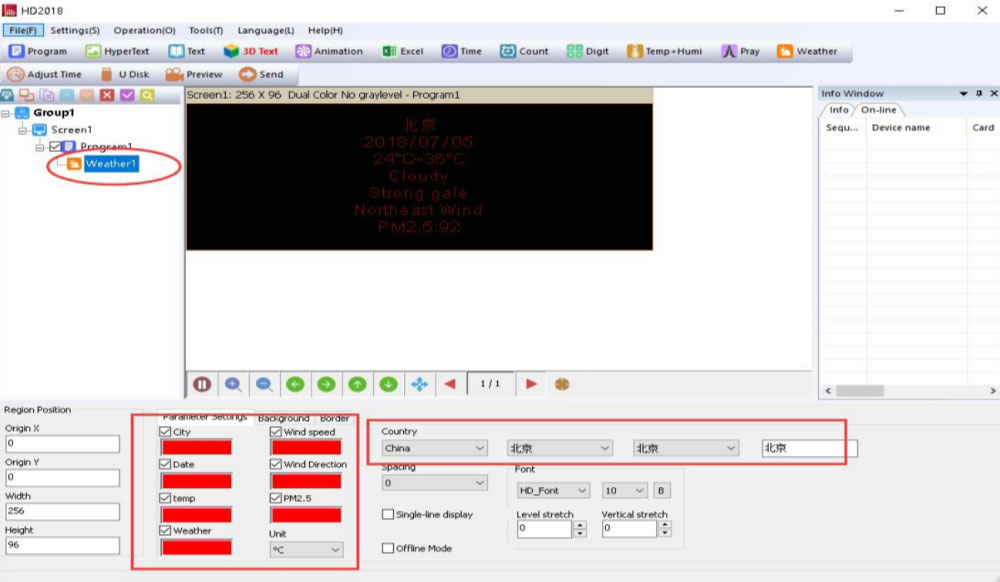
Weather information can also be displayed, making HD2018 ideal for applications in public spaces.
Procedure:
- Follow steps in 3.3.1 and 3.3.2 to configure the screen and program.
- Click Weather to add a weather display area.
The software will retrieve weather data every hour directly from the server. Please note that online mode requires a network port, while offline mode is supported by all controllers.
5.4 How to Updated Firmware of Controllers
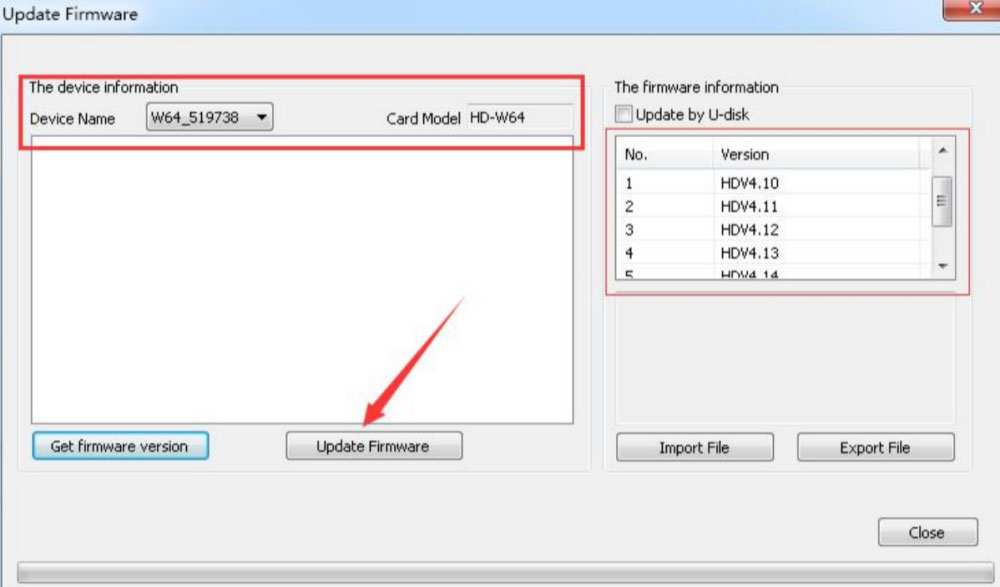
a. Download the Firmware: Obtain the appropriate .bin file for the specific controller you are updating.
b. Update Firmware:
Click on Operation > Update Firmware and enter the password (168).
Select the downloaded .bin firmware file.
c. Select Update Method: Firmware can be updated via RS232, 485, LAN, or U-disk.
For U-disk updates, copy the firmware to a U-disk and insert it into the controller, just as you would with a program update.
Note: During the update, ensure that the display remains powered on. Do not disconnect the RS232 or LAN cables.
5.5 How to Test Display
There are two primary methods to test the display functionality: hardware testing and software testing.
a. Hardware Test
When the display is powered on and functioning correctly, press and hold the TEST button for 6 seconds.
This will activate the test mode, and you can release the button. Pressing it up to 6 times will cycle through 6 different testing modes.
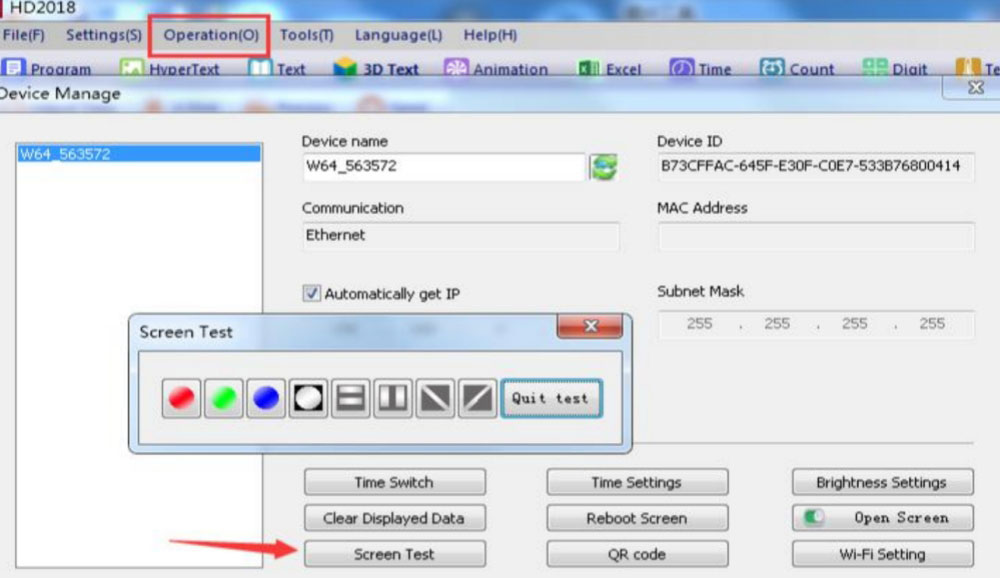
b. Software Test
Go to Operation > Screen Test in the software to initiate the display test from your computer.
5.6 How to Renew to Factory Setting
a. Hardware Reset
Power off the display and controller.
Press and hold the TEST button, then power the device back on while keeping the button held for 6 seconds.
Release the button to restore the factory settings.
b. Software Reset
Navigate to Operation > Clear Display Data in the software.
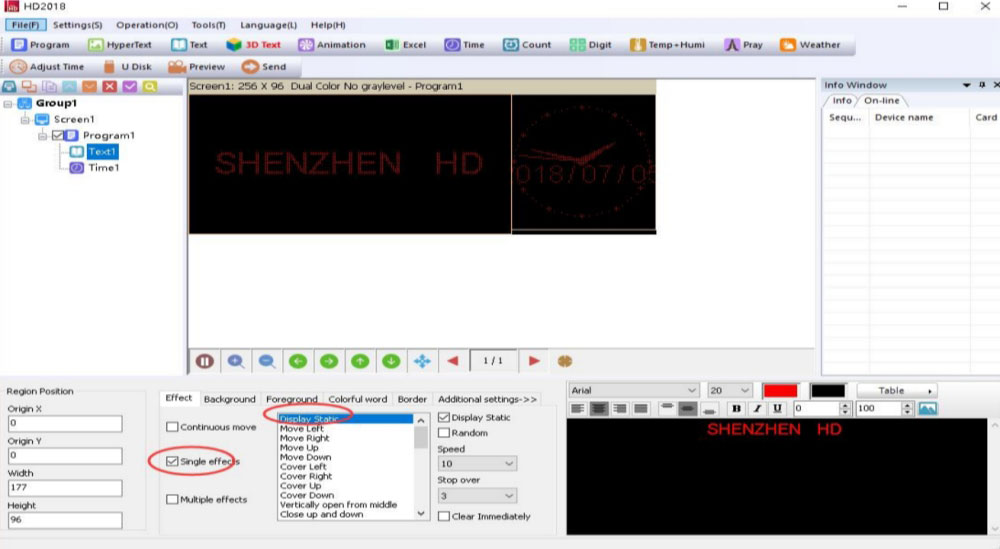
5.7 How to Set Text Static and No Moving
In the Text Effects section, select Display Static.
6. Troubleshooting
Most HD2018 problems fall into a few categories: the software can’t find the controller, the display shows scrambled content, or something specific isn’t working. Here’s how to work through each one.
6.1 The software can't detect my controller
Start with the basics. Confirm the controller is powered on, then check by connection type:
● LAN: Check that the cable is physically connected. In Communication Settings → Ethernet, try checking “Direct connection mode” if you’re connecting one controller directly to your PC with no router between them. If the controller and PC are on different network segments, manually add the controller’s IP range under the Ethernet tab.
● Wi-Fi: The controller’s signal should appear in your PC’s Wi-Fi list. In Communication Settings → Wi-Fi tab, select the signal and click Link. Default password: 88888888.
● RS232: Verify the HL340 driver is installed. One PC handles one serial card at a time. Check the Info Window — it shows the device once the driver finds it.
If the Info Window says “selected screen not binding device” — that’s not a connection error. It means the screen file isn’t assigned to a controller. Go to Settings → Screen Parameter Settings and pick your device from the dropdown.
6.2 The display shows scrambled content or the wrong scan pattern
This is almost always a hardware settings mismatch. The software and the LED module are out of sync.
Go to Settings → Screen Parameter Settings → Hardware Settings. Run Commonly Smart. If it returns no result, connect the controller via cable or Wi-Fi first, then run it again.
For LED modules that don’t match any Commonly Smart preset: click Additional → Smart Setting. The wizard walks you through identifying polarity, scan mode, and color channel step by step.
HD-U6x controllers only: these cards don’t support smart setting. You have to configure them manually — set data polarity, OE polarity, memory, line blanking, scan frequency, and IC type to match your module’s spec.
6.3 The Wi-Fi password stopped working
If the password was changed and you don’t know the new one, reset the controller to factory defaults:
● Power off the controller.
● Hold the TEST button.
● Power it back on while still holding the button.
● Keep holding for 6 seconds, then release.
The controller resets. Wi-Fi password returns to 88888888.
6.4 The display shows nothing after sending the program
Check the Info Window first — it tells you whether the Send command succeeded. If it did but the screen is still blank, look at these three things:
(1) Is the screen file bound to the correct device in Screen Parameter Settings?
(2) Is the program’s Play Time set to a date or time that hasn’t arrived yet — or one that already passed?
(3) If you’re using U-disk: did you check “Export the parameters” on the first export? Without that, the controller gets the program but not the hardware config — and the display won’t drive correctly.
6.5 The firmware update failed mid-way
Don’t power off the display during a firmware update. Don’t disconnect the RS232 or LAN cable while it’s running. If either happens and the firmware gets corrupted, use U-disk to push the .bin firmware file directly to the controller as a recovery method.
7. FAQs
What is the default password for HD2018?
Two passwords. Wi-Fi connection: 88888888. Creating a new screen file or updating firmware: 168.
Is HD2018 completely free?
Yes. No license key, no subscription, no activation required. Download and use it directly.
Does HD2018 run on Windows 10 or 11?
Yes. It also runs on XP, Vista, 7, and 8. On Vista or Windows 7, install to a non-system drive.
Is there an Android APK for HD2018?
No. HD2018 is Windows-only. For mobile control, use the LedArt app (Android and iOS), which connects to Wi-Fi-enabled Huidu controllers over a local network.
How do I stop the text from scrolling?
Text area → Effect tab → select Display Static.
Can I control multiple screens from one PC?
Yes. Go to Operation → Multiple Sending. Multi-screen mode assigns each screen file to a specific controller. Copy mode pushes the same file to all connected devices at once.
How many programs can one screen hold?
Up to 1,000 programs per screen, each with its own schedule.
8. Conclusion
Huidu HD2018 is an essential tool for anyone working with LED displays, offering a comprehensive set of features that cater to both simple and advanced display needs. By following the instructions provided, you can easily set up new screens, manage content, and troubleshoot issues effectively.
With its user-friendly interface and powerful capabilities, Huidu HD 2018 makes managing your LED display system both straightforward and efficient.