8 LED Display Installation Methods and How to Pick the Right One
LED display installation methods are often the first thing people think about when they plan a new LED screen. The screen itself gets most of the attention, but the way it is installed decides how it performs, how long it lasts, and how easy it is to maintain. Many problems that show up later—uneven modules, heat buildup, difficult repairs—come from the installation method, not the hardware.
Before thinking about pixel pitch or screen size, look at the installation conditions first. They often decide what the screen can or cannot use.
Table of Contents
1. Why the LED Display Installation Method Matters?
The LED display installation method affects how the LED screen performs in real use. It is not only about where the screen sits. It changes the structure behind it, the way the cabinets connect, and how easy the screen is to service later.
It decides what the structure must carry
Each installation method places weight in a different way.
- A wall mount loads the wall directly.
- A cantilever pushes weight outward.
- A pole must resist wind from all directions.
If the method does not match the structure, the screen may tilt, sag, or loosen over time.
It determines how maintenance works
Some methods give access from the back. Some allow only front removal of modules.
If a screen is embedded or against a solid wall, rear access is impossible.
Choosing the wrong method makes simple repairs difficult and sometimes requires taking down the whole display.
It affects heat movement and ventilation
LED screens generate heat.
- A wall-mounted or embedded screen can trap hot air if the gap is too tight.
- Outdoor screens need open airflow to avoid moisture buildup.
The installation method controls how the screen breathes.
It changes the cable layout
Power, signal, and grounding lines must take different routes depending on how the screen is mounted.
- A hanging screen requires secured cable paths.
- A pole-mounted screen needs outdoor protection and waterproof boxes.
- An embedded screen needs hidden conduits before the wall is closed.
It influences the final alignment
Large screens need precise alignment so module edges stay flat.
Different mounting methods use different frame systems. If the frame is not built for the chosen method, you may see cabinet steps, gaps, or shadows.
It affects long-term reliability
Screens that are mounted poorly may:
- absorb vibration
- shift because of temperature changes
- trap humidity
- loosen at the mounting points
These issues often show up months after installation—not on day one.
2. 8 Common LED Display Installation Methods
Each installation method solves a different site requirement, so the sections below explain how they work and where they are commonly used.
2.1 Wall-Mounted Installation
Wall-mounted installation fixes the LED screen directly on a concrete wall or on a steel frame attached to the wall. It is one of the most common indoor installation methods.
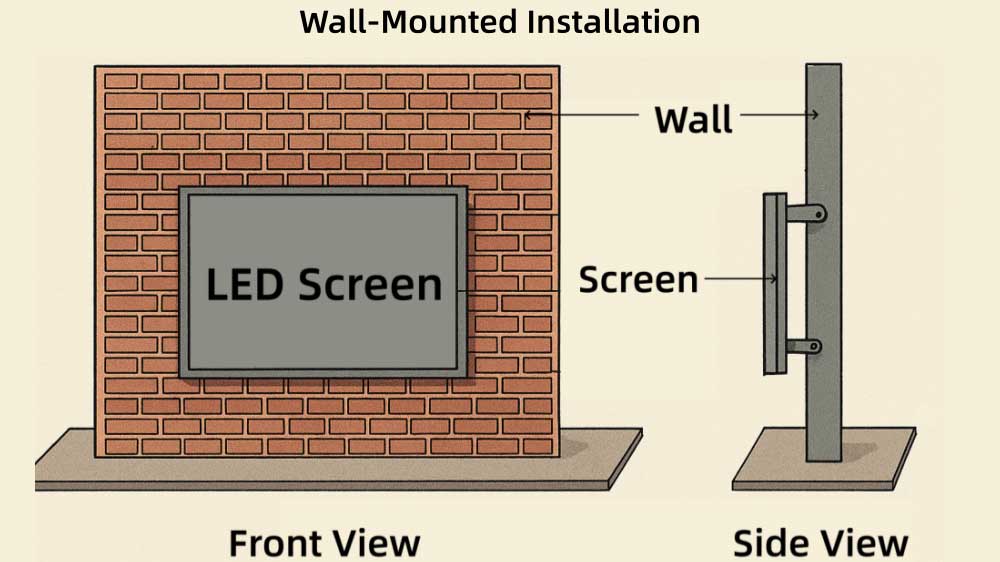
- Key characteristics
- The screen stays close to the wall, giving a compact and clean appearance.
- Cable routing usually stays hidden behind the screen, giving a tidy finish.
- The screen becomes part of the wall visually, often blending with the surrounding interior.
- Limited depth makes it suitable for small and medium screens.
- Where it fits
- Meeting rooms
- Hotels and reception halls
- Retail stores
- Company lobbies
- Indoor advertising walls

- Maintenance considerations
- If the wall has no rear access, front maintenance is required.
- Rear maintenance is possible only when the screen backs onto a service passage.
- Ventilation must be planned—tight wall gaps trap heat.
- Installation notes
- Check wall load capacity before installing.
- Level the steel frame to avoid cabinet gaps.
- Leave side gaps or vents for airflow.
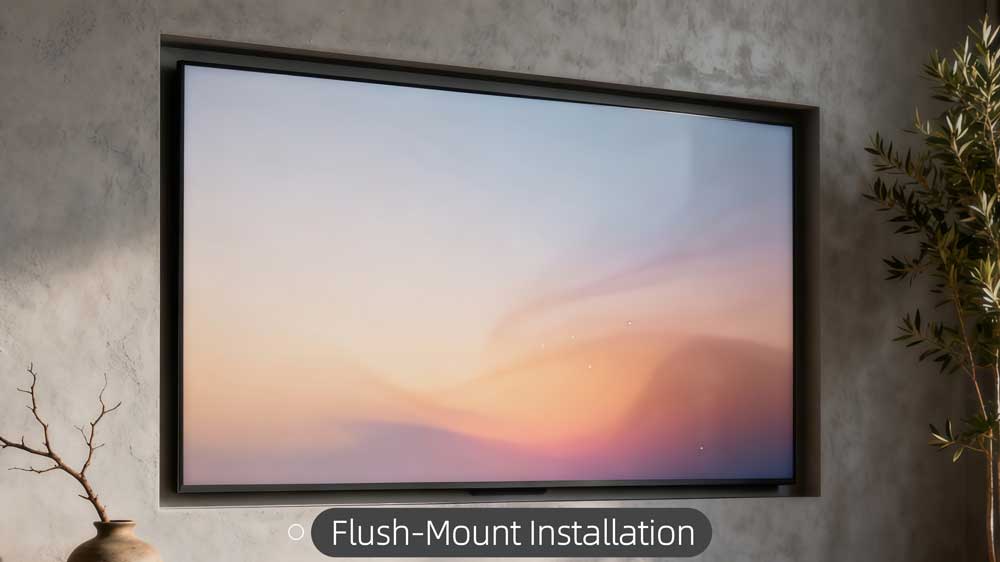
2.2 Embedded (Flush-Mount) Installation
Embedded installation places the LED display inside a wall recess so the surface of the screen sits flush with the wall finish. It gives a clean “built-in” appearance.
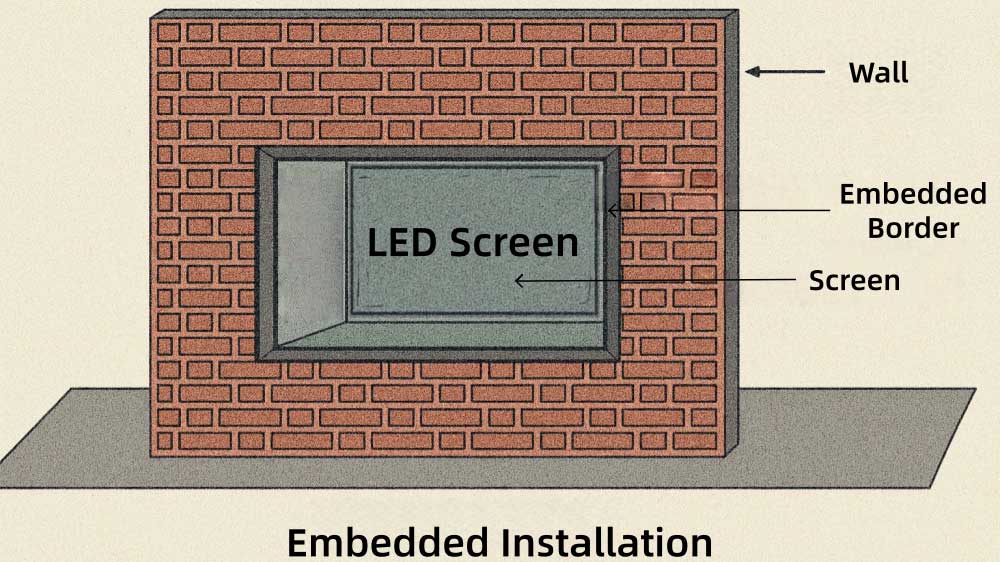
- Key characteristics
- The display sits flush with the wall, producing a seamless architectural look.
- The wall opening surrounds the screen edges, creating a built-in appearance.
- The structure hides the frame completely, exposing only the LED surface.
- The narrow wall cavity shapes the airflow and internal space behind the display.
- The outcome is minimalist, modern, and integrated.
- Where it fits
- Reception walls
- Hotel lobbies
- High-end retail
- Conference LED screen
- Interior architecture requiring a clean finish
- Maintenance considerations
- Front-removable modules or front-removable cabinets are required.
- The recess must allow enough room for cables, power supplies, controllers, airflow.
- Installation notes
- Check wall material, some walls require reinforcement.
- Reserve openings for power and signal access.
- Leave 5–10 cm behind the frame for ventilation (general practice, not fictional).
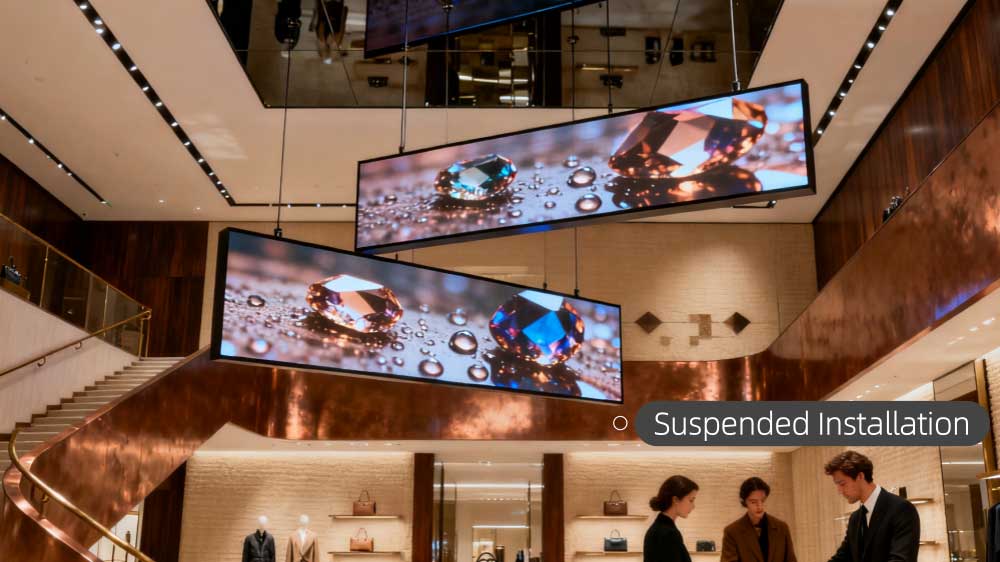
2.3 Hanging (Suspended) Installation
A hanging installation suspends the LED display from the ceiling, a beam, or a dedicated support structure. It keeps the screen above ground and visible from far away.
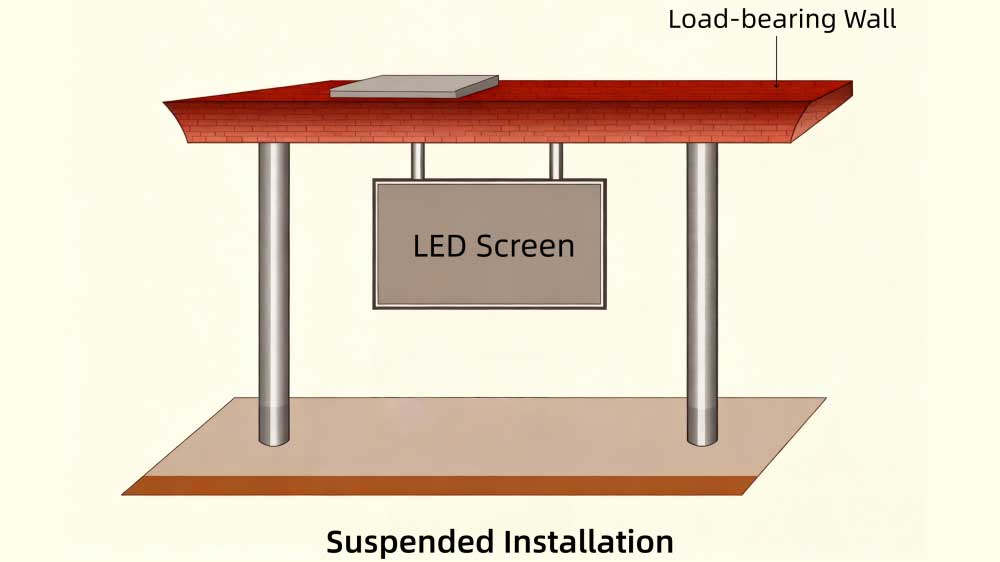
- Key characteristics
- The screen hangs in open space, giving visibility from multiple directions.
- The display keeps a fixed height above ground, unaffected by wall or floor constraints.
- Suspension points carry the full load, resulting in a “floating” visual effect.
- Cable paths often follow the suspension route, keeping the underside clear.
- The structure allows the screen to face wide pedestrian areas.
- Where it fits
- Shopping mall LED display
- Airports
- Railway stations
- Exhibition centers
- Public halls
- Atrium spaces
- Maintenance considerations
- Most hanging screens use front maintenance.
- Some have lifting systems that lower the screen for service.
- Cable tension and suspension points must be checked regularly.
- Installation notes
- Verify structure load capacity before mounting.
- Use certified rigging hardware—shackles, chains, or steel cables.
- Prevent swinging by adding side stabilizing bars if needed.
- Keep power and signal cables neat and supported.
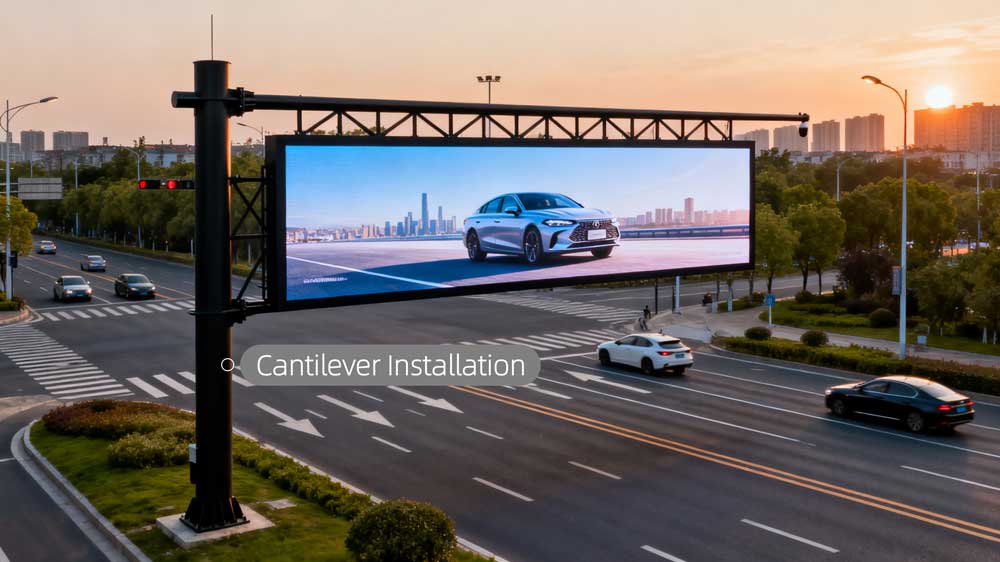
2.4 Cantilever Installation
A cantilever installation supports the LED screen using a bracket or arm that projects outward from a wall, column, or structural surface. The screen sits forward from the mounting surface instead of being directly attached to it.

- Key characteristics
- The screen extends beyond the wall surface.
- Provides better visibility in walkways or directional areas.
- Requires careful structural design due to the “lever” effect.
- Cable routing typically runs through the bracket or behind it.
- Where it fits
- Building entrances
- Corridor wayfinding displays
- Transportation hubs
- Semi-outdoor directional signage
- Retail storefront signs
- Maintenance considerations
- Usually uses front maintenance.
- The bracket must allow safe access for removal of modules or cabinets.
- Regular checks ensure the arm or frame does not loosen over time.
- Installation notes
- Cantilever setups create bending forces; the base structure must handle this.
- Anchoring depth and bolt quality matter more than in normal wall-mount designs.
- Check for safe clearance below and around the screen.
- Weather protection is required for semi-outdoor use.
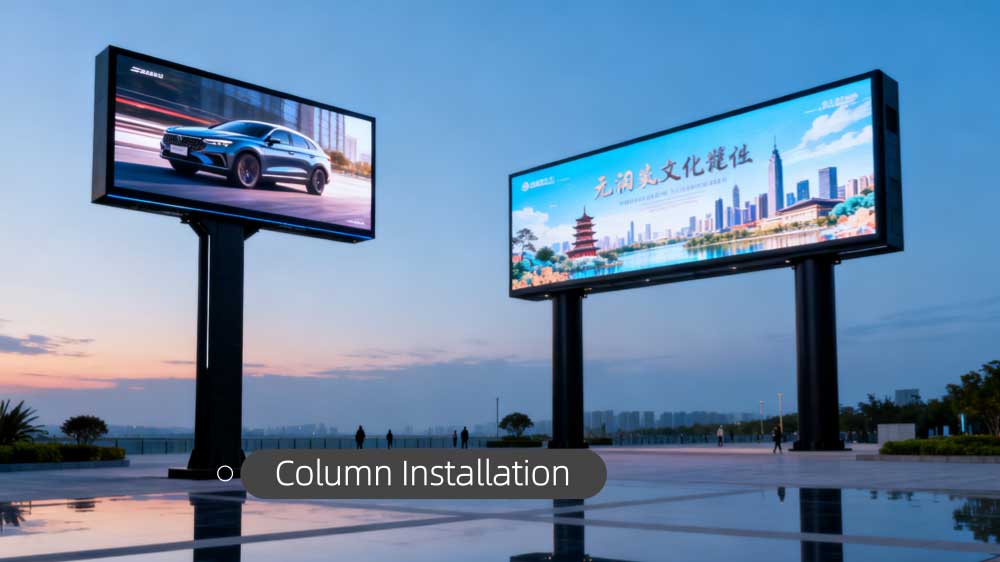
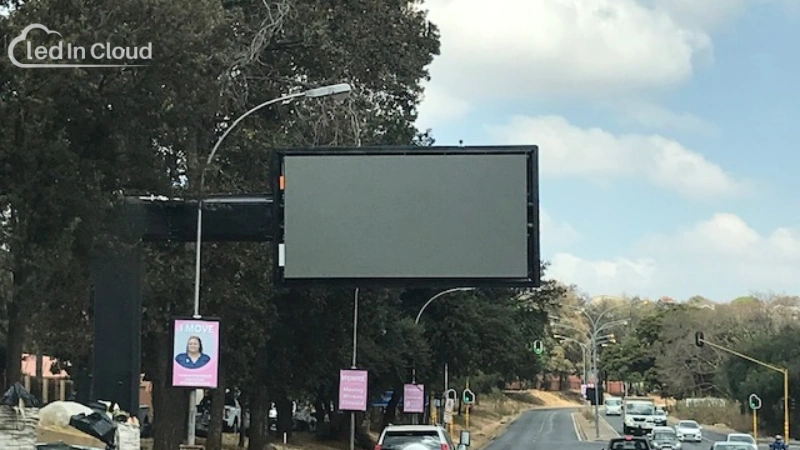
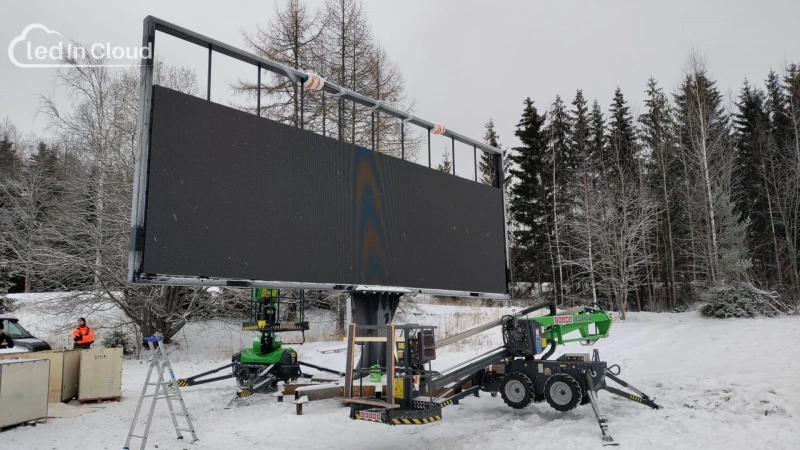
2.5 Column / Pole Installation
Pole installation mounts the LED display on one or more vertical poles. It is one of the most common outdoor mounting methods, especially for advertising and roadside displays.
- Types
- Single-pole installation: One central pole supports a small or mid-size outdoor screen. Often used for traffic or directional signs.
- Double-pole installation: Two poles support medium to large LED displays. Provides better stability against wind. Used for very large outdoor screens.
- Key characteristics
- Designed for outdoor visibility and long-distance viewing.
- Needs a solid foundation to resist wind and vibration.
- Cabinet design often includes rear maintenance doors.
- Typically paired with waterproof and dustproof LED cabinets.
- The angle of the screen can be adjusted to face the main viewing direction.
- Where it fits
- Highways
- Open plazas
- Roadside advertising
- Parking areas
- Outdoor information boards
- Service stations
- Maintenance considerations
- Most pole-mounted screens allow rear maintenance.
- Larger structures may include walkways and maintenance ladders.
- Weatherproofing, grounding, and drainage must be inspected regularly.
- Installation notes
- Engineering calculations are needed for wind load.
- The pole base must be embedded deep enough in concrete.
- Anti-corrosion materials extend service life.
- Lightning protection and grounding are important for safety.
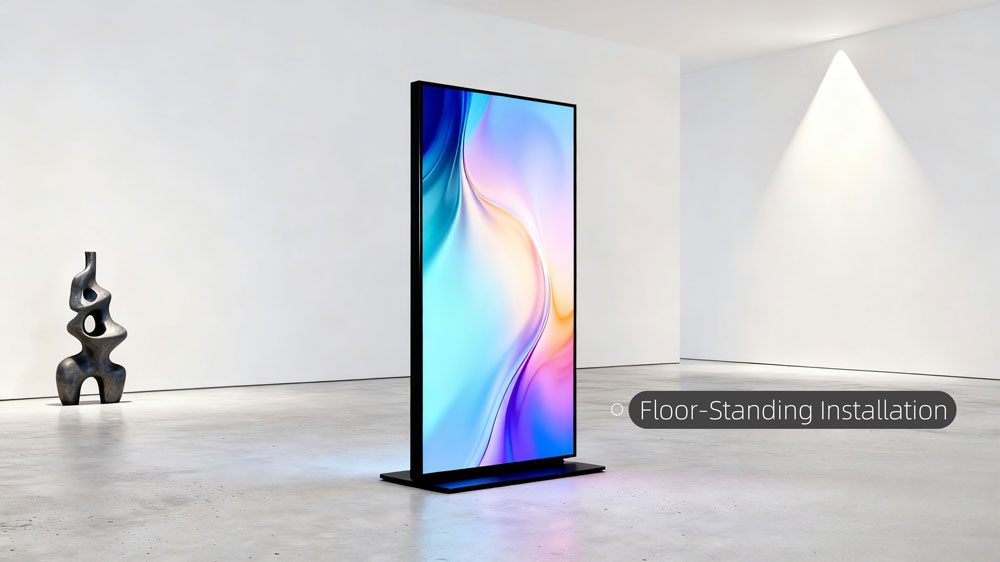
2.6 Floor-Standing / Freestanding Installation
A floor-standing installation places the LED screen on a base or support structure that sits directly on the ground. It does not rely on walls or ceilings and is often used for flexible or movable display setups.
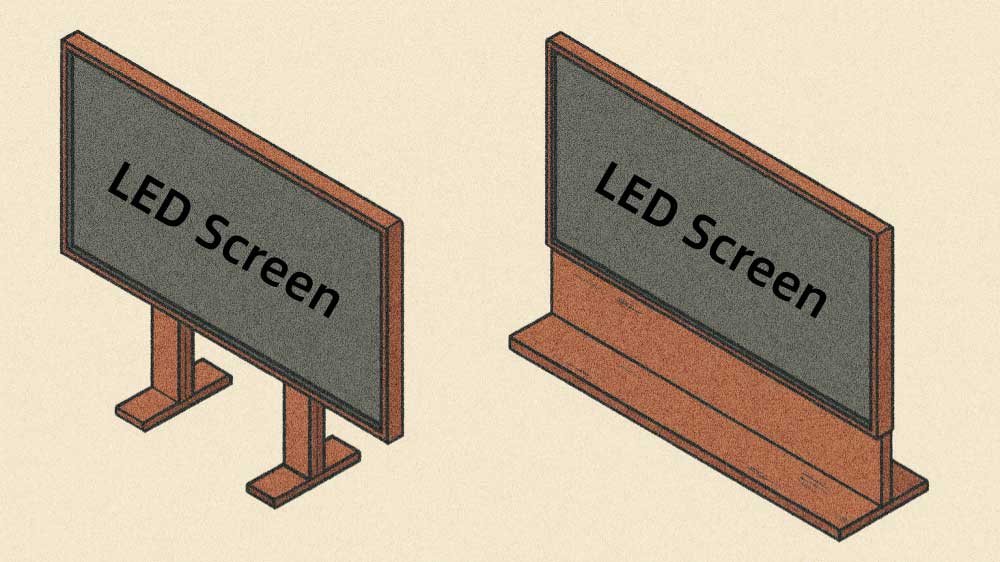
- Key characteristics
- No need for structural walls or ceilings.
- Flexible placement and simple relocation.
- Stable base prevents tipping; heavier screens require wide support.
- Cable routing is straightforward due to ground-level access.
- Where it fits
- Exhibition halls
- Lobbies
- Retail showrooms
- Temporary stages
- Indoor advertising spaces
- Training rooms and event venues
- Maintenance considerations
- Both front and rear maintenance are possible depending on frame design.
- Movable units require locking wheels to keep the screen stable.
- Frames must be checked for loosened joints due to repeated moves.
- Installation notes
- Ensure the base is wide enough to remain stable.
- Avoid placing heavy screens on weak floors or raised stages without reinforcement.
- Cable management is important to prevent tripping hazards.
- For tall freestanding setups, additional rear braces improve stability.
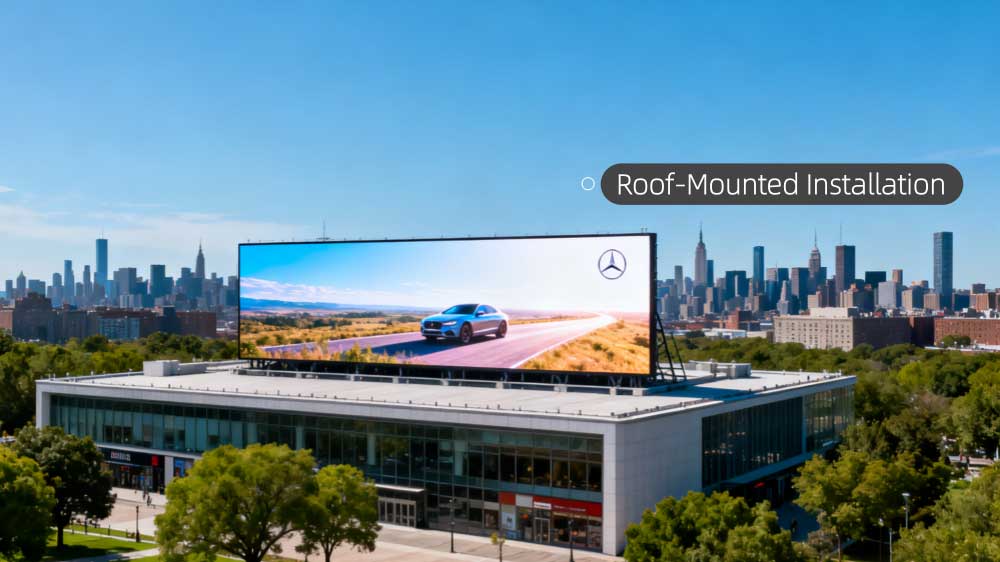
2.7 Roof-Mounted Installation
A roof-mounted installation places the LED display on top of a building or structure. The screen is fixed to a steel frame that transfers the load to the roof.
This method is common in outdoor advertising where long-distance visibility is important.
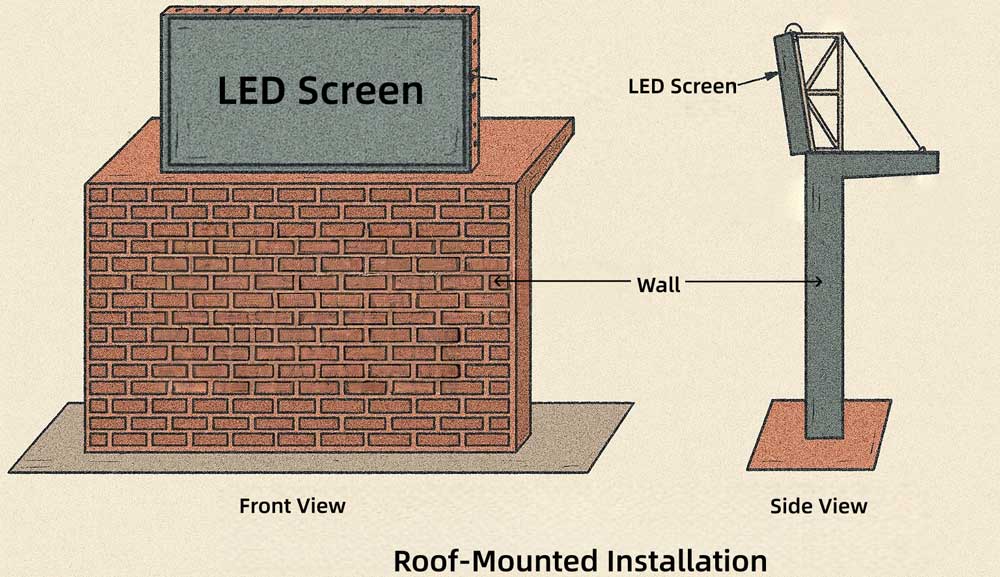
- Key characteristics
- The screen sits at the top of a building, giving long-range visibility.
- The support frame lifts the display above the roof surface.
- The open back allows easy airflow and maintenance access.
- The display becomes a visible part of the building’s outline.
- The screen is usually angled for better visibility from roads
- Where it fits
- Commercial building rooftops
- Shopping mall roofs
- Factory or warehouse roofs
- Long-range outdoor advertising
- Maintenance considerations
- Rear maintenance is common because there is open space behind the screen.
- Technicians often need ladders or platforms.
- Regular checks for corrosion and loose bolts are important in rooftop environments.
- Installation notes
- Structural assessment of the roof is necessary.
- Strong anchoring is required to resist wind uplift.
- Consider lightning protection and waterproof cable entry points.
- Drainage paths must prevent water buildup around the frame.
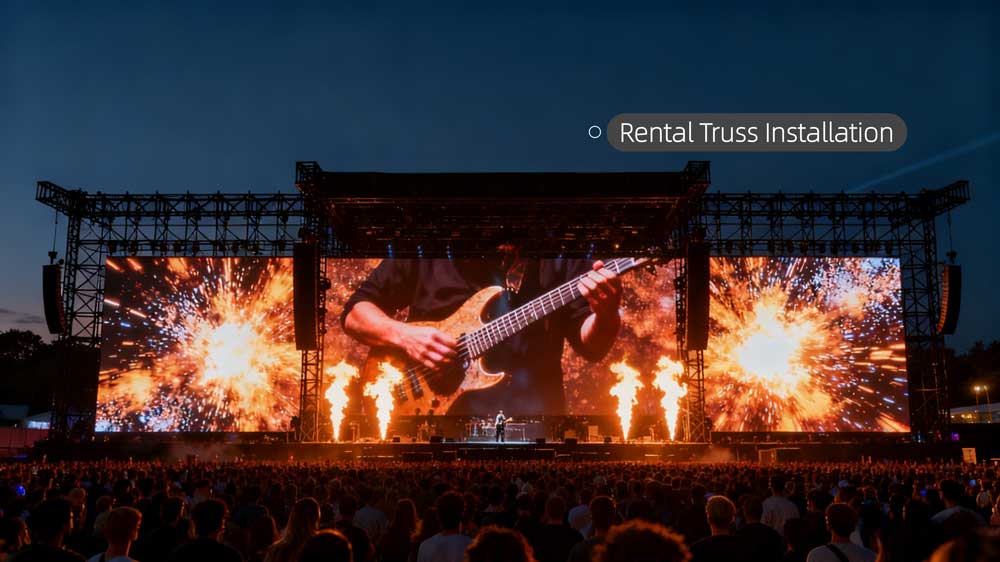
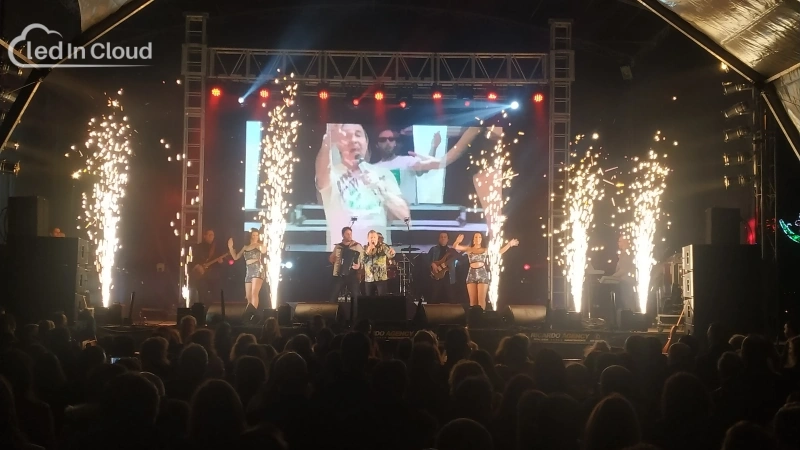
2.8 Rental Truss Installation
Rental installation uses modular LED panels and lightweight frames designed for quick assembly and disassembly. Trusses, hoists, and locking systems help build temporary screens for events.

- Key characteristics
- The system uses lightweight panels designed for quick setup.
- Cabinets lock together with fast connectors to form different screen sizes.
- The display can stand on a truss base or hang from stage beams.
- The layout can change quickly depending on the event.
- The structure is made for repeated assembly and transport.
- Where it fits
- Concerts
- Conferences
- Trade shows
- Roadshows
- Pop-up events
- Temporary staging
- Maintenance considerations
- Frequent assembly demands careful module handling.
- Frame and locks must be checked often for wear.
- Cable routing must stay tidy to avoid tripping hazards.
- Installation notes
- Use certified truss equipment.
- Avoid uneven ground that may tilt the screen.
- Add safety wires for overhead setups.
- Protect modules during transport and storage.
3. How to Choose the Right Installation Method
Choosing the right installation method becomes easier when you follow a simple decision path.
Start with the installation environment
The first question is always the same: indoor or outdoor.
✓ Outdoor environments need structures that resist wind, rain, and sunlight.
Common choices:
- Pole installation
- Roof-mounted installation
- Outdoor ground frames
✓ Indoor environments focus more on appearance, space, and access.
Common choices:
- Wall-mounted
- Embedded
- Hanging
- Floor-standing
Once you select the environment, many unsuitable methods are already out.
Check the structural support available
Different structures can carry different loads.
- Strong concrete walls → wall-mounted or embedded
- Weak partition walls → floor-standing or hanging
- No usable walls at all → hanging or freestanding frames
- Open outdoor areas → pole or large outdoor frames
If the structure can’t carry weight, you must avoid wall-mounted methods.
Look at the space available for maintenance
Maintenance access is often the real deciding factor.
✓ No space behind the screen → front maintenance only
Suitable methods:
- Front-service wall mount
- Embedded
- Cantilever
- Hanging with front access
✓ Rear space available → rear maintenance is possible
Suitable methods:
- Outdoor pole
- Roof-mounted
- Large steel frames
- Indoor rear-service wall structures
Identify the viewing distance
Viewing distance influences mounting height and screen position.
- Long-distance viewing → pole, roof, or outdoor frames
- Short-distance, indoor viewing → wall-mounted, embedded, hanging
- Multiple viewing angles → hanging or curved
- Surround-view or immersive layouts → custom-shaped screens
The further the viewer is, the higher and larger the screen must be.
Decide if the screen needs to be movable
Some installations must change position or size.
- If movement is required → rental/truss or movable floor-standing
- If the screen will stay in one place → all fixed methods remain open
Prioritize appearance vs. visibility
Different sites value different outcomes.
✓ For a clean, built-in architectural look
- Embedded
- Wall-mounted
- Curved or custom-shaped
✓ For maximum visibility in open spaces
- Hanging
- Cantilever
✓ For long-distance outdoor viewing
- Pole
- Roof-mounted
4. LedInCloud LED Display Installation Case Examples
Real projects often help explain why different installation methods exist. For users who want to see real-world applications, LedInCloud – a global leading LED Screen Cloud Platform has several completed projects that show how different installation methods perform in actual use.
South Africa Project - Cantilever Installation
Finland Project - Column Installation
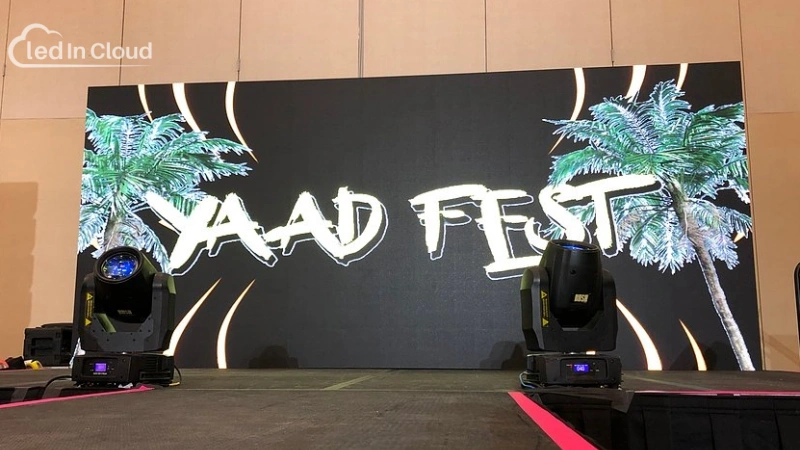
Portugal Project - Truss Installation
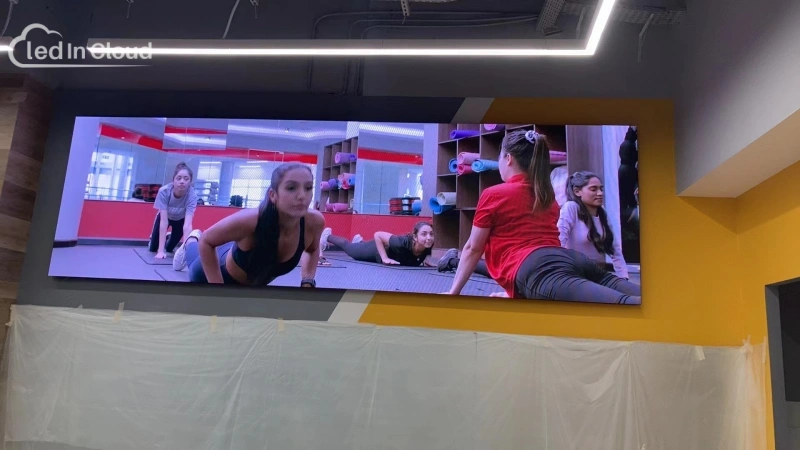
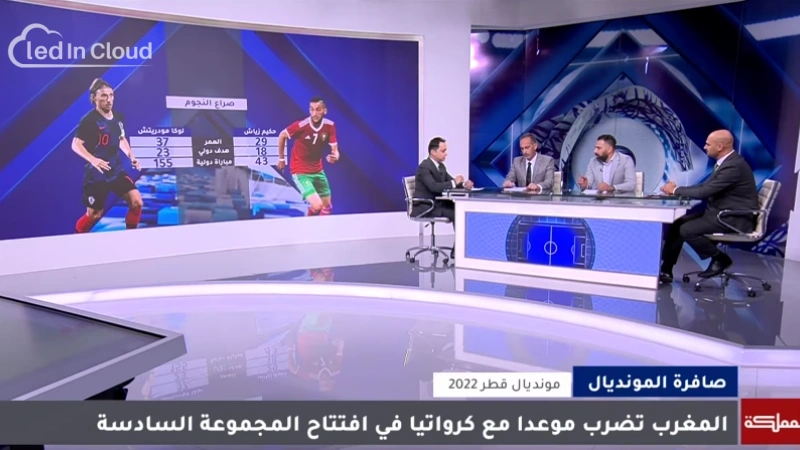
UAE Project - Wall-Mounted Installation
Qatar Project - Embedded Installation
USA Project - Floor-Standing Installation
5. FAQs
Many users have similar questions when planning an LED display installation, so the answers below cover the points that come up most often.
- Which installation method is best for small indoor LED displays?
Wall-mounted and embedded installations work best for small indoor screens. They save space and keep the appearance clean.
- What installation method is most suitable for outdoor advertising?
Pole installation and roof-mounted installation are the most common. Both provide stable structures, good height, and clear visibility at long distances.
- What if the wall cannot carry the weight of the LED display?
Use a hanging system, a floor-standing frame, or a rental-style truss. These options shift the load away from the wall and prevent structural damage.
- What installation method works best for large open indoor spaces?
Hanging installation is common in malls, stations, and atriums. It keeps the floor clear and makes the screen visible from multiple angles.
- How are rooftop LED screens usually installed?
Rooftop screens use a welded steel structure fixed to the roof. The frame must resist wind load and distribute weight across the roof safely.
Rear maintenance is typically used because space is available behind the screen.
6. Conclusion
A good LED display installation does more than hold the screen in place. It supports heat control, cable routing, maintenance access, and long-term stability. These details decide whether a display performs well for years or develops issues early.
There is no universal “best” method. The right choice depends on where the screen will be used, how it will be viewed, and how technicians will service it later. When the installation method aligns with these needs, the display looks cleaner, runs more reliably, and stays easier to maintain.
If you’re planning a project and need guidance on installation options, feel free to contact LedInCloud. Our team can help you review your site and choose the method that fits your project best.