
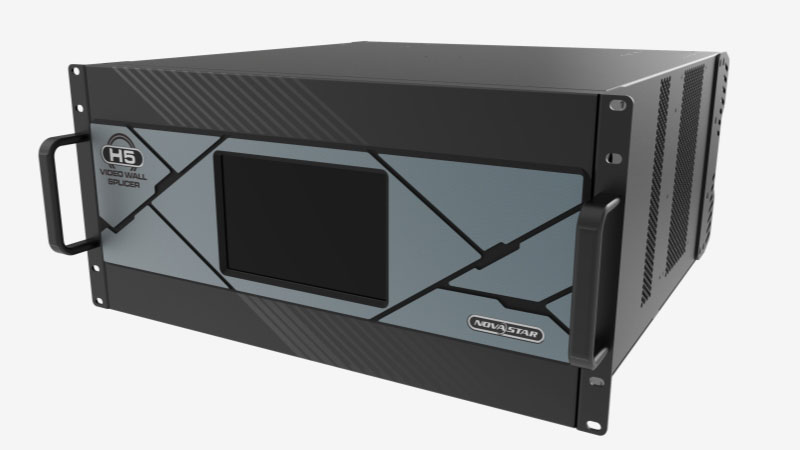
Novastar H5 video wall splicer is a professional device designed for small and medium-sized stage lighting, projection and sound systems, which can realize the splicing and distribution of multi-channel signals.
This product adopts high-quality Novastar electronic components and has stable and reliable signal processing capabilities, providing excellent technical support for various performances and activities.
1. Introduction to Novastar H5
Novastar H5 video wall splicer has extremely high signal transmission quality and stability, and can ensure long-term high-voltage working state.
The product supports input and output of multiple signal formats, including video, audio, RGB, etc., to meet various signal requirements.
H5 adopts intuitive panel design and humanized operation process, making equipment debugging and operation simple and easy.
It has a very high performance-price ratio and can provide strong guarantee for cost savings of performances and activities.
2. H5 Video Wall Splicer Price
When considering the cost of the H5 Video Wall Splicer, the base price is approximately $1,066. However, this price can vary depending on the specific needs and requirements of the user.
It is recommended that customers who need to purchase visit our LED Screen Cloud Platform or Contact Us first. We have a professional team ready to answer any questions and provide detailed information to help you make the best decision for your specific needs.
3. Appearance
3.1 Front Panel
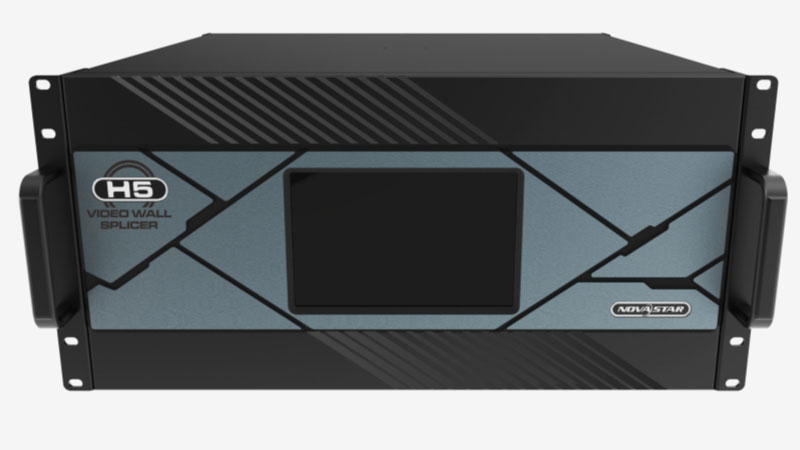
The front panel of the Novastar H5 is crafted for easy access and user-friendly operation.
The clear and bright LCD screen provides essential information at a glance. This screen shows real-time device status, settings, and messages.
3.2 Rear Panel
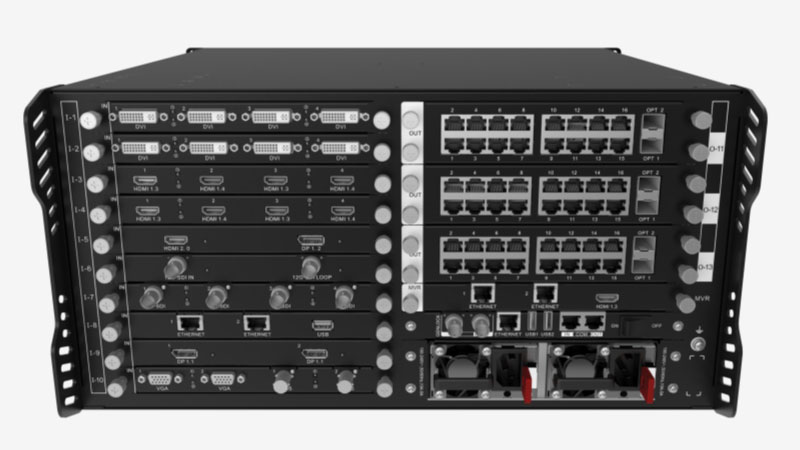
The rear panel of the Novastar H5 is designed for robust connectivity and efficient cable management. Key components include: input and output interfaces (HDMI, DVI, and SDI ports), ethernet ports, power supply, expansion slots.
4. Novastar H5 vs. Traditional Solution
Firstly, traditional solutions for managing LED displays often need a lot of equipment. This complexity leads to cumbersome wiring setups, which can be a hassle to install and maintain. The sheer number of components increases the risk of something going wrong, making troubleshooting a time-consuming process.
Secondly, traditional setups restrict the creative freedom of users, as they cannot easily customize the display to meet their specific needs.
Thirdly, when the display is unable to sync properly, it results in visible lines or “tears” across the screen.
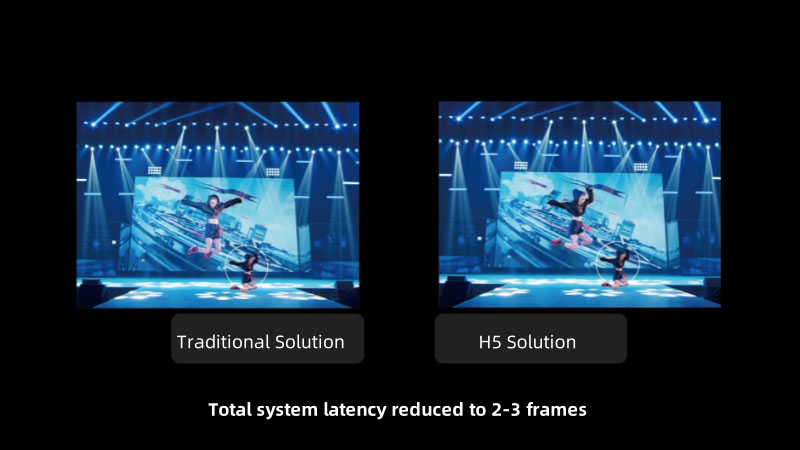
Fourthly, high latency between input and display can be significant, leading to poor visual experiences.
In contrast, the Novastar H5 offers a highly integrated solution. It reduces the amount of hardware needed and simplifies wiring, making setup and maintenance much easier.
The H5 allows for flexible layer settings, giving users greater creative control and the ability to customize LED display screen to their exact needs.
Perfect synchronization is another key advantage of the H5. It eliminates tearing issues, ensuring smooth and consistent visuals.
The H5 also features low latency, providing a more responsive and enjoyable viewing experience.
5. Advanced Operation
5.1 Input Source Grouping
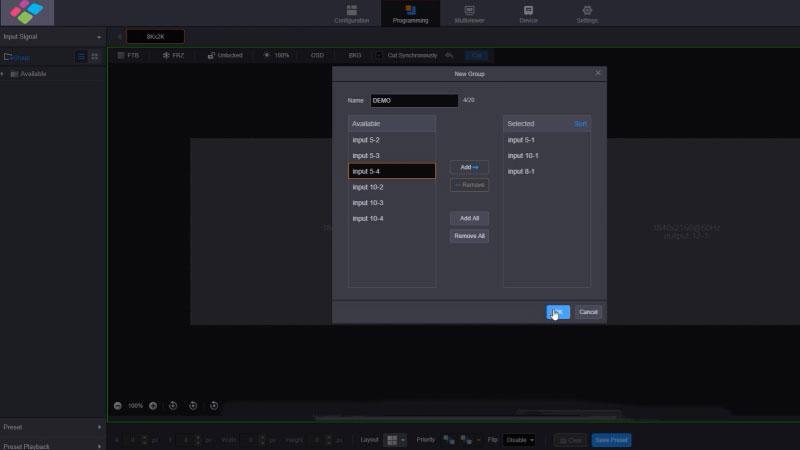
In the programming interface, click the group on the left side, enter the group name. Here we use “demo” as an example, select input signals that you want to put in the same group, click “add”, and click “OK”.
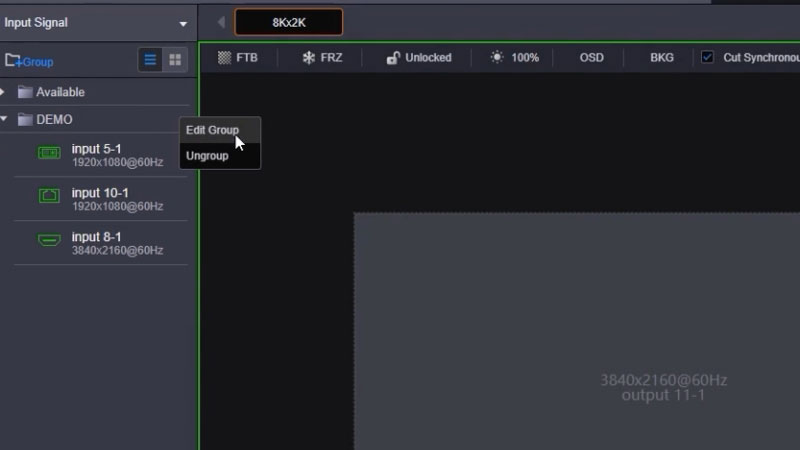
Then you can see we’ve got a new demo group on the left, click the menu button on the right to edit the group name or upgroup it.
More details, you can watch this operation video:
5.2 Preset
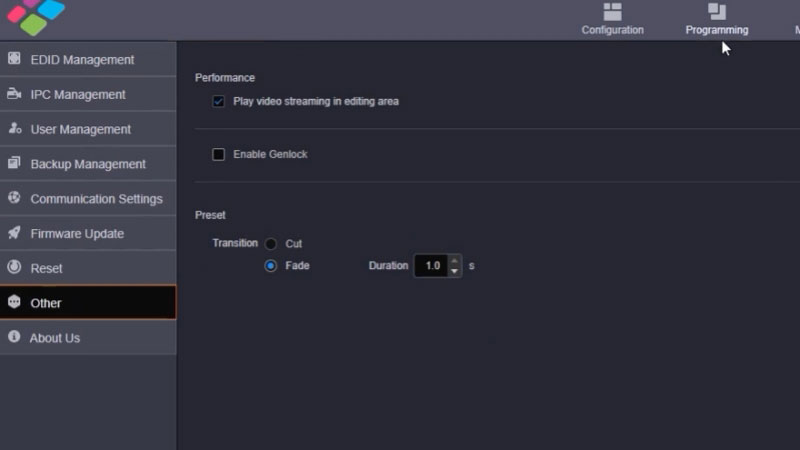
It preset in the “programming” interface. Select preset in the preset list, click the blue switch button on the right to switch the selected preset, or directly drag the preset to the screen area to realize the preset switching, the preset waiting defaults to the straight cut mode in “Settings” interface, “Other” menu.
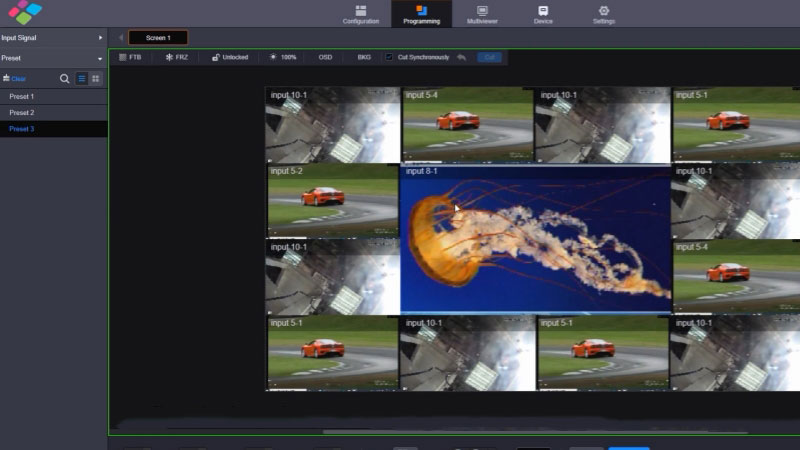
The preset switching effects can be set to fit in and fade out, and the duration can be modified as well.
Back to the Programming-Preset interface, click the menu button on the right to rename, copy or delete the current preset.
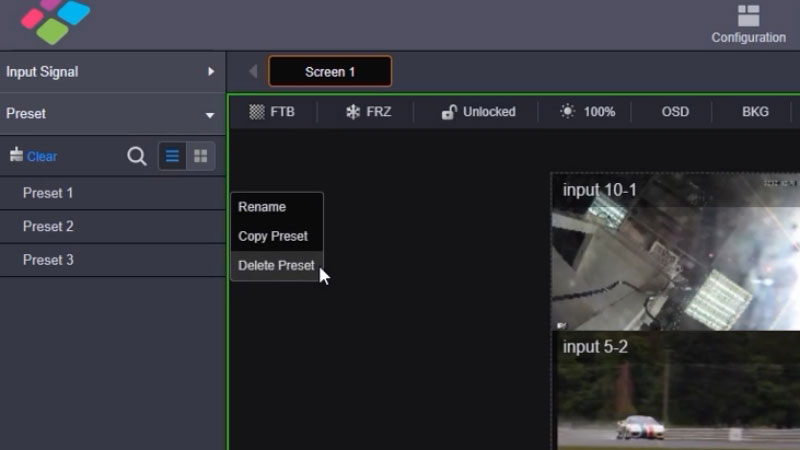
More details, you can watch this operation video:
5.3 EDID Management
In a “Settings” interface, click “EDID Management” to configure the input and output resolution, click the input or output tab to view the resolution of the input and output interfaces. TICK the check box in front of the interface whose resolution needs to be set. You can choose a preset resolution or customize the resolution. The frame rate can also be customized, then click “Apply” to finish the “EDID management” setting.
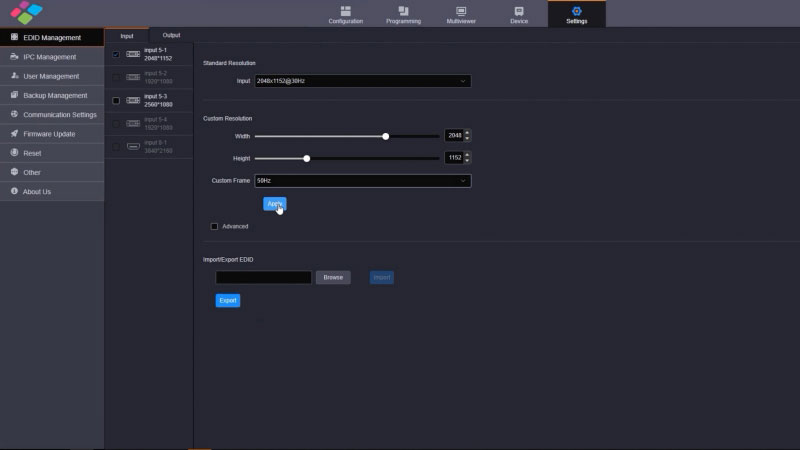
More details, you can watch this operation video:
5.4 OSD Image
In the “Programming” interface, click “OSD”.
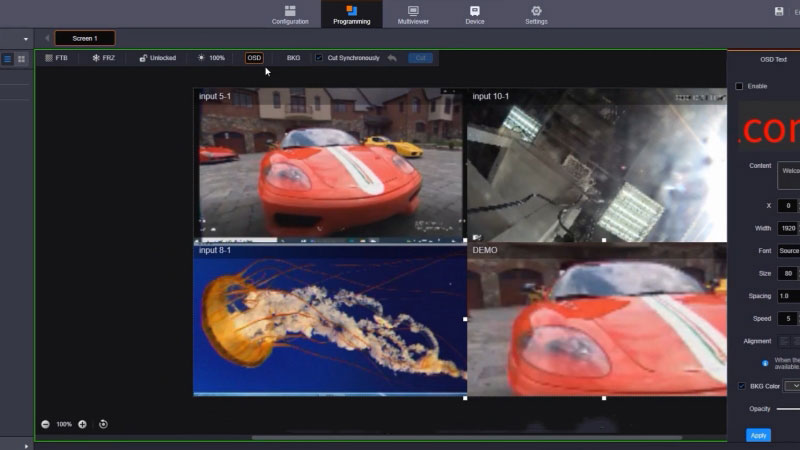
Select OSD image tab, take enable picture OSD, then click “Upload”. Select a picture that needs to be used as the OSD, click “Open” to finish the OSD image upload. The uploaded picture can be cropped by dragging the picture border, click “OK” to finish the crop setting.
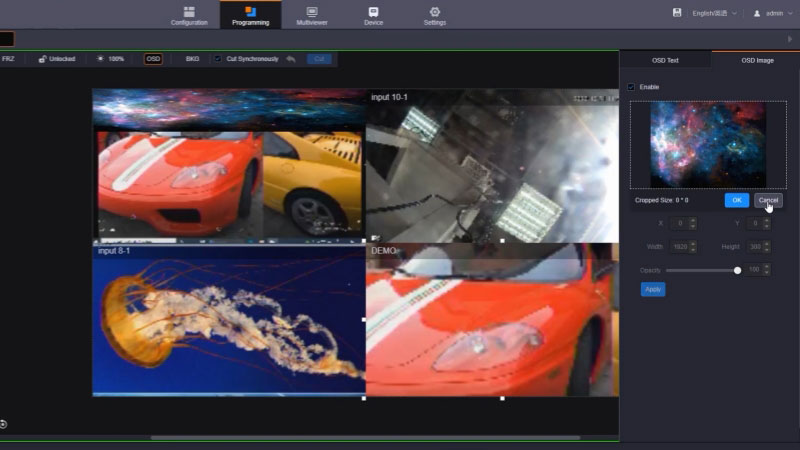
X and Y respectively, represent the horizontal start of the image, start position and vertical start position. Width and height are the Width and height up the osd image. After setting the related attributes of the OSD image. Click “apply” to finish the OSD image setting.
More details, you can watch this operation video:
6. Features
6.1 Two Different Types of 4K Sending Cards Available
The H_20xRJ45 sending card handles up to 13,000,000 pixels. The H_16xRJ45+2xfiber sending card supports up to 10,400,000 pixels and includes two OPT ports that replicate Ethernet port outputs.
6.2 Different Configurations Possible on One Sending Card
A single sending card in the Novastar H5 can be configured in multiple ways to suit various needs. It can support configurations such as 4x 2K×1K@60Hz, 2x 4K×1K@60Hz, or 1x 4K×2K@60Hz. This versatility allows for simple and effective screen setup.
6.3 Online Monitoring for All Input & Output Cards
The Novastar H5 enables online status monitoring for all input and output cards. This feature is helpful for all components functioning correctly and can quickly alert users to any issues.
6.4 "Hot-Swap" Function for All in- & Output Cards
With the Novastar H5, both input and output cards are hot-swappable. This means cards can be replaced or upgraded without needing to power down the system, keeping continuous operation and minimizing downtime.
6.5 IP Input Card H_2xRJ45 Supports up to 100 IP Cameras Incl. Input Mosaic
The H_2xRJ45 IP input card in the Novastar H5 supports up to 100 IP camera inputs. It also includes an input mosaic feature, which allows multiple video feeds to be combined into a single display.
6.6 Automatic Decryption of HDCP Protected Sources
Novastar H5 automatically decrypts HDCP-encrypted sources. The protected content can be displayed without additional configuration steps, streamlining the setup process.
6.7 Multi-Screen Management
Novastar H5 supports multi-screen management, which allows users to achieve centralized control of multiple displays. Each screen can have its own output resolution, and the system can handle output mosaics. All output connectors work synchronously to provide smooth and seamless images without any tearing or frame loss.
6.8 Web Control
H5 provides real-time response and 1000M/100M adaptive network control, which enables multi-user collaboration. Users can monitor inputs and outputs and perform firmware updates through web pages. The Ark visual management and control platform application also allows control from pad devices, improving ease of use and convenience.
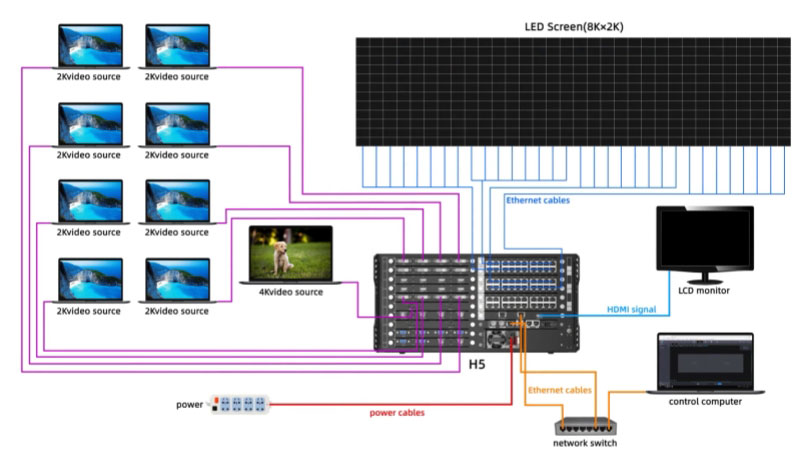
7. Specifications
| Rack Unit | H5 | |
| Max. Input Cards | 10 | |
| Max. Input Channels | 40 | |
| Max. Output Cards | 3 | |
| Max. Loading Capacity (LED 4K Sending Card) | 39 million pixels | |
| Max. Layers | 48 | |
| Electrical Specifications | Power Connector | 100-240V~, 50/60Hz, 10A-5A Note: The H5 comes with a single power supply. A redundant power supply is optional. |
| Power Consumption | 400 W | |
| Operating Environment | Temperature | 0°C to 45°C |
| Humidity | 0% RH to 80% RH, non-condensing | |
| Storage Environment | Temperature | -10°C to +60°C |
| Humidity | 0% RH to 95% RH, non-condensing | |
| Physical Specifications | Dimensions | 482.6 mm × 532.8 mm × 228.2 mm |
| Net Weight | 25 kg | |
| Gross Weight | 28 kg | |
| Packing Box | 780 mm×615 mm×345 mm | |
| Packing Information | Accessories | 1×Power Cord 1×RJ45 Ethernet Cable 1×Grounding Cable 1×HDMI Cable 1×Quick Start Guide 1×Certificate of Approval 1×Safety Manual 1×Custom Letter |
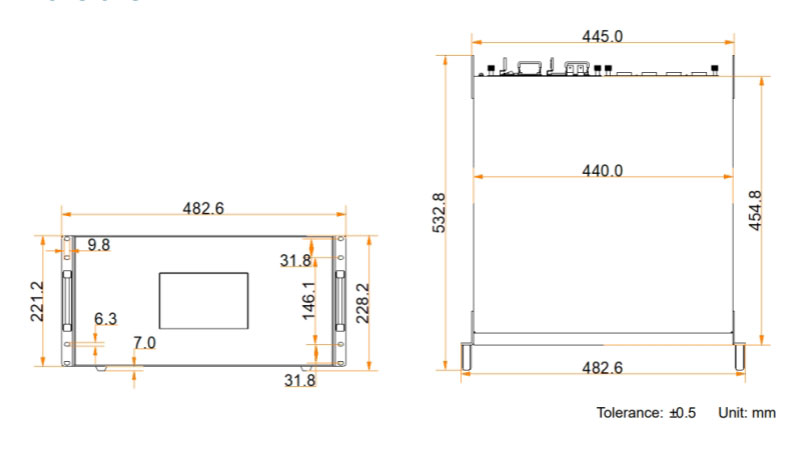
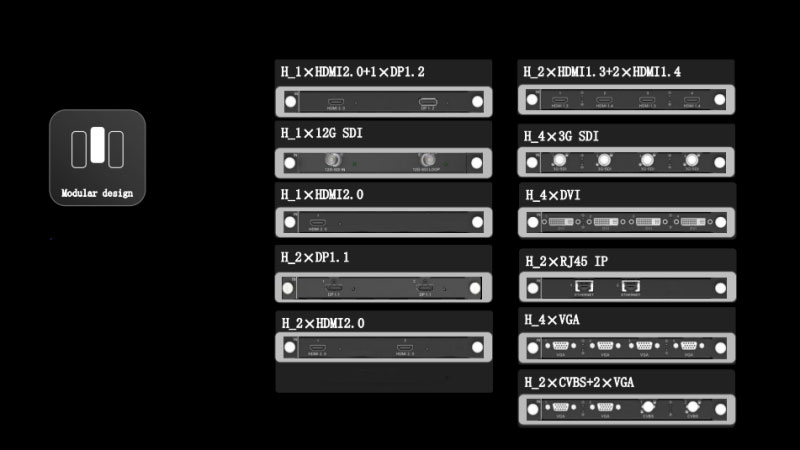
8. Inputs Card and Outputs Card
8.1 Inputs Cards
- H_4xDVI input card
Support for single link and dual link input modes, and 10-bit input source. - H_4xHDMI input card
Support for 10-bit input source Does not support interlaced signal input. - H_1xHDMI2.0+1xDP1.2 input card
Set to use which connector on the Web page. The default option is HDMI 2.0connector. Does not support interlaced signal input. - H_2xRJ45 IP input card
Support for interlaced signal input. - H_4x3G SDI input card
Supports ST-424 (3G), ST-292 (HD) and SMPTE 259 SD.Supports 1080i/576i/480i de-interlacing processing. - H_2xCVBS+2xVGA input card
2x VGA: Each connector supports the maximum resolution of 1920×1200@60Hz.
2x CVBS: Supports PAL and NTSC. - H_4xVGA input card
Each connector supports the maximum resolution of 1920×1200@60Hz. - H_2xDP1.1 input card
Each connector supports the maximum resolution of 3840×1080@60Hzor 3840×2160@30Hz. - H_1xDP1.2 input card
Each connector supports the maximum resolution of 4096×2160@60Hz or 8192×1080@60Hz. - H_STD I/O card
- H_1x12G SDI input card
- H_1xHDMI2.0 input card
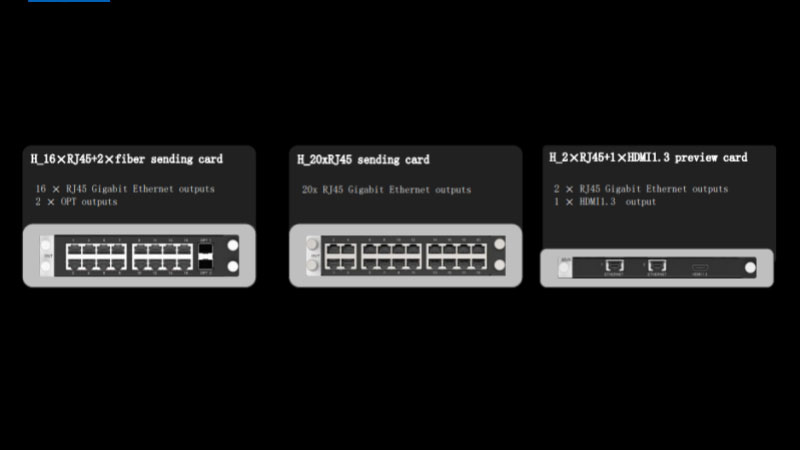
8.2 Outputs Cards
- H_16xRJ45+2xfiber sending card
LED 4K sending card can load up to 10,400,000 pixels (max. width: 10,240 pixels, max. height: 10,240 pixels). - H_20xRJ45 sending card
LED 4K sending card can load up to 13,000,000 pixels (max. width: 10,752 pixels, max. height: 10,752 pixels). - H_2xRJ45+1xHDMI1.3 preview card
2xRJ45: Gigabit Ethernet outputs Connect to the network for monitoring the inputs and outputs.
1xHDMI: 1.3 Connect to a monitor for displaying the monitoring information.
9. FAQ about H5 Novastar
9.1 Is There Any H5 User Manual and Software Available for Download?
If you need more resources of NovaStar products, you can navigate our NovaStar Resources Download page.
9.2 How to Set Backup Between Two H series Splicer?
a. Configure the screen with the primary H series splicer and make sure the display is fine.
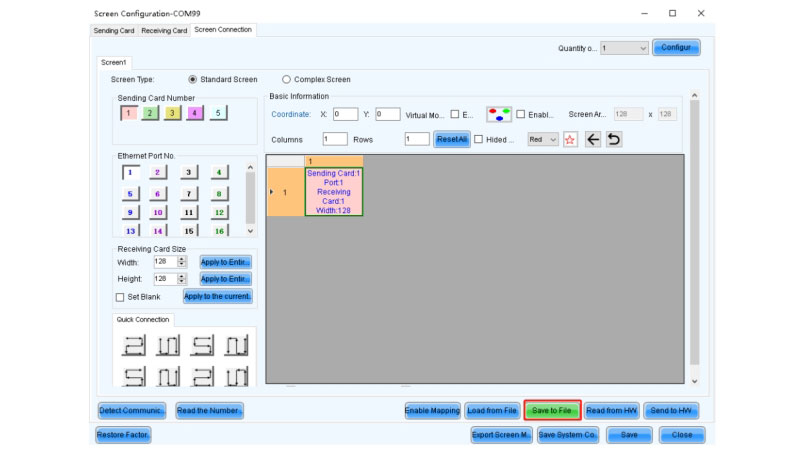
b. Then click Save to File on NovaLCT screen connection page shown as Figure 1 and save screen connection file.
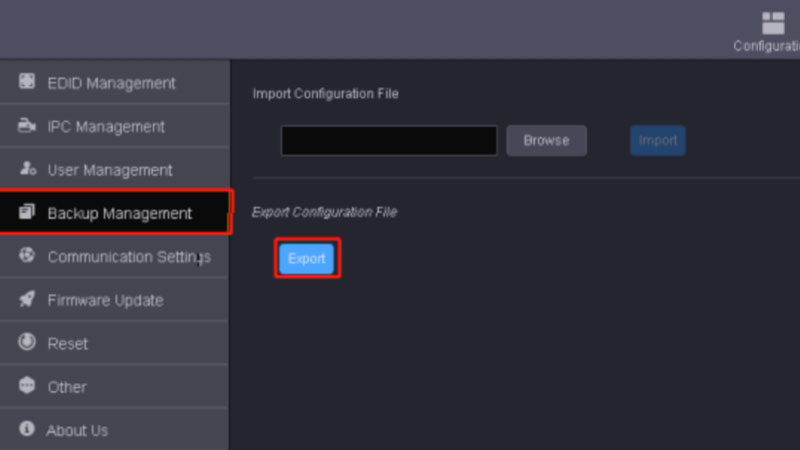
Login in H series splicer web control page and export configuration file on Settings/Backup Management.
c. For the backup H series splicer, screen Ethernet cable connection must be reversed and corresponded with the primary H series splicer. For example, backup H series splicer output slave card 1 port 1 corresponds to primary output slave card 1 port 1 and backup H series splicer output slave card 1 port 2 corresponds to primary output slave card 1 port 2 etc.
d. Load the primary H series splicer screen connection file to backup splicer with NovaLCT and import primary H series splicer configuration file into backup splicer with web control page.
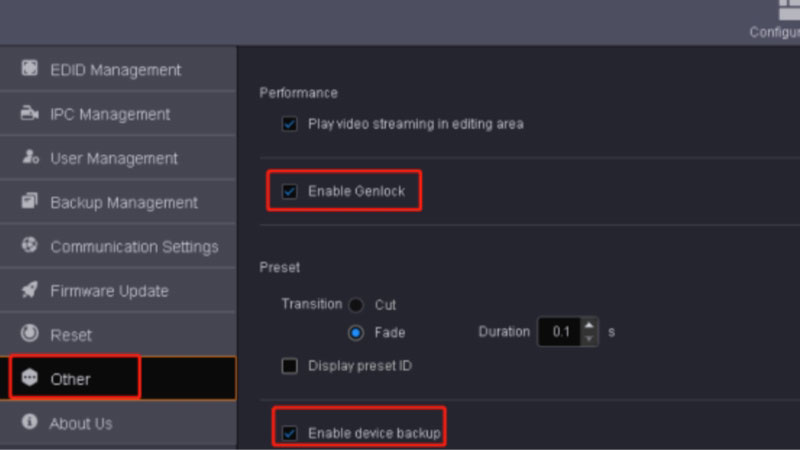
e. Connect primary and backup H series splicer separately. Select Enable Genlock and Enable device backup on Settings/Others.
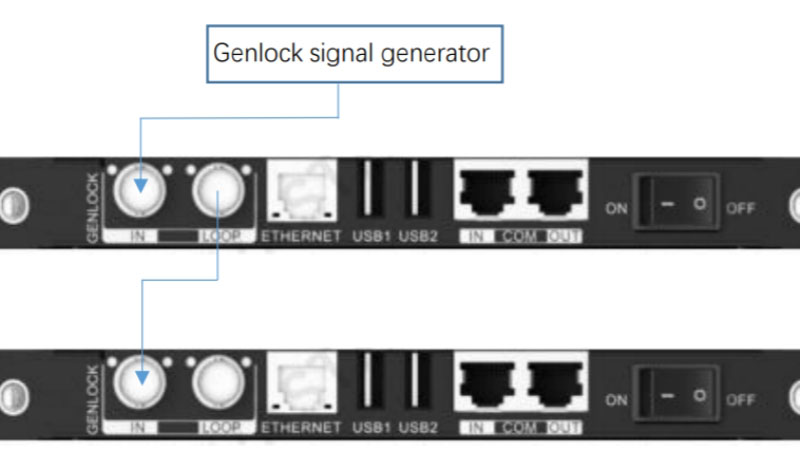
f. Use a genlock signal generator output the genlock signal to the primary and backup H series splicer separately or loop mode.
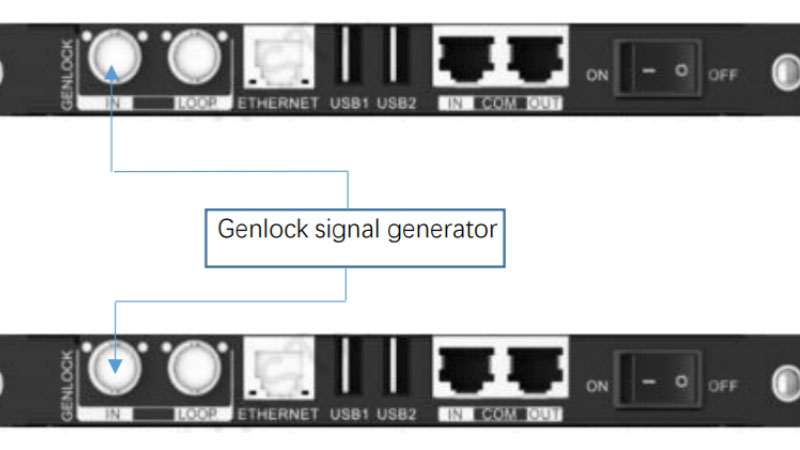
g. Connect the primary and backup H series splicer with NovaLCT and set the splicer as primary and backup separately.
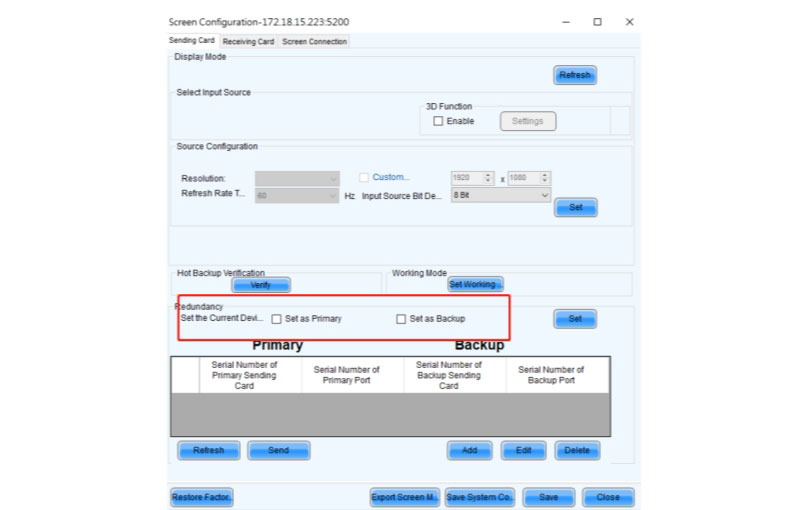
Tips:
1. The video source into two H series splicer must be synchronous.
2. The physical screen connection of the two H series must be reversed and corresponded which means the primary output slave card 1 port 1 corresponded to the backup output slave card 1 port 1,output slave card 1 port 2 corresponded to the backup output slave card 1 port 2 etc.
9.3 Can H Series Cascade Multi Unit? Can H2 Cascade with H5?
No, it cannot do cascade. But you can make all devices in the same network. Then, you can get to configure Novastar H2 and H5 seperately.
9.4 Does the H5 Support Odd Shapes or Angle of LED Display?
Yes, H5 can support odd shapes or angel LED screen.
9.5 What Is the Advantages and Disadvantages H5 Compare with the Normal Processor?
It has a big capacity, and is highly integrated, so you don’t have to use many devices to load a big LED screen. It’s also simple for using and maintainance. It’s heavier and bigger than normal processors of course.