
NovaStar MBOX600 Pro Industrial Controller Full Review
NovaStar MBOX600 Pro is an industrial LED display controller that combines a sending card and an industrial PC into one unit. It’s built for outdoor fixed screens and unattended deployments, and it comes with a web-based interface for both local and remote management.
This guide covers the full picture — specs, ports, setup steps, monitoring features, and more.
Table of Contents
1. What Is the NovaStar MBOX600 Pro?
Most outdoor LED screen setups need two things: a PC to handle content, and a sending card to push that content to the display. The MBOX600 Pro puts both into one box.
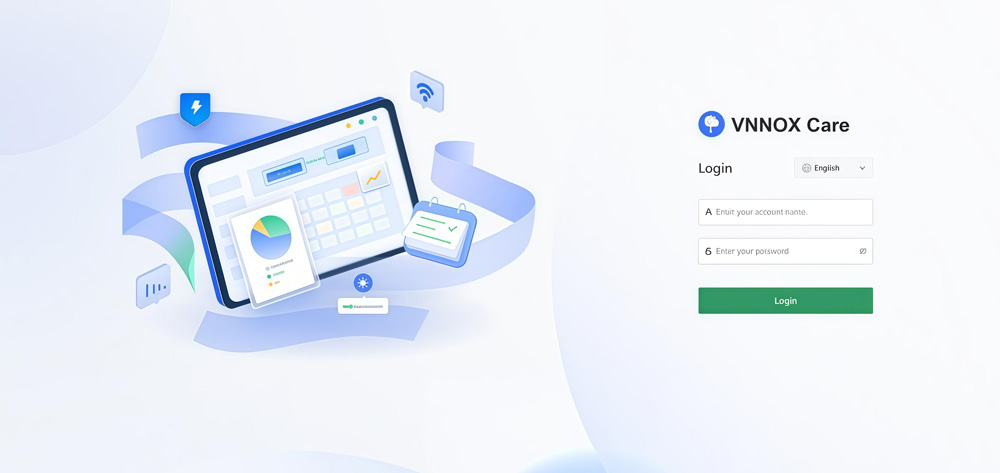
It runs on VNNOX Care Configuration, a browser-based app — so there’s no software to install on your end. Just open Chrome, type in the IP address, and you’re in.
The device supports Linux, Windows 10, and Windows 11. It also has SNMP support built in, which is useful if you’re managing multiple screens across different sites and need centralized monitoring.
Overall, it’s aimed at outdoor fixed installations — digital billboards, advertising displays, anything that runs unattended for long periods.
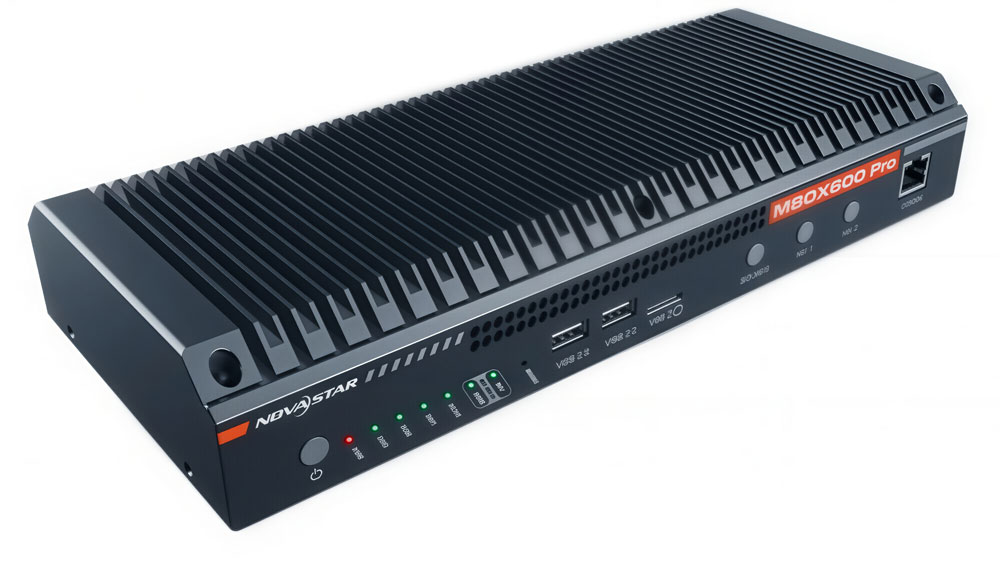
2. Specs, Ports, and Panel Overview
Before diving into the features, let’s first take a look at the hardware itself — the panel layout, core specs, and what connections are available.
2.1 Key Specifications at a Glance
Here’s a quick overview of the core specs:
| Parameter | Details |
| CPU | Intel® Processor N97, 4 cores / 4 threads, up to 3.6 GHz |
| RAM | 4 GB or 8 GB |
| SSD | 128 GB or 256 GB |
| Rated Power | 34W |
| Input Voltage | DC 12V, 3A |
| Operating Temperature | -20°C to +60°C |
| Storage Temperature | -40°C to +80°C |
| Dimensions | 319.0 × 135.3 × 45.5 mm |
| Net Weight | 1,778 g |
| OS Support | Linux, Windows 10, Windows 11 |
| Certifications | CE, RoHS, FCC, IC, UL, RCM, SRRC, CB |
The N97 is a quad-core chip with a 12W TDP and 24 EU integrated graphics. It’s not a powerhouse, but for LED display control and system monitoring, it handles the workload well.
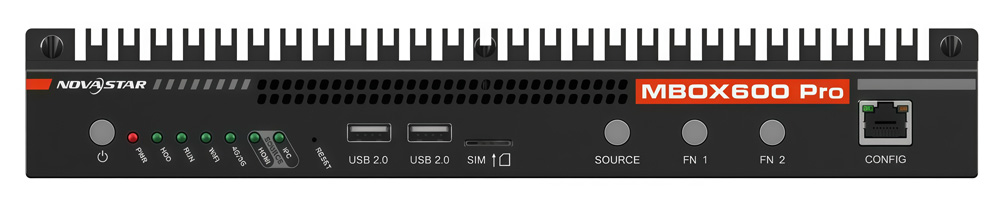
2.2 Inputs, Outputs, and Connectivity
Here’s a full breakdown of what ports and connections the MBOX600 Pro offers.

- Inputs
| Port | Details |
| HDMI Input | 1 × HDMI 1.3, up to 2048×1152 @ 60Hz, supports 24–120Hz frame rates, HDCP 1.4, no interlaced signal support |
- Outputs
| Port | Details |
| LED Output | 4 × Gigabit Ethernet, up to 2.6 million pixels total |
| HDMI Output | 1 × HDMI 1.3 |
| Audio Output | 1 × 3.5mm stereo (output only, no mic input) |
- Connectivity
| Connection | Details |
| USB | 2 × USB 2.0 (front) + 2 × USB 3.0 (rear) |
| Ethernet Control | 2 × Gigabit Ethernet (one for communication, one for remote management) |
| Light Sensor | 2 × Sensor connectors (SENSOR 1 & SENSOR 2) |
| Wi-Fi | Wi-Fi 5, 2.4G/5G dual band |
| 4G/5G | Supported via separately purchased module |
3. Key Features and Highlights
The MBOX600 Pro isn’t just about raw specs. So let’s look at what actually makes it stand out in real-world use.
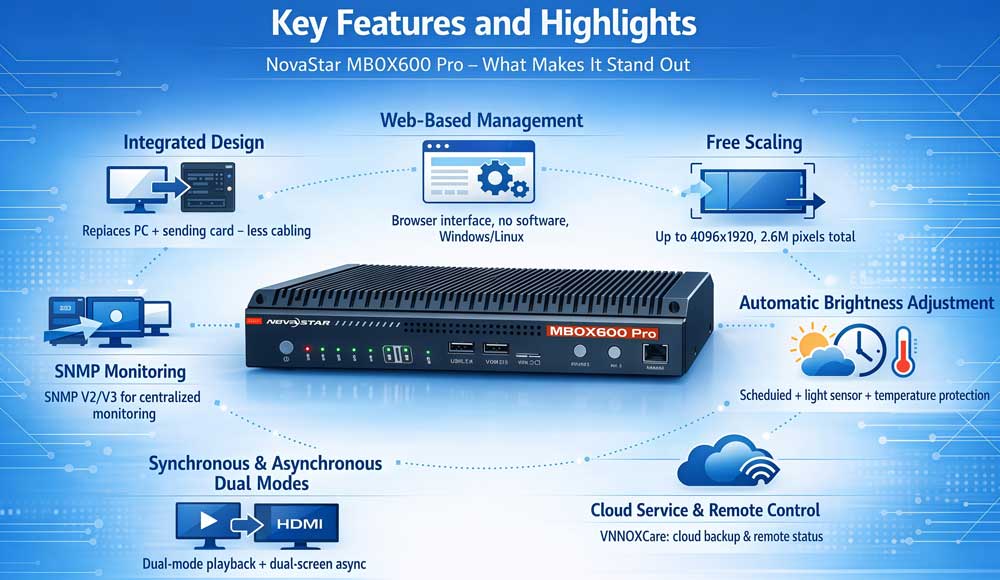
Integrated Design
Most LED screen setups require a separate PC and a separate sending card. The MBOX600 Pro combines both into one unit. This means less cabling, fewer devices to manage, and a simpler overall system. For outdoor installations where rack space is limited, that's a real advantage.
Automatic Brightness Adjustment
The device supports two approaches to brightness control. You can set scheduled brightness rules based on time of day, or connect a light sensor and let the device adjust brightness automatically based on ambient light levels. On top of that, there's also a temperature-based monitoring strategy — if the receiving card temperature gets too high, the system will automatically reduce brightness to protect the display.
Free Scaling
The MBOX600 Pro supports flexible output scaling. You can adjust the output resolution to match your screen layout without being tied to fixed presets. Width goes up to 4,096 pixels and height up to 1,920 pixels, as long as the total stays within the 2.6 million pixel limit.
SNMP Monitoring
The MBOX600 Pro supports SNMP V2 and V3. For operators managing multiple screens across different locations, this makes centralized monitoring much more practical. Instead of checking each screen individually, you can pull status data through your existing network management system.
Cloud Service and Remote Control
Through VNNOXCare, you can back up screen parameters to the cloud and monitor display status remotely. This is particularly useful for large deployments where on-site visits are costly or impractical.
Web-Based Management
Everything is controlled through a browser-based interface — no dedicated software needed. You can access it locally or from a remote PC on the same network. It works on both Windows and Linux, so you're not locked into a specific operating system.
Dual Modes
The MBOX600 Pro supports both synchronous and asynchronous playback modes. It also supports dual-screen asynchronous display, which gives operators more flexibility in how content is managed and distributed across different screens.
4. How to Log In and Access the Web Interface?
There are two ways to access the MBOX600 Pro — locally or from an external PC. Either way, you’ll need Chrome and the right IP address.
✔ Local Login
Connect a monitor, keyboard, and mouse to the device. Open Chrome and go to 127.0.0.1. That’s it.
✔ External PC Login
Connect your PC to the CONFIG port on the front panel via an Ethernet cable. Set your PC’s IP to the 192.168.0.xxx range, then open Chrome and go to 192.168.0.10.
Alternatively, connect both devices to the same router via the ETHERNET port on the rear panel and access it over LAN.
Default credentials:
| Username | admin |
| Password | SN2008@+ |
One thing to note — only one user can be logged in per account at a time. And after making any changes, wait at least 30 seconds before restarting the device.
5. Screen Configuration: Connecting Your Cabinets
Once you’re logged in, go to Screen Configuration in the left navigation bar. You’ll see two tabs — Device Configuration and Screen Connection. Work through them in order.
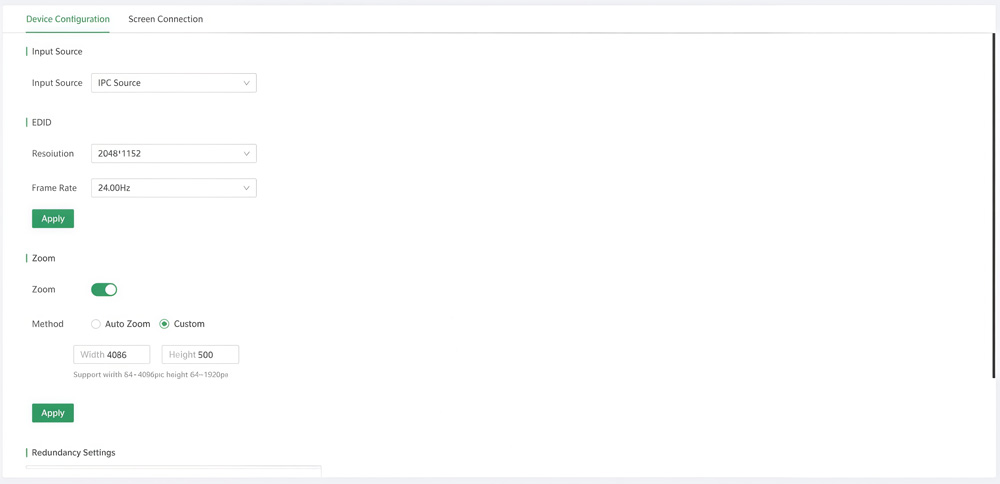
Part 1: Device Configuration
- Step 1: Choose your input source
Select either IPC source or HDMI source. This syncs with the SOURCE button on the front panel, so changing one changes the other.
- Step 2: Set your EDID
Pick a resolution and frame rate from the dropdown menus and click Apply. If the presets don’t fit your setup, enter a custom resolution — the supported range is 800×600 to 2048×1152.
- Step 3: Configure scaling (optional)
If your screen needs scaling, enable Zoom. Choose Auto Zoom to let the device fit the input automatically, or switch to Custom if you need a specific output size. Remember — width must be an even number, and total pixels can’t exceed 2.6 million.
- Step 4: Set up redundancy (optional)
Scroll down to Redundancy Settings. Click New to pair a master output port with a backup. If the primary port fails, the backup kicks in automatically.
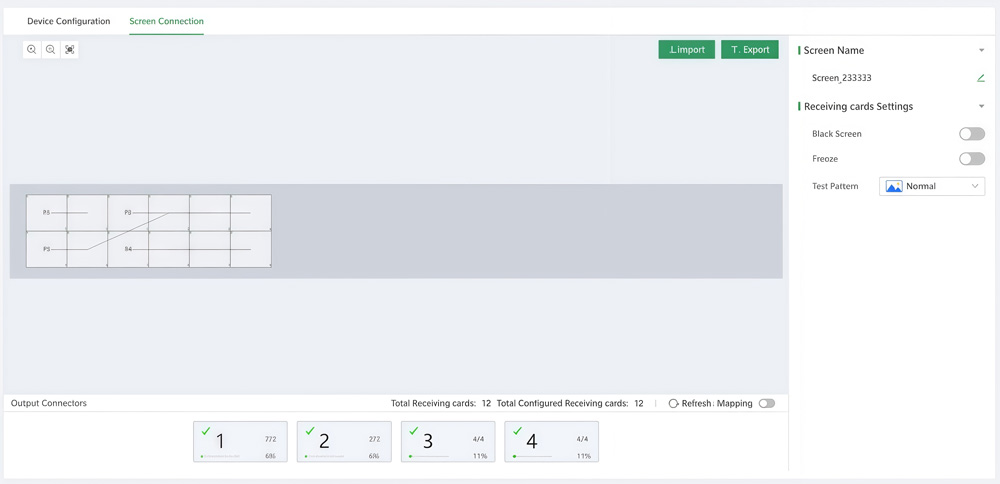
Part 2: Screen Connection
- Step 1: Add your cabinets
Select an output Ethernet port at the bottom of the page. Drag the corresponding number of cabinets onto the canvas — they connect automatically as you add them. Repeat this for each output port until all cabinets are mapped.
- Step 2: Verify the connection
Turn on Mapping to check whether the layout on screen matches your actual physical wiring. If a cabinet appears offline or outside the canvas, check the cable connection on that port.
6. Monitoring, Maintenance, and Cloud Backup
The MBOX600 Pro doesn’t just run your screen — it also gives you the tools to monitor it, maintain it, and manage it remotely. Let’s go through each part.
6.1 Brightness Control
For most outdoor screens, manually adjusting brightness every day isn’t realistic. So the MBOX600 Pro gives you two automated options.
The first is scheduled brightness. You set rules based on time of day — for example, lower brightness at night, higher during the day. Simple and predictable.
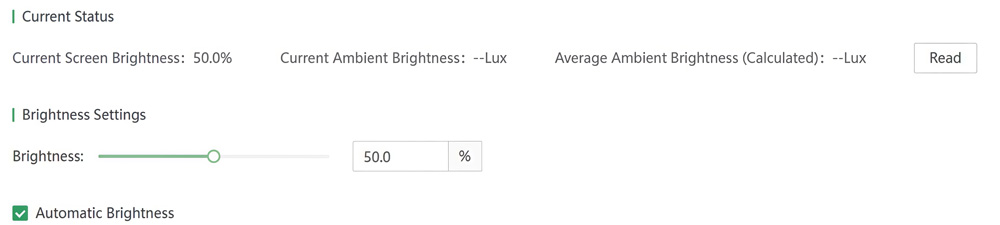
The second option is sensor-based. Connect a light sensor to the rear panel, and the device adjusts brightness automatically based on actual ambient light levels. You define a mapping table that links light intensity ranges to screen brightness percentages. If you don’t want to set this up manually, Quick Division lets you split a range into up to 20 sections in one go.
There’s also a temperature-based strategy. If the receiving card gets too hot, the system drops the brightness automatically to protect the display. While this is active, it overrides everything else — manual adjustments and scheduled rules both pause until the temperature comes back down.

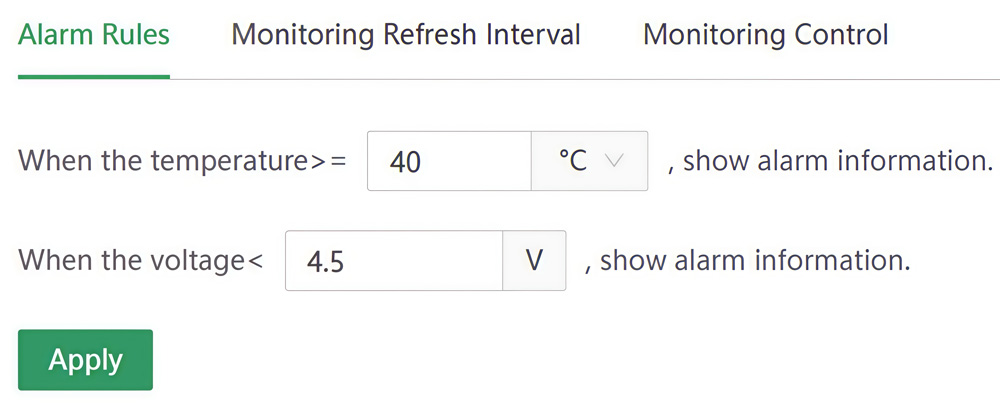
6.2 Alarm Rules
The device monitors receiving card temperature and voltage continuously. When either value drifts outside the normal range, it gets flagged — either as an alarm or a fault, depending on how far out it is.
Here are the default thresholds:
| Parameter | Normal | Alarm | Fault |
| Temperature | -20°C to +80°C | -30°C ~ -20°C or +80°C ~ +90°C | Below -30°C or above +90°C |
| Voltage | 3.3V to 5.5V | 3.2V ~ 3.3V or 5.5V ~ 6.0V | Below 3.2V or above 6.0V |
These thresholds are adjustable. If your hardware or environment calls for different limits, you can change them under Rule Configuration.
6.3 SNMP Monitoring
If you’re managing multiple screens across different locations, logging into each one individually gets old fast. The MBOX600 Pro supports SNMP V2 and V3, so you can pull status data directly into your existing network management system instead.
Just make sure Automatic Refresh is turned on — without it, SNMP won’t update properly.
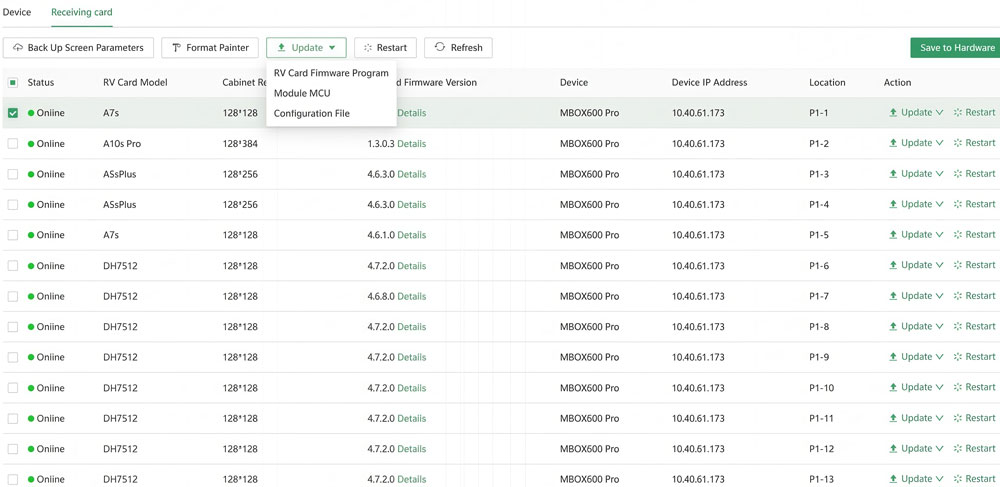
6.4 Firmware and Receiving Card Maintenance
Updating the device firmware is simple. Go to Maintenance, click Update, and upload the file. Use .exe for Windows or .deb for Linux. Each update package covers MCU, FPGA, Xserver, and LCT Lite all at once.
For receiving cards, you can update firmware, module MCU, and configuration files from the same page. If you have a lot of cabinets with the same configuration, the Format Painter tool saves a lot of time — copy the config from one cabinet and push it to as many others as you need.
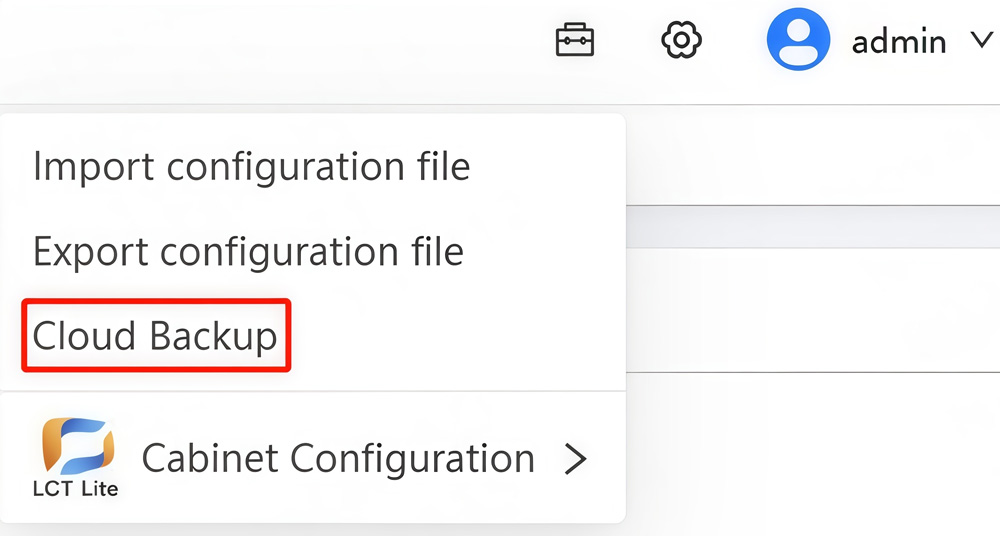
6.5 Cloud Backup
Through the Toolbox menu, you can sync everything to VNNOXCare — screen config, brightness settings, source parameters, and monitoring configuration. Once that’s done, you can check on your display remotely without needing to be on-site.
7. Who Should Use the NovaStar MBOX600 Pro?
The MBOX600 Pro is a pretty specific piece of kit. It’s not for everyone, so it’s worth being honest about who actually benefits from it.
- It's a good fit if you:
- Run large outdoor fixed LED screens that operate 24/7 with no one on-site
- Manage multiple screens across different locations and need centralized monitoring
- Want to simplify your setup by replacing a separate PC and sending card with one device
- Need remote access and cloud backup for screen parameters
- Work in advertising media, digital billboards, or rail transit display systems

- It's probably not the right choice if you:
- Are running a small indoor screen with simple playback needs
- Don’t need remote monitoring or cloud management
- Are looking for a budget controller — the MBOX600 Pro is an industrial-grade device and priced accordingly
The bottom line is this — if you’re dealing with large-scale, unattended outdoor deployments and need reliable remote management, the MBOX600 Pro makes a strong case for itself. But if your setup is straightforward and small, there are simpler options out there that will do the job without the extra complexity.
8. Price and Resources Download
Before you make a decision, here’s where to check pricing and grab the official documents you need.
8.1 MBOX600 Pro Price
The MBOX600 Pro is an industrial-grade device, and the price varies depending on the configuration — RAM, SSD, and regional standards all affect the final number. Rather than listing a fixed price here, the best way to get an accurate quote is to register on our platform and check directly.
8.2 MBOX600 Pro Specs and Manual Download
Here are the official documents for the MBOX600 Pro:
9. FAQ
Q: What operating systems does the NovaStar MBOX600 Pro support?
The MBOX600 Pro supports Linux, Windows 10, and Windows 11. Both the firmware update process and the web interface work across all three systems.
Q: Does the MBOX600 Pro come with a 4G/5G module?
No, it doesn’t. The device has a SIM card slot and supports 4G/5G connectivity, but the module itself needs to be purchased separately.
Q: How many pixels can the MBOX600 Pro drive?
The MBOX600 Pro can drive up to 2.6 million pixels across its four Gigabit Ethernet output ports.
Q: What happens if the primary Ethernet output port fails?
If you’ve set up redundancy, the backup port takes over automatically. No manual intervention needed.
Q: What is the default login for the MBOX600 Pro web interface?
The default username is admin and the default password is SN2008@+. It’s recommended to change the password after your first login.
10. Conclusion
The NovaStar MBOX600 Pro combines an industrial PC and a sending card into one unit, which makes it a practical choice for large outdoor LED screen deployments. Remote management, SNMP monitoring, automatic brightness control, and cloud backup — it covers most of what you’d need for an unattended installation.
It’s not the simplest device to set up, but once it’s running, it largely takes care of itself.
Have questions or want a quote? Register on our LED Screen Cloud Platform, and we’ll help you from there.