NovaStar TB60 Manual, Datasheet & Setup Guide | Taurus Series
The NovaStar TB60 is a Taurus series multimedia player that supports up to 2,300,000 pixels, runs synchronous and asynchronous modes, and manages LED displays remotely via cloud.
This page covers the full specs, manual, default password, configuration guide, firmware download, and price reference.
Table of Content:
1. Taurus TB60 Introduction
2. Full Specifications
3. Functions
4. What Is the Price of NovaStar TB60?
5. NovaStar TB60 Default Password & Factory Reset
6. NovaStar TB60 Configuration Guide
7. NovaStar TB60 vs TB50 vs TB30: Which One Do You Need?
8. NovaStar TB60 User Manual Download
9. FAQs
10. Conclusion
1. Taurus TB60 Introduction
The NovaStar TB60 is a multimedia player built for full-color LED displays. It combines playback and sending in one device, so you can push content and control the screen from a PC, phone, or tablet — no separate sending card needed. It works in both asynchronous and synchronous modes, supports up to 2,300,000 pixels, and connects to NovaStar’s cloud platform for remote management from anywhere.
Most people use it for commercial signage, retail displays, lamp-post screens, and smart city applications. If you’re comparing it to the TB30 or TB50, the main difference is loading capacity and port count — the TB60 is the most capable of the three.
2. NovaStar TB60 Full Specifications
The TB60 is a multimedia player that supports up to 2,300,000 pixels and runs on Android 11. It works in both asynchronous and synchronous modes, and connects to LED screens via 4 Gigabit Ethernet ports.
2.1 Output
| Parameter | TB60 Spec |
| Max loading capacity | 2,300,000 pixels |
| Max pixel width | 4,096 pixels |
| Max pixel height | 4,096 pixels |
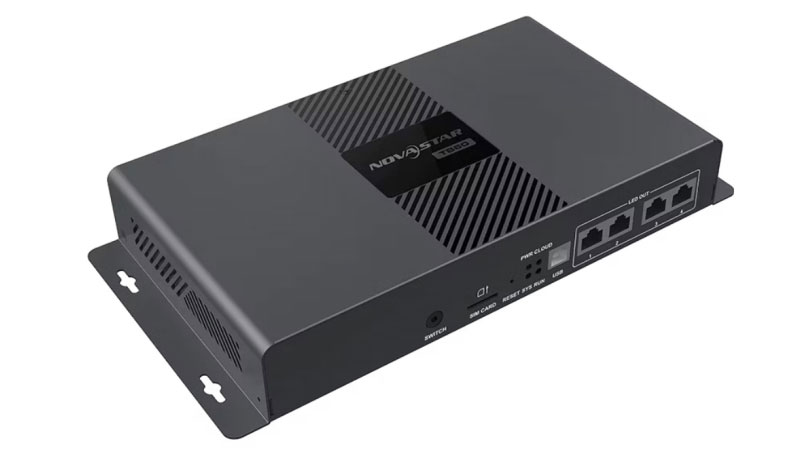
| LED output ports | 4x Gigabit Ethernet (all primary by default, or 2 primary + 2 backup) |
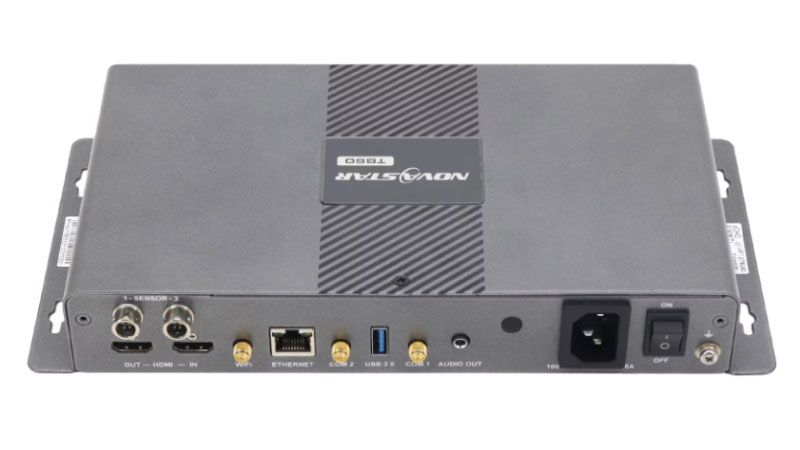
| HDMI OUT | 1x HDMI 1.3, max 1920×1200@60Hz, supports HDMI loop |
| Audio output | 1x stereo connector, fixed 48 kHz sample rate |
| Custom resolutions | Supported in both async and sync modes (pixel clock ≤ 153 MHz) |
2.2 Input
| Parameter | TB60 Spec |
| HDMI IN | 1x HDMI 1.3, max 1920×1200@60Hz |
| HDMI IN sync mode | Auto full-screen scaling (source width/height: 512–2048 px, max 1920×1080) |
| Sensor connectors | 2x (brightness sensor or temperature/humidity sensor) |
2.3 Control & Connectivity
| Parameter | TB60 Spec |
| USB | 1x USB 3.0 Type A (playback, firmware upgrade, storage expansion) |
| USB Type B | 1x (content publishing and screen control via PC) |
| Ethernet (control) | 1x Gigabit (LAN or internet, content publishing and monitoring) |
| Wi-Fi | 2.4 GHz, supports Wi-Fi AP and Wi-Fi Sta simultaneously |
| 4G | Optional — EC20 module, purchased separately |
| Network priority | Wired > Wi-Fi > 4G |
2.4 Performance
| Parameter | TB60 Spec |
| Processor | Quad-core ARM A55 @ 1.8 GHz |
| RAM | 1 GB |
| Internal storage | 32 GB |
| Operating system | Android 11 |
| Video decoding | H.264 (4K@30fps), H.265/HEVC (4K@60fps), MPEG4, VP8, VP9 |
| Simultaneous playback | 1x 4K, or 2x 1080p, or 5x 720p, or 6x 480p, or 6x 360p |
| Sync playback | Halves simultaneous stream count when enabled |
2.5 Power & Physical
| Parameter | TB60 Spec |
| Input power | 100–240V~, 50/60Hz, 0.6A |
| Max power consumption | 18W |
| Recommended supply | 25W |
| Dimensions | 274.3 × 139.0 × 40.0 mm |
| Net weight | 1,230.4 g |
| IP rating | IP20 |
| Operating temperature | –20°C to +60°C |
| Storage temperature | –40°C to +80°C |
| Humidity | 0% to 80% RH, non-condensing |
2.6 Synchronous Playback — Time Sync Methods
The TB60 supports three sync methods for multi-screen installations:
NTP — syncs all players to a network time server. Works over LAN or internet. No extra hardware needed. This is the recommended method for most setups.
RF — one TB60 acts as the master clock, others follow via radio signal. Requires the E32-433T30D-NW RF module installed in each unit. Good for locations where network sync isn’t reliable.
GPS — each TB60 syncs to GPS time independently. Requires the EC20 4G module and a SIM card. Best for outdoor installations spread across large areas.
Note: Enabling synchronous playback cuts the simultaneous video count in half. Plan your content resolution before enabling this feature.
3. Functions
The TB60 covers the full range of control, connectivity, and playback options you’d expect from a professional multimedia player.
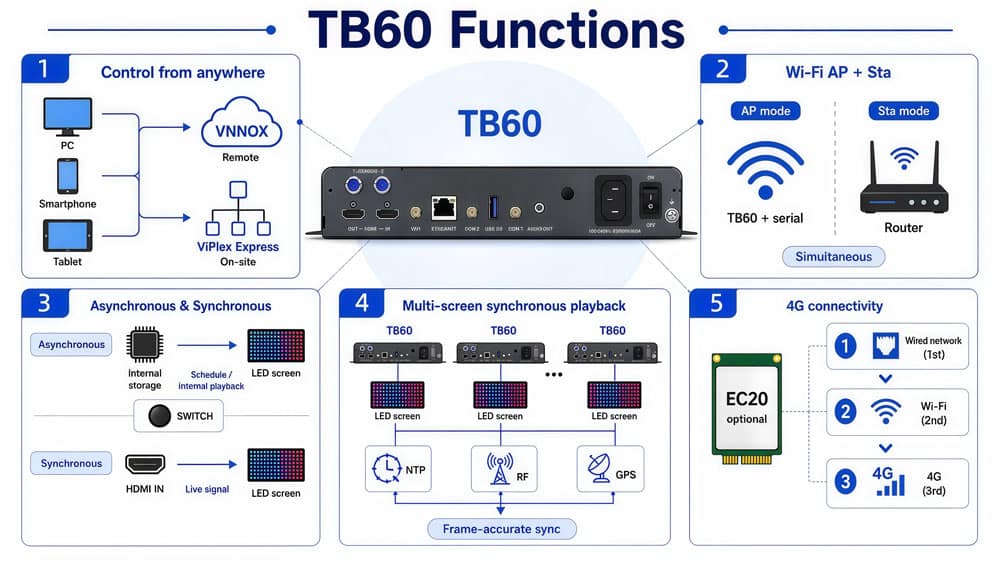
3.1 Control from anywhere
The TB60 lets you publish content and manage screens from a PC, phone, or tablet. On-site, ViPlex Express handles configuration and content pushing over a local network. Remotely, VNNOX gives you full control over schedules, monitoring, and time sync — as long as the TB60 has an internet connection.
3.2 Wi-Fi AP and Wi-Fi Sta
The TB60 runs both Wi-Fi modes at the same time. In AP mode, it broadcasts its own hotspot — the SSID is “TB60 + last 8 digits of the serial number” and the password is printed on the label on the device. In Sta mode, it connects to your existing router. You can run both simultaneously, which is useful when you need local hotspot access while the device is also connected to the internet.
3.3 Asynchronous and synchronous modes
In asynchronous mode, the TB60 plays content from its internal storage on a schedule. No live input needed. This is the standard mode for most signage setups.
In synchronous mode, it takes a live signal from the HDMI IN port and displays it on the screen in real time. Switch between the two using the SWITCH button on the front panel.
3.4 Multi-screen synchronous playback
When you need multiple TB60 units playing the same content in perfect sync, the TB60 supports three time sync methods: NTP over a local or public network, RF via the E32-433T30D-NW module, and GPS via the EC20 4G module. All three keep displays frame-accurate across units.
3.5 4G connectivity
The TB60 ships without a 4G module. If you need cellular connectivity for remote management, purchase the EC20 module separately. When multiple connections are available, the device follows this priority order: wired network first, then Wi-Fi, then 4G.
4. What Is the Price of NovaStar TB60?
The price of the NovaStar TB60 is approximately $400, offering excellent value for its range of capabilities. For the latest and most accurate pricing, we recommend visiting our LED Screen Cloud Platform. There, you can access detailed pricing information, explore special offers, and connect with our team for tailored advice on your display project.
5. NovaStar TB60 Default Password & Factory Reset
Default login password: 123456
Default Wi-Fi password: printed on the SSID label on the device
That covers 90% of what people come here looking for. If you need more detail — how to connect, how to reset, what the indicator lights mean — keep reading.
5.1 Default Password
The TB60 uses 123456 as the default password for both ViPlex Express and ViPlex Handy. It’s the same across the full Taurus series — TB30, TB40, TB50 all use the same default.
For Wi-Fi, the SSID shows up as “TB60 + last 8 digits of the serial number”. The Wi-Fi password is not 123456. It’s printed on the label stuck to the device body. Check the label before you try to connect.
5.2 How to Log In
(1) On a PC — ViPlex Express
Open ViPlex Express → go to Terminals → click Refresh → hover over the TB60 → click Connect → enter 123456 → done. The status dot turns green when you’re in.
(2) On a phone — ViPlex Handy
Connect your phone to the TB60’s Wi-Fi hotspot first. Then open ViPlex Handy → Local Devices → tap Connect → enter 123456 → tap the device name to get into settings.
ViPlex Handy works fine for basic setup. For anything more involved — custom resolutions, synchronous playback, bulk configuration — use ViPlex Express on a PC instead.
5.3 Forgot the Password? How to Reset
Locate the RESET button on the front panel (between the SIM card slot and the SYS indicator). Power the device on, wait for it to fully boot, then hold RESET for 5 seconds. The TB60 reboots and returns to factory defaults — password back to 123456, Wi-Fi SSID back to default.
Before you reset: this wipes everything. Screen config, content schedules, network settings — all cleared. Export your settings in ViPlex Express first if you can.

5.4 Indicator Lights — Quick Reference
| Indicator | Status | Meaning |
| PWR (red) | Solid on | Power normal |
| SYS (green) | Flashes every 2s | System running normally |
| SYS (green) | Solid on or off | System error |
| CLOUD (green) | Off | No internet |
| CLOUD (green) | Solid on | Internet connected |
| CLOUD (green) | Flashes every 2s | Connected to VNNOX |
| RUN (green) | Flashes every 0.5s | FPGA normal |
| RUN (green) | Flashes every 4s | No video source |
If SYS stays solid after a reset, it’s usually a firmware issue, not hardware. Try reflashing via USB before anything else.
6. NovaStar TB60 Configuration Guide
The TB60 supports three connection methods: Ethernet, wired LAN, and Wi-Fi. Which one you use depends on your site setup. Most permanent installations go with Ethernet. Wi-Fi works fine for temporary setups or on-site adjustments.
Step 1 — Connect the TB60 to Your Network
(1) Ethernet (most common)
Plug an Ethernet cable directly from the TB60’s ETHERNET port into your router or switch. In ViPlex Express, go to the terminal settings and turn off DHCP, then assign a static IP. This keeps the device address stable across reboots — important for permanent installations.

(2) Wi-Fi AP (no router needed)
The TB60 broadcasts its own Wi-Fi hotspot out of the box. Connect your PC or phone directly to it. The SSID format is TB60 + last 8 digits of the serial number, and the password is on the label. No router, no extra configuration — useful when you’re setting up on-site without a local network.
(3) Wi-Fi Sta (connect TB60 to existing Wi-Fi)
If you want the TB60 on the same network as everything else, connect it to your router via Wi-Fi Sta mode. In ViPlex Express, go to Terminal Control → Network → Wi-Fi, and select your network. The TB60 also supports running Wi-Fi AP and Wi-Fi Sta at the same time, so you can keep the hotspot active while it’s connected to your router.
Network priority order when multiple connections are active: Wired > Wi-Fi > 4G.


Step 2 — Choose Your Playback Mode
Before pushing any content, decide which mode you need. The TB60 supports two:
Asynchronous mode — the TB60 stores content locally and plays it back on its own schedule. No live input needed. This is the standard mode for most digital signage applications — retail displays, lobby screens, billboard content.
Synchronous mode — the TB60 takes a live video signal from the HDMI IN port and displays it in real time. Use this when you need to show live video, presentations, or broadcast content directly on the LED screen.
Switch between modes using the SWITCH button on the front panel. When the SWITCH indicator stays on, the device is in synchronous mode. When it’s off, you’re in asynchronous mode.
Step 3 — Push Content with ViPlex Express
ViPlex Express is the main software for TB60 configuration and content management on Windows. Download it from the NovaStar software page.
Once you’re connected and logged in (default password: 123456):
To publish content:
Go to Solutions → create a new solution → add your media files → set the playback schedule → click Publish. The TB60 downloads the content and starts playing according to the schedule.
To configure the screen output:
Go to Terminal Control → Screen Configuration. Set the resolution, Ethernet port connections, and pixel layout to match your actual LED panel setup. The TB60 supports up to 2,300,000 pixels, with a maximum width and height of 4,096 pixels each.
To set a custom resolution:
The TB60 supports non-standard resolutions in both asynchronous and synchronous modes. Go to Screen Configuration → Custom Resolution. The pixel clock for custom resolutions cannot exceed 153 MHz.
Step 4 — Set Up Multi-Screen Synchronous Playback (Optional)
If you’re running multiple TB60 units playing the same content in sync — like a video wall across several separate cabinets — you need to enable synchronous playback and set up time synchronization.
The TB60 supports three sync methods:
NTP (recommended for most setups)
All TB60 units sync their clocks to an NTP server over the network. In ViPlex Express, go to Terminal Control → Time Synchronization Management → select all target devices → check “Auto sync time with NTP server” → apply.
RF synchronization
One TB60 acts as the master device and the others follow it via RF signal. Requires the E32-433T30D-NW RF module installed in each unit. The master device sets the time reference — it doesn’t load a screen itself.
GPS synchronization
Requires the EC20 4G module and a SIM card installed in each TB60. In ViPlex Express, go to Time Synchronization Management → select GPS → apply.
Note: When synchronous playback is enabled, the number of videos the TB60 can play simultaneously is halved. Plan your content resolution accordingly.

Quick Configuration Checklist
Step | Task | Tool |
1 | Connect TB60 to network | Physical cable / Wi-Fi settings |
2 | Log in with default password 123456 | ViPlex Express or ViPlex Handy |
3 | Set playback mode (async / sync) | SWITCH button on front panel |
4 | Configure screen resolution and port layout | ViPlex Express → Screen Configuration |
5 | Upload content and set schedule | ViPlex Express → Solutions |
6 | Enable time sync if running multiple screens | ViPlex Express → Terminal Control |
7. NovaStar TB60 vs TB50 vs TB30: Which One Do You Need?
People often ask this when budgeting a project: the TB30, TB50, and TB60 all run the same software and look almost identical from the outside. But the loading capacity gap between them is significant — and that’s usually what determines which one actually fits your screen.
The short answer:
TB30 → small single screens, retail shelves, door headers
TB50 → mid-size screens, chain stores, lamp-post displays
TB60 → large screens, multi-cabinet video walls, complex setups
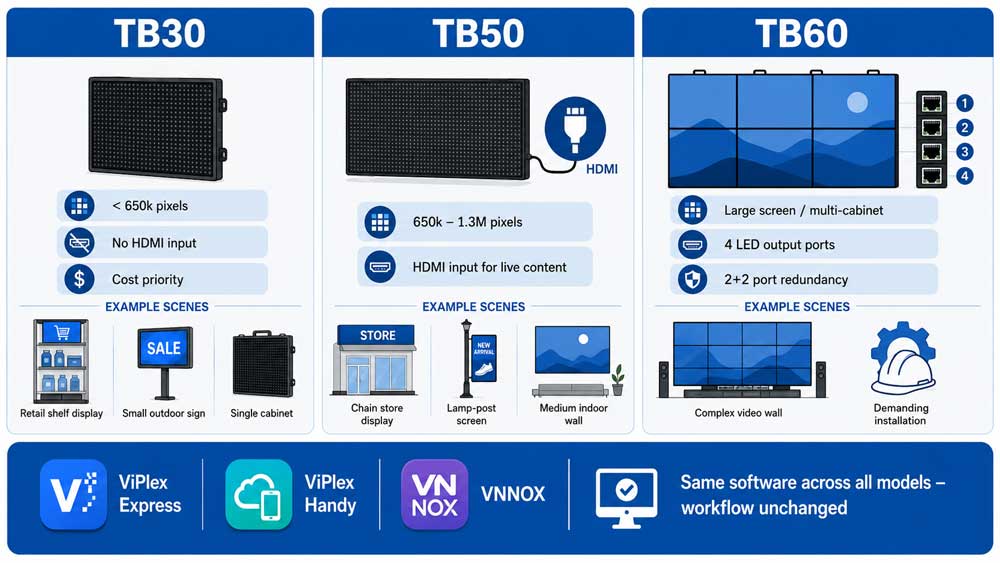
Side-by-Side Comparison
| Spec | TB30 | TB50 | TB60 |
| Loading capacity | 650,000 pixels | 1,300,000 pixels | 2,300,000 pixels |
| LED output ports | 2x Gigabit (1 primary + 1 backup, fixed) | 2x Gigabit (both primary by default, or 1+1) | 4x Gigabit (all primary by default, or 2+2) |
| HDMI IN | No | Yes (1x HDMI 1.3) | Yes (1x HDMI 1.3) |
| HDMI OUT | No | Yes (1x HDMI 1.3, max 1920×1200@60Hz) | Yes (1x HDMI 1.3, max 1920×1200@60Hz) |
| Sync/Async switch | Async only | Yes (front panel SWITCH button) | Yes (front panel SWITCH button) |
| Processor | Quad-core ARM A55 @1.8 GHz | Quad-core ARM A55 @1.8 GHz | Quad-core ARM A55 @1.8 GHz |
| RAM | 1 GB | 1 GB | 1 GB |
| Internal storage | 32 GB | 32 GB | 32 GB |
| Video playback | 1x 4K / 2x 1080p / 5x 720p | 1x 4K / 2x 1080p / 5x 720p | 1x 4K / 2x 1080p / 5x 720p |
| NTP / RF / GPS sync | Yes | Yes | Yes |
| 4G module support | Optional (separate purchase) | Optional (separate purchase) | Optional (separate purchase) |
| Operating temp | –20°C to +60°C | –20°C to +60°C | –20°C to +60°C |
| Power consumption | Max 18W | Max 18W | Max 18W |
| Dimensions | 274.3 × 139.0 × 40.0 mm | 274.3 × 139.0 × 40.0 mm | 274.3 × 139.0 × 40.0 mm |
Which One Should You Buy?
Go with the NovaStar TB30 if your screen is under 650,000 pixels, you don’t need live video input, and cost is a priority. It’s a solid choice for retail shelf displays, small outdoor signage, and single-cabinet setups.
Go with the NovaStar TB50 if your screen falls between 650,000 and 1.3 million pixels, or if you need HDMI input for live content. It covers the mid-range market well — chain store displays, lamp-post screens, and medium indoor walls.
Go with the NovaStar TB60 if you’re running a large screen or a multi-cabinet video wall, need 4 LED output ports for complex wiring, or want maximum redundancy with 2+2 port configuration. It’s the top of the Taurus series and handles the most demanding installations.
All three models run the same software — ViPlex Express, ViPlex Handy, and VNNOX — so switching between them doesn’t change your workflow at all.


8. NovaStar TB60 User Manual Download
Our NovaStar Software download page is your central hub for all official TB60 resources, including firmware updates, software, user manuals, and configuration guides.
You can quickly and easily access everything you need to set up, operate, and optimize your NovaStar products for a seamless LED display experience. We recommend checking this page regularly for the latest updates and tools.
9. FAQs
The TB60 is online but my screen isn't displaying anything. What's wrong?
Check the RUN indicator on the front panel. If it's flashing every 4 seconds, the FPGA has no video source — meaning the TB60 hasn't received a valid screen configuration yet. Open ViPlex Express, go to Screen Configuration, and verify that the resolution and Ethernet port layout match your actual LED panel setup.
How many screens can the TB60 drive at the same time?
One TB60 drives one logical screen, but that screen can span multiple LED cabinets as long as the total loading capacity remains within 2,300,000 pixels. If you need multiple independent screens showing different content, each screen requires its own TB60.
Can the TB60 play 4K video?
Yes. The TB60 supports H.265/HEVC 4K video at 60fps and H.264 4K video at 30fps. However, it can play only one 4K stream at a time. For multiple simultaneous video streams, 1080p content is recommended.
What happens to playback if the internet goes down?
Nothing. In asynchronous operation, all content is stored locally on the TB60's 32 GB internal storage. The screen continues playing the last published schedule even if the network connection is lost. Internet access is only required for content publishing and remote management through VNNOX.
Can I use a 4G SIM card with the TB60?
Yes, but the 4G module is sold separately. You must install a compatible EC20 4G module before inserting a SIM card. The network priority order is Ethernet, then Wi-Fi, then 4G, so 4G is used only when wired and Wi-Fi connections are unavailable.
10. Conclusion
The NovaStar TB60 handles up to 2.3 million pixels, supports both sync and async modes, and ties into cloud platform for remote management. It’s a solid pick for large screens and multi-cabinet video walls. If your screen is smaller, the TB50 or TB30 will do the job at a lower cost.
For pricing and configuration file downloads, register LedInCloud and our team will take it from there.