The NovaStar J6 switcher is a professional-grade video processor built for multi-screen display, seamless switching, and live production control. It’s designed to handle complex setups with multiple inputs, high resolutions, and layered visuals—without dropping a frame.
In the sections below, we’ll walk through what it does, how it works, and where it fits best.
Table of Contents:
1. What Is the NovaStar J6 Switcher?
2. Main Features of the NovaStar J6 Processor
3. Inputs, Outputs, and Connectivity Options
4. How to Control the Nova Star J6?
5. Preset, Transition, and Background Setup Guide
6. Typical Application Scenarios
7. J6 Vs. NovaStar N9
8. NovaStar J6 Price
9. NovaStar J6 Manual and Software Download
10. Conclusion
1. What Is the NovaStar J6 Switcher?
The J6 isn’t just a switcher—it’s the central hub developed by NovaStar Technology for visual control. Think of it as the traffic controller for your video signals. It takes up to eight different input sources—computers, cameras, media players—and lets you send them to a large LED display or multiple screens, all in real time.
It supports two working modes. In Splicer mode, you can stitch multiple DVI outputs into one giant screen layout—ideal for ultra-wide LED walls. In Switcher mode, it lets you preview layouts and switch them live, using smooth transitions like fade or cut. That’s perfect for live productions where you need full control over what goes on screen and when.
But the J6 isn’t only about switching. It also lets you layer content, scale videos, add background images, and manage presets—all through a single unit. There’s no need for a separate scaler or background generator. It’s built into the same box.
This flexibility makes the NovaStar J6 especially useful for rental setups, touring events, or venues with dynamic screen layouts. It doesn’t try to automate everything—it gives you the manual control professionals actually want.
2. Main Features of the NovaStar J6 Processor
What sets the NovaStar J6 apart isn’t just that it can handle 4K—it’s how it manages complex visual setups with precision and flexibility.
4K Input and Output Support
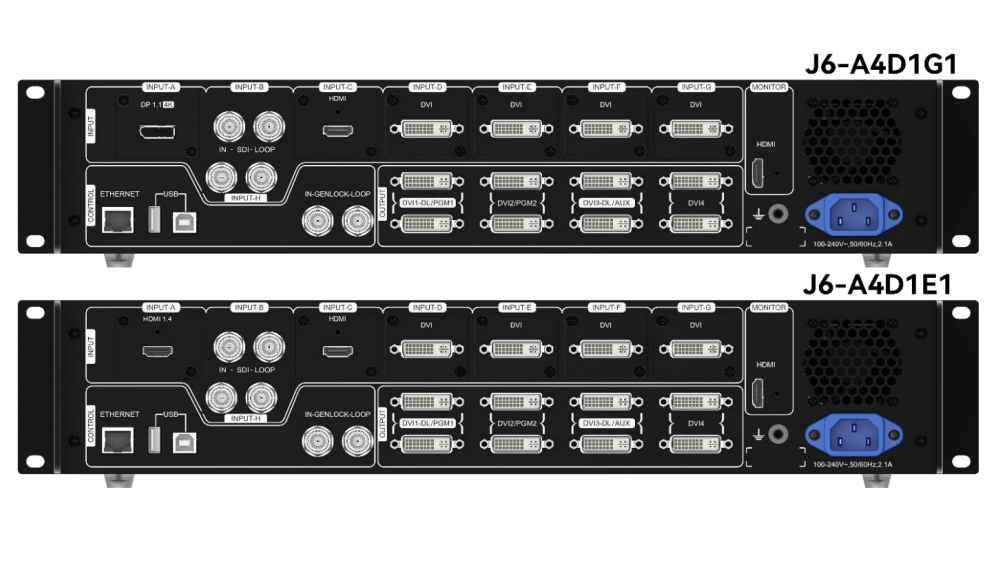
The J6 accepts up to 4K×2K @ 60Hz through its DP 1.1 input. This allows high-resolution video playback without scaling loss. For output, it uses four DVI connectors that can be combined into a large spliced screen or used independently for multi-display setups.
Multiple Input Types
You’re not locked into one format. The J6 supports DP, HDMI 1.4, DVI, and SDI inputs. That makes it easy to work with different source devices—laptops, broadcast cameras, media servers—without needing external converters.
Each input card slot is modular, and you can mix them based on your needs. This flexibility matters a lot in rental or touring situations, where the setup can change from event to event.
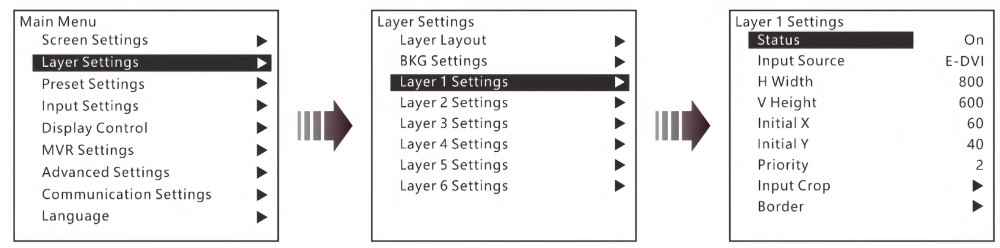
Up to 6 Layers
You can place up to six layers (video windows) on screen at once. That includes your main content, picture-in-picture (PIP), logos, countdowns, or any other overlay. Each layer is fully adjustable—position, size, and priority order. You can even add borders or crop specific content.
This layered control is especially useful when switching between speakers, combining live feeds and graphics, or running multiple sources on one screen.
Built-In Scaling and Seamless Switching
The J6 handles scaling internally. You don’t need to resize your source to match the screen—it does it for you in real time. When switching between inputs or presets, it can apply smooth fade or instant cut transitions. These transitions are hardware-level, meaning no lag or black screens.
Dual-Mode Operation: Splicer and Switcher
In Splicer mode, you treat the output as one big canvas. Great for LED walls or ultra-wide installations.
In Switcher mode, you get a two-stage workflow: preview your layout (PVW), then push it live (PGM). This is ideal for live productions that need control and flexibility.
Presets and Scene Management
You can store up to 32 presets, including layouts, layer settings, and input mappings. This helps speed up show control—switching from a presentation layout to a video playback layout takes just one click.
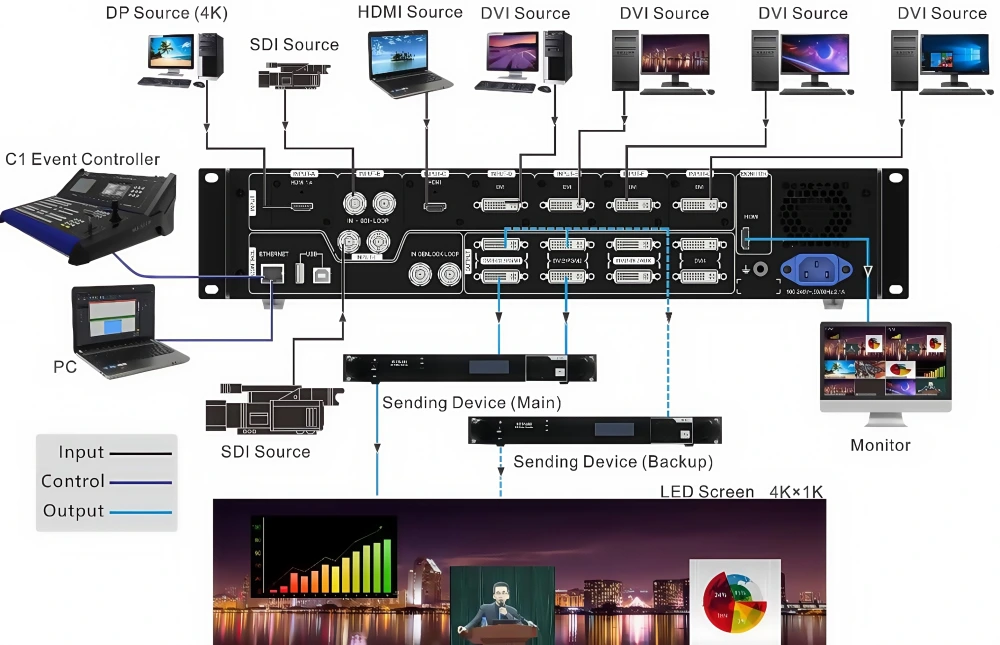
Presets can be recalled manually or through an external controller (like NovaStar’s C1 console), allowing for real-time scene switching without menu diving.
Front Panel + Software + Console Control
Control the J6 directly via its front panel, through V-Can software, or by using a NovaStar C1 console. No matter how you prefer to work—hands-on, touchscreen, or controller—you’re covered. We’ll go deeper into control options in the next section.
In short, the NovaStar J6 is not just a processor—it’s a fully manual, real-time control unit that puts every part of the screen in your hands. Whether you’re running a live show or managing fixed installation displays, it’s built to adapt without slowing you down.
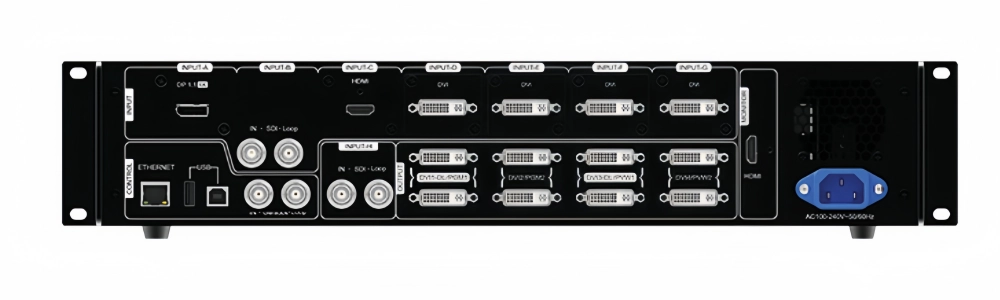
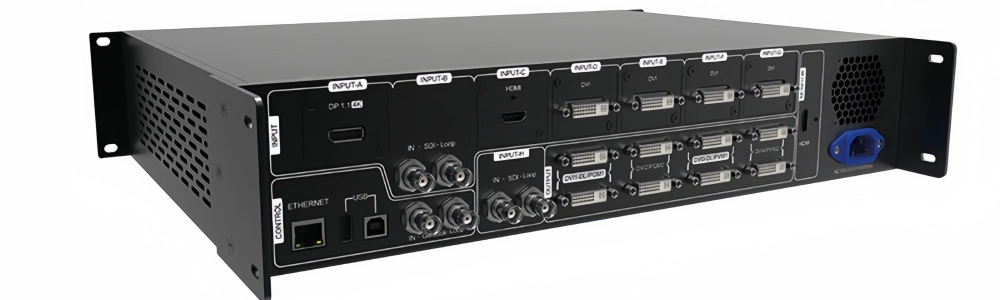
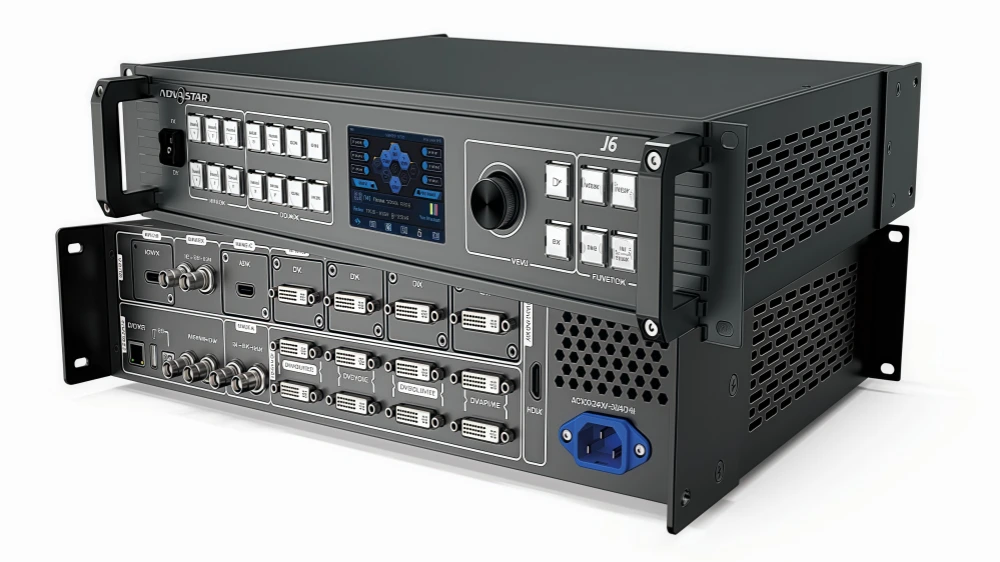
3. Inputs, Outputs, and Connectivity Options
When you’re setting up a screen system, half the battle is getting everything to connect properly. The NovaStar J6 gives you enough flexibility to handle most setups without extra gear. Here’s how it handles inputs and outputs.
| Type | Connector |
| Input | DP 1.1 |
| HDMI 1.4 | |
| DVI | |
| 3G-SDI | |
| Output | DVI |
| Analog Audio | |
| Control | Ethernet |
| USB (Type-B) | |
| RS232 | |
| Sync | Genlock In |
| Genlock Loop |
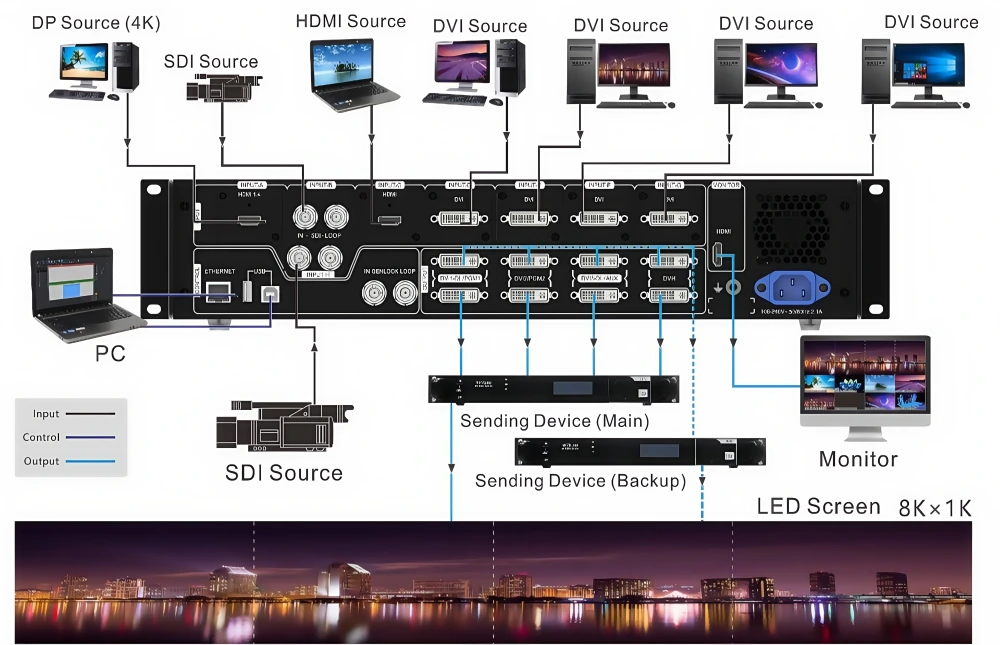
3.1 8 Inputs, 4K Supported
The J6 supports up to 8 input sources, and you can mix and match different types:
- 1x DP 1.1 (up to 4K×2K @ 60Hz)
- 2x HDMI 1.4
- 2x DVI
- 1x SDI
Optional slots for other signal types (HDBaseT, VGA, etc.)
These inputs are modular, so you can swap or upgrade cards depending on the gear you’re using. If you’re working with various laptops, cameras, or playback systems, this setup makes life easier—you won’t need a pile of converters.
3.2 4 DVI Outputs for Splicing or Multi-Screen
On the output side, the J6 offers four DVI outputs, which you can use in two ways:
- Splicer Mode: Stitch them together into one wide, seamless screen. Ideal for LED walls.
- Independent Output Mode: Send different content to separate screens.
You can adjust the resolution, refresh rate, and screen mapping from the front panel or via software. This makes it easy to adapt to LED cabinets with different pixel pitches or screen sizes.
3.3 Genlock and Sync Support
For live video applications, sync is everything. The J6 supports:
- Genlock input: for frame-accurate syncing with other broadcast gear
- Genlock loop out: to pass the sync signal to other devices
- Analog audio output: to route audio from embedded signals (like HDMI or SDI)
This matters when you’re running live shows, where timing between audio and video must be spot-on.
3.4 USB, LAN, and RS232 Control Ports
For control and communication, the J6 gives you multiple options:
- USB: for direct PC connection and firmware updates
- LAN (Ethernet): for software control using NovaStar V-Can or linking with external devices
- RS232: for serial command integration in control rooms or automation systems
This means you can use it in a simple stand-alone setup, or tie it into a larger control network—it’s flexible either way.
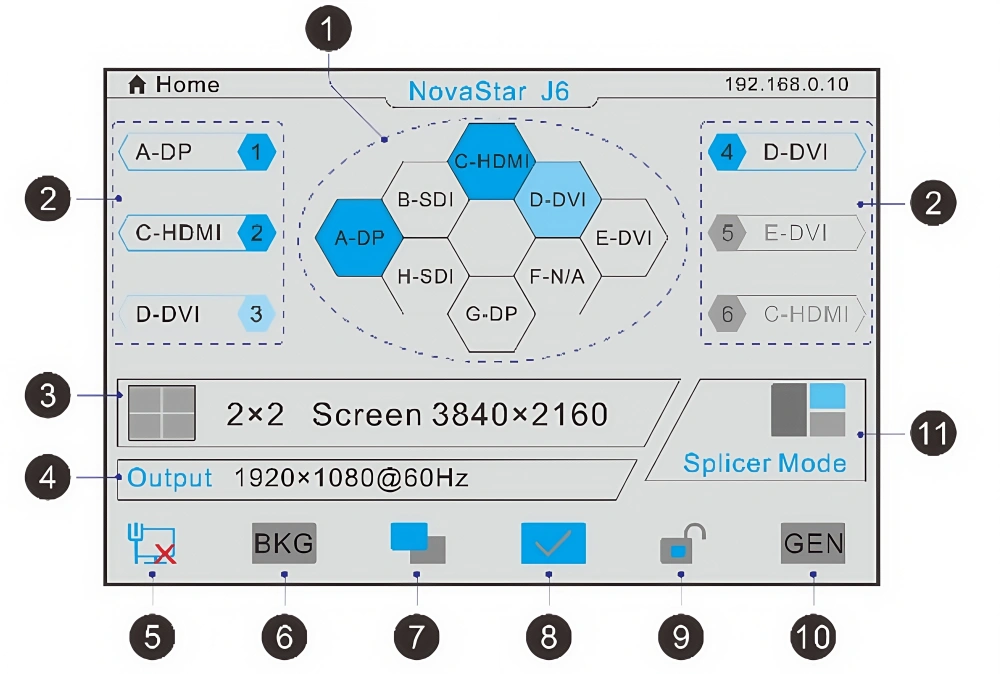
3.5 Monitoring and Feedback
The front panel includes an LCD screen and physical buttons for on-the-fly control. You can view signal status, switch inputs, load presets, and monitor output resolution directly—no computer required.
In short, you can think of the NovaStar J6 as a signal hub. It accepts most common video formats, outputs to different screen setups, and keeps everything in sync. Whether you’re feeding an LED wall, stage display, or multiple confidence monitors, it’s built to connect smoothly without extra boxes or workaround cables.
4. How to Control the Nova Star J6?
The NovaStar J6 gives you more than one way to take control—which is a good thing, because not every event runs the same way. Whether you prefer hands-on buttons, software, or a control console, the J6 gives you options that actually make sense on-site.
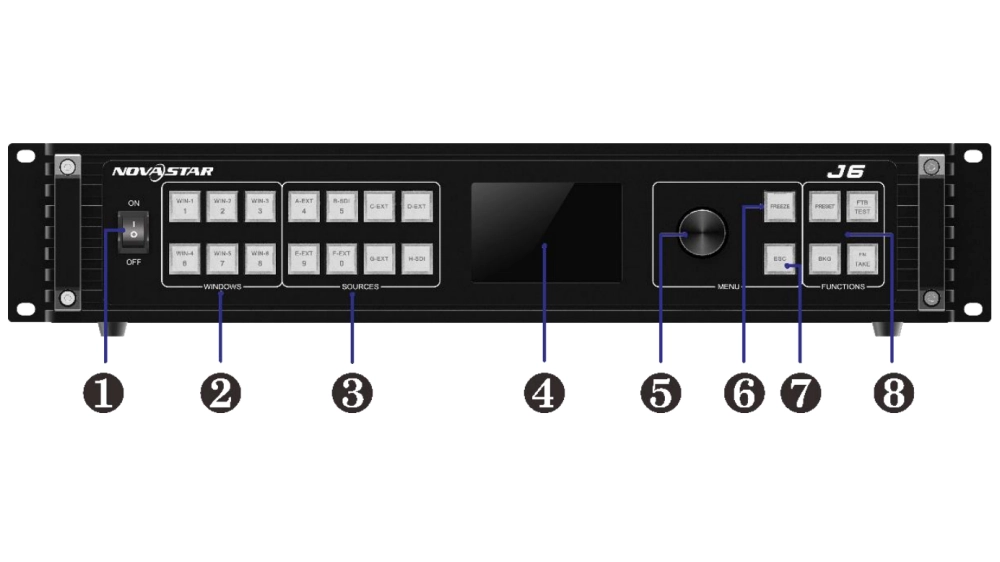
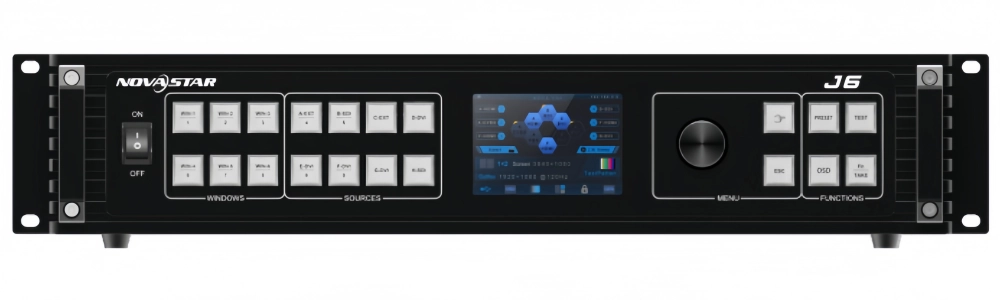
Option 1: Front Panel Operation
If you like having physical control at your fingertips, the J6’s front panel is solid. It comes with:
- A bright LCD screen that shows your active inputs, output status, and layers
- Navigation knobs and buttons for switching, loading presets, and adjusting layers
- A Take button for live switching between preview (PVW) and program (PGM) in Switcher mode
This method is great when you’re standing next to the rack or working solo on smaller events. It’s responsive and doesn’t rely on a network or PC connection.
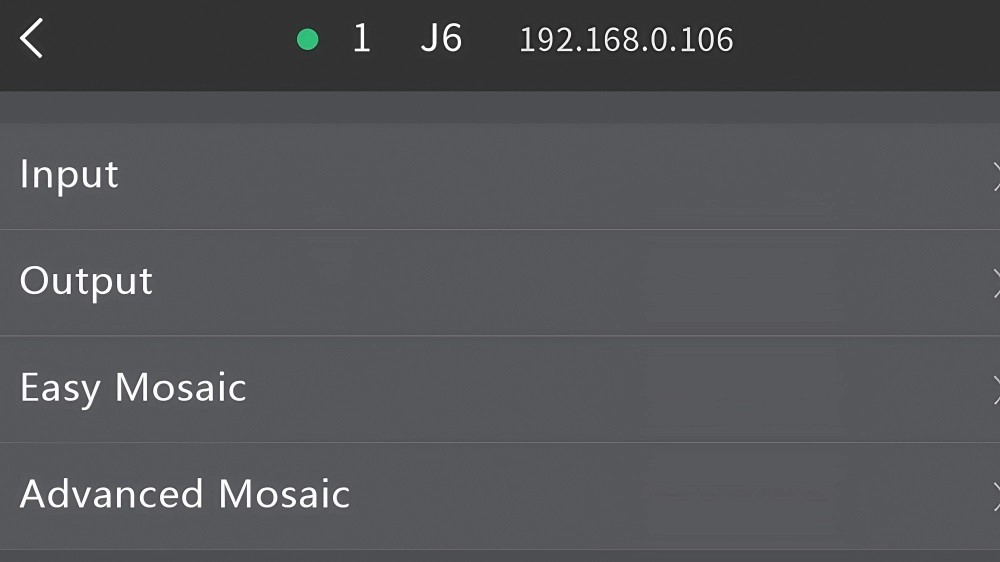
Option 2: V-Can Software (for PC)
For more complex setups, or when you’re seated at a tech desk, NovaStar V-Can software gives you a full visual interface. You can:
- Drag and drop inputs onto screen layouts
- Adjust layer sizes and positions in real time
- Store and manage presets
- Control transitions and background settings
- Monitor signal status across all inputs and outputs
The software connects via USB or LAN, and the learning curve is pretty low. Most operators get used to it within one or two events. It’s especially handy when you’re working with more than two layers or using large spliced walls.

Option 3: C1 Control Console
If you prefer hardware but need more power than the front panel offers, the NovaStar C1 console is the perfect companion.
- Physical T-bar for live switching
- Customizable buttons for quick preset recall
- Full layer control with on-board screen
- Designed to integrate natively with the J6
This setup is common in touring, broadcast, or live event scenarios where precise timing and hands-on feedback are key. It gives you the feel of a traditional video switcher, without locking you into a fixed layout.
Quick Comparison
| Control Method | Best For | Requires PC? |
| Front Panel | Small setups, quick edits | No |
| V-Can Software | Visual layout editing, presets | Yes |
| C1 Console | Live switching, tactile control | No (connects via LAN) |
5. Preset, Transition, and Background Setup Guide
Once your inputs are connected and your screen is live, the next step is running the actual show—and that’s where presets, transitions, and backgrounds come in. These three features define how smooth, clean, and flexible your screen switching feels.
Let’s break them down into simple, usable steps. Any questions, please contact us – a global leading LED Screen Cloud Platform.
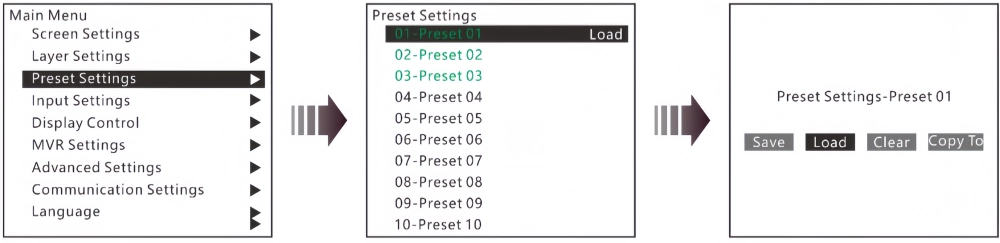
5.1 Saving and Using Presets
Presets are pre-built screen layouts that save your input source positions, layer sizes, and transition styles. They’re useful when you need to switch between scenes quickly—like going from a speaker view to a video playback, or from a full-screen feed to a split layout.
How to use them:
- Set up your layers the way you want on screen.
- On the front panel or V-Can software, choose an available preset slot.
- Press Save to store that layout.
- When needed, select the preset and press Load.
In Switcher mode, presets load into PVW (preview), letting you check everything before pushing it live.
In Splicer mode, they go straight to the PGM (program) output instantly.
You can store up to 32 presets, and rename them for easy recall (e.g. “Opening,” “Speaker 1,” “Break Video”).
5.2 Transitions: Fade or Cut?
When switching scenes or inputs, you have two main options: Fade or Cut.
- Fade gives you a smooth dissolve from one layout to another. It’s clean and professional.
- Cut does a hard switch with no effect—fast and direct.
You can set the transition type and duration in the menu or via software. For example:
- Fade duration: 0.5s, 1s, 2s
- Cut: instant
To apply a transition, load the preset into PVW, then hit Take. The system applies the effect as it pushes the preview to the live screen.
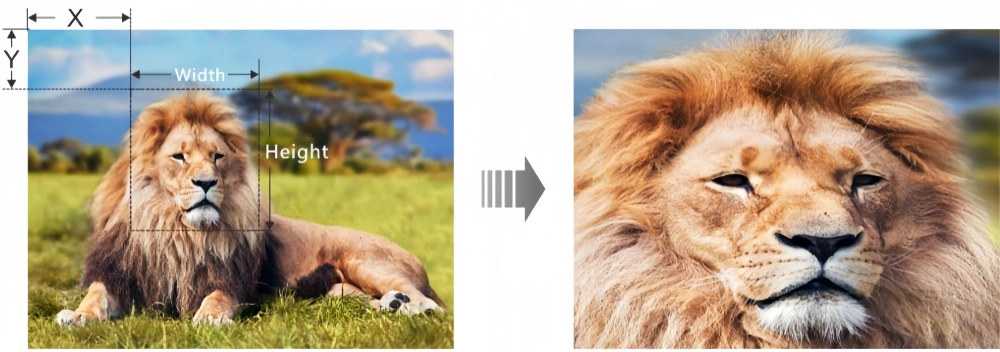
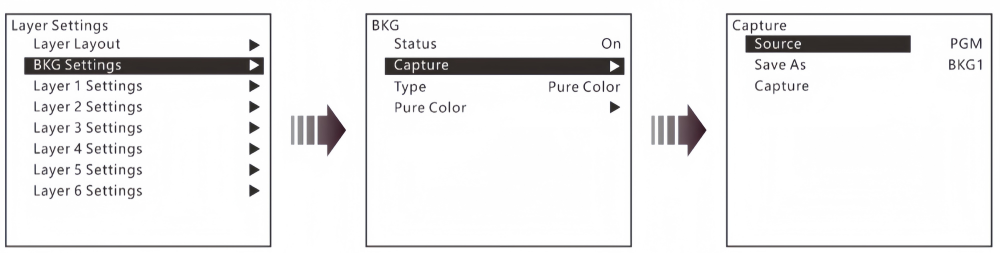
5.3 Setting Backgrounds (BKG)
What happens when you hide all your layers? The BKG (background) is what fills the screen underneath. It can be:
- A solid color (set by RGB values)
- An image (like a logo, pattern, or sponsor backdrop)
- A live capture from one of your input sources

How to set it:
- Open the BKG menu on the panel or software
- Choose Color, Image, or Capture
- Adjust as needed
- Enable or disable background display
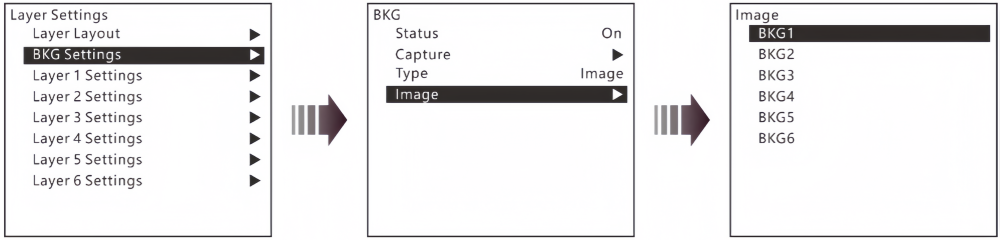
You can store up to six images in the processor for quick switching. For events, it’s common to use a company logo, sponsor slide, or decorative pattern as the default background.
5.4 A Few Tips That Help On Site
- Always test your presets before the show. Some layouts may need layer priority tweaks.
- Keep a black background preset ready in case of an emergency reset.
- Use fade transitions between calm scenes and cut transitions for high-energy sequences.
- If you’re running solo, name your presets clearly—panic-proof labeling saves time.
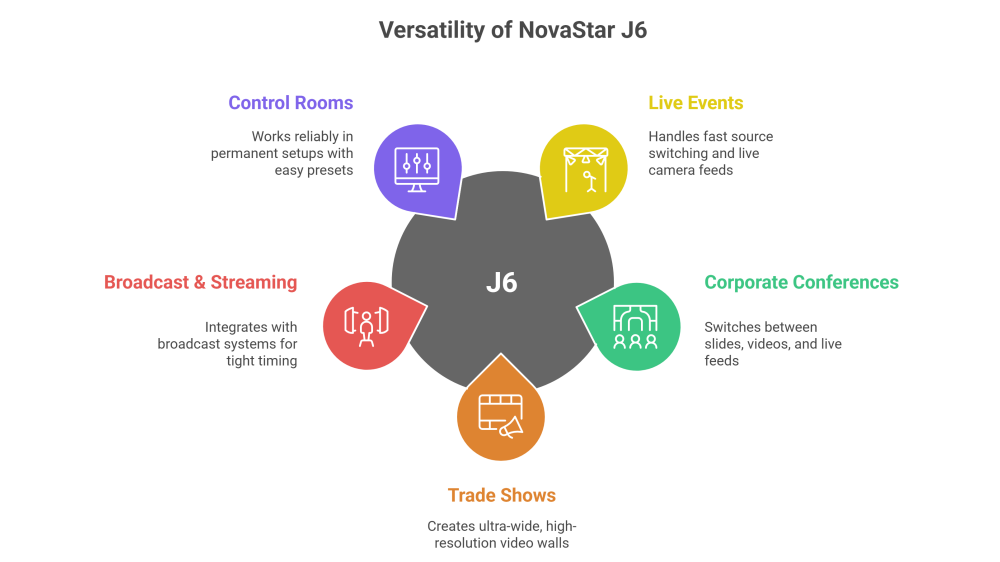
6. Typical Application Scenarios
The NovaStar J6 isn’t built for one specific type of job—it’s made to adapt. Whether it’s a fixed LED wall in a showroom or a mobile stage setup that changes every weekend, the J6 fits right in.
Live Events & Concerts: J6 handles fast source switching, live camera feeds, and real-time layout changes without screen flicker. Perfect for LED walls behind the stage or side screens showing different angles.
Corporate Conferences: Switch between slides, videos, and live feeds from multiple presenters. The preview/program workflow gives operators more control, so mistakes don’t go on screen.
Trade Shows & Exhibitions: Use the splicing mode to create ultra-wide, high-resolution video walls. The ability to add logos, background images, and switch scenes quickly makes a big difference in a busy booth.
Broadcast & Streaming: With Genlock sync and SDI support, the J6 integrates well into broadcast systems. It ensures timing stays tight between screens and cameras, even in multi-source setups.
Control Rooms & Fixed Installations: In permanent setups, the J6 works reliably day after day. Once the presets are saved, switching layouts becomes a one-button task—even for non-technical staff.
No matter the setting, the core advantage is the same: smooth visuals, flexible control, and real-time reliability.
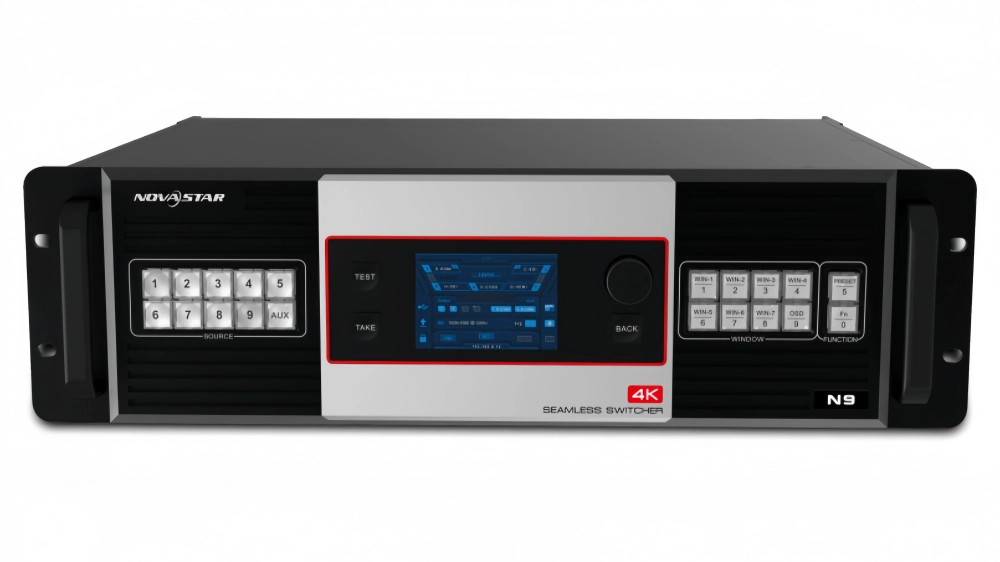
7. J6 Vs. NovaStar N9
| Feature | NovaStar J6 | NovaStar N9 |
| Key Strength | Flexibility & Value | Raw Power & High Res |
| Operation Modes | Spilcer Mode & Switcher Mode | Single Mode (Advanced Switcher) |
| Max Inputs | 8 (with expandability options) | 9 (Base), +7 with VE7 expander |
| Max Layers | 6 | 7 |
| 4K Input | Up to 4Kx2K@30Hz (DP 1.1/HDMI 1.4 inputs) | Up to 4Kx2K@60Hz (DP 1.2 input) |
| Max Screen Load (Single Unit) | Spilcer: 9.2M pixels Switcher: 4M pixels | 8.8 Million pixels |
| Max Mosaic Width | 15,360 pixels (Spilcer Mode) | 8,192 pixels |
| Outputs (Mosaic) | 4x DVI Groups (Up to 4 connectors usable) | 4x DVI Pairs (Up to 4 connectors usable) |
| Control | Front Panel, V-Can, C1 | Front Panel, V-Can, C1 |
| Best For | Mid-size events, flexible setups, value focus | High-end rental, complex productions, 60Hz 4K |
8. NovaStar J6 Price
As a general range, the J6 typically falls into the mid-to-high price tier of video processors.
If you want an accurate price based on your configuration or project requirements, we recommend registering on our official site.
Register LedInCloud to create a free account and get a custom quote from our support team. We offer regional pricing, shipping options, and suggestions based on your setup.
9. NovaStar J6 Manual and Software Download
To help you get started with the NovaStar J6, we provide direct access to its user manual and related download links. These include basic setup guides, connection instructions, and firmware files for the J6 processor itself.
If you’re looking for control software like V-Can, or need other NovaStar tools, you can head to our dedicated NovaStar Software page. There, you’ll find a full library of official applications, including version updates and compatibility notes.
Want to access more in-depth materials or get support for your specific project? We recommend registering on our website.
10. Conclusion
The NovaStar J6 isn’t just about signal switching—it’s about reliable, real-time control for demanding screen setups. From trade shows to concerts, from fixed installations to live tours, it offers flexibility without adding unnecessary complexity.
If you’re building a video wall, managing live feeds, or looking for a smoother way to control multiple sources, the J6 is a solid piece of gear to consider.