NovaStar MX6000 Pro LED Controller Full Guide
The NovaStar MX6000 Pro is often described as an all-in-one LED display controller, but that short label does not really explain why it exists or when it becomes the right choice. Many users first encounter it while comparing high-end LED control systems, especially when a standard sending box or a simple video processor starts to feel limiting.
At that point, understanding what the MX6000 Pro actually does — and how it fits into a real signal workflow — becomes more important than reading a list of specifications.
Table of Contents
1. What Is the NovaStar MX6000 Pro?
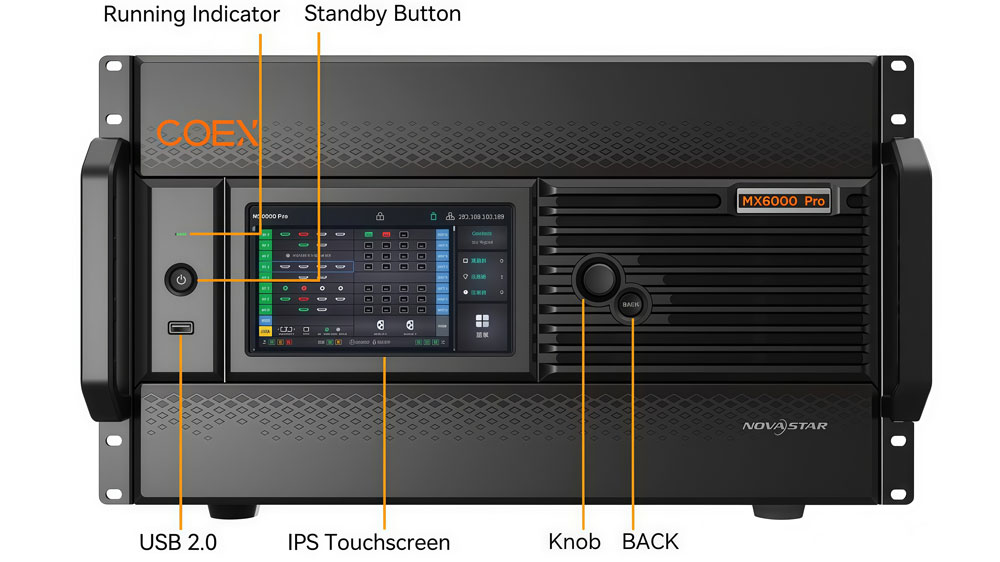
The NovaStar MX6000 Pro is an integrated LED display controller that combines video processing and sending capabilities in a single unit. Rather than relying on external processors for scaling or layout control, it handles signal input, image processing, and LED output internally.
In simple terms, a traditional setup often uses a video processor together with a sending box. The MX6000 Pro reduces that separation. Signals enter the controller, are processed inside the device, and then sent directly to the LED display.
This design is useful when projects become more complex. For example:
- multiple video inputs need to be managed at the same time
- higher pixel loading capacity is required
- centralized control is preferred instead of multiple devices
At the same time, the MX6000 Pro is not meant for every project. Smaller installations may still work well with simpler sending controllers. Understanding this positioning helps avoid confusion when comparing it with other models in the NovaStar Technology lineup.
2. Key Features Explained
Looking at a specification sheet is easy. Understanding how those features actually change a real LED setup is harder. So instead of listing functions one by one, it makes more sense to see what they do in practice.
- Integrated video processing and sending
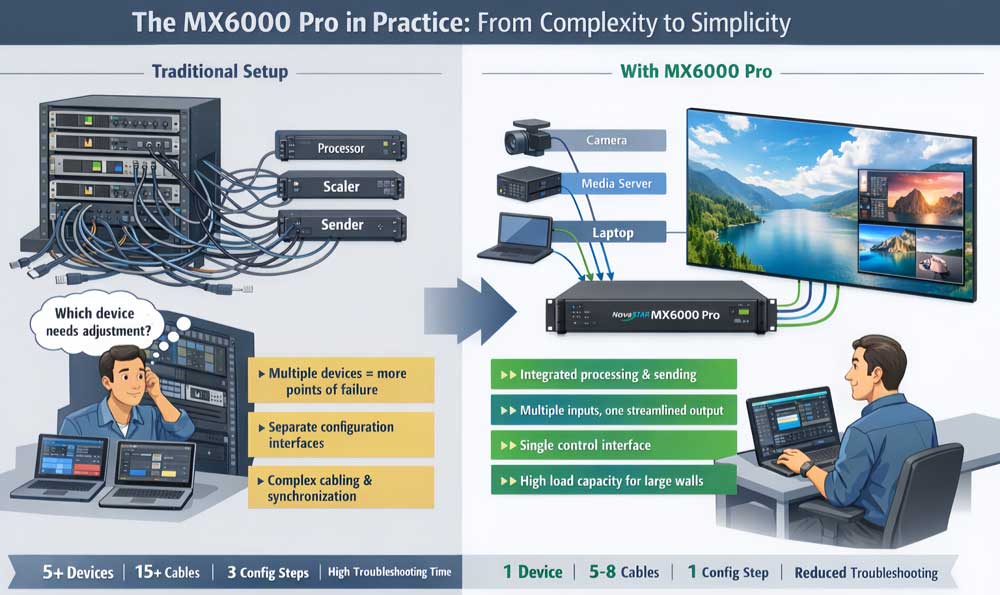
One of the main ideas behind the NovaStar MX6000 Pro is integration. Traditional systems often split video processing and sending into separate devices. That means more hardware, more cables, and more configuration steps.
Here, signal processing and LED control happen inside the same unit. Video signals enter the controller, are processed internally, and then mapped directly to the LED screen. For many projects, this reduces system complexity and makes troubleshooting easier because fewer devices are involved.
- Multiple signal inputs for flexible workflows
Modern LED installations rarely rely on a single source. Live productions, studios, and event environments may switch between cameras, media servers, or external processors.
The MX6000 Pro supports multiple input signals, which allows users to manage different sources without constantly reconfiguring the system. This becomes especially useful when layouts change frequently or when operators need to switch content quickly during operation.
- Advanced scaling and layout control
Scaling is not just about resizing an image. In LED systems, it affects how content fits irregular resolutions and custom screen shapes.
With built-in processing, the controller can scale and map signals directly to the LED canvas. This reduces dependence on external processing devices. It also allows operators to adjust layouts without rebuilding the entire signal chain.
- High loading capacity for larger LED screens
As LED resolutions increase, controllers need to manage more pixels without creating signal bottlenecks. The MX6000 Pro is designed for larger projects where higher loading capacity is required.
In practical terms, higher loading capacity means:
- fewer controllers for large screens
- simpler system architecture
- easier synchronization across the display
- Centralized control and configuration
Another benefit of an integrated controller is centralized setup. Instead of configuring processing and sending separately, users can manage signal routing, mapping, and output within one system environment.
This does not remove complexity entirely, but it reduces fragmentation. For technicians working under time pressure, having fewer control layers can make a noticeable difference.
3. MX6000 Pro Technical Specifications
After understanding the main capabilities, most users want a clearer technical picture. The table below summarizes the key specifications of the NovaStar MX6000 Pro, focusing on parameters that directly affect system design and deployment.
| Category | Specification |
| Product Type | Professional all-in-one LED display controller |
| Series | NovaStar COEX control system |
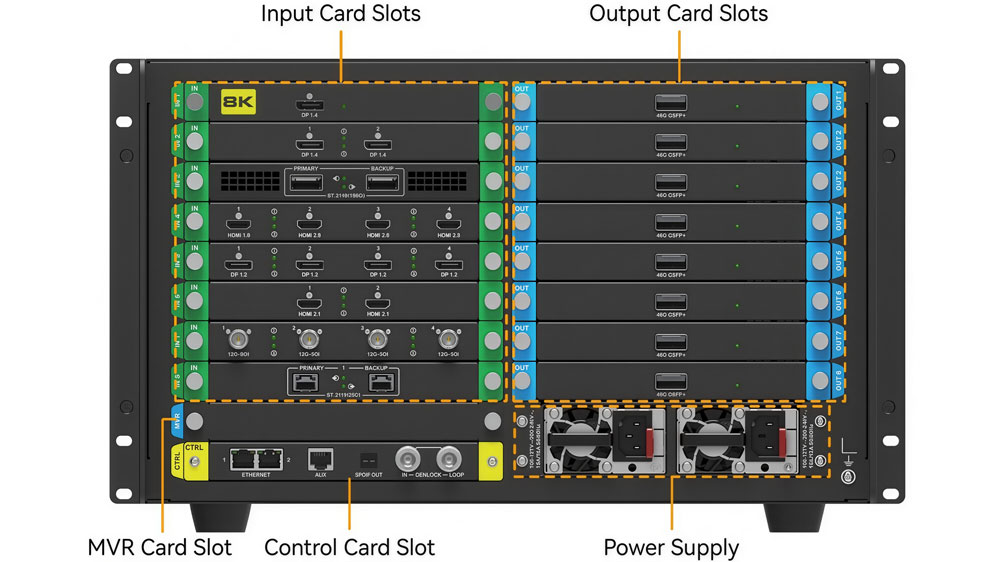
| Form Factor | 6U modular design |
| Architecture | Card-based modular input and output configuration |
| Maximum Loading Capacity | Up to 141 million pixels |
| Color Depth | 12-bit processing |
| Frame Performance | Up to 480 Hz capability |
| Latency | 0-frame latency processing (real-time) |
| HDR | HDR supported |
| Category | Specification |
| Input Design | Modular input card system |
| Supported Input Types | HDMI, DisplayPort, 12G-SDI, ST 2110 (depending on installed cards) |
| Maximum Input Resolution | Up to 8K@60Hz (via supported input cards) |
| Input Capacity | Up to 32× 4K@60Hz / 16× 8K@30Hz / 8× 8K@60Hz (depending on configuration) |
| Color Sampling | HDMI 2.0 supports YCbCr 4:2:0 |
| Category | Specification |
| Output Design | Modular output card system |
| Output Types | 4×10G fiber or 1×40G fiber output cards |
| Control Bandwidth | Supports 1G or 5G bandwidth configuration |
| Audio | SPDIF audio output supported |
| Control Protocols | Art-Net protocol and central control support |
| Category | Specification |
| Scaling | Real-time multi-screen scaling |
| Signal Processing | Integrated video processing engine |
| Brightness Control | Precise brightness and color fidelity management |
| Image Quality | Designed for high-end LED visual performance |
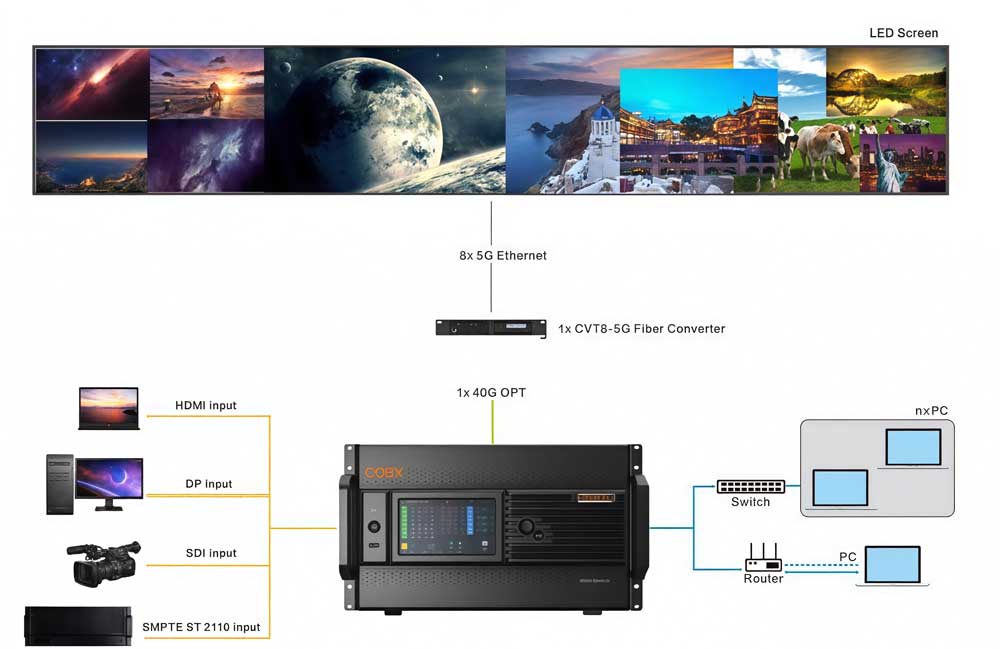
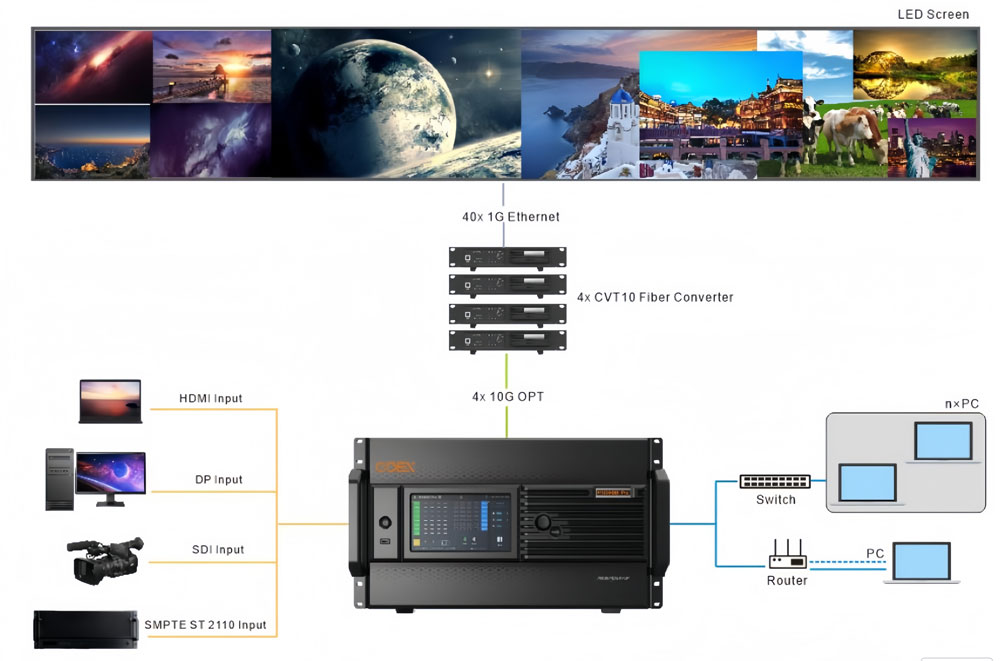
4. Video Processing Workflow and System Architecture
Unlike a basic sending box, MX6000 Pro does more than just transmit data. It receives signals, processes them internally, and sends optimized output directly to the LED display.
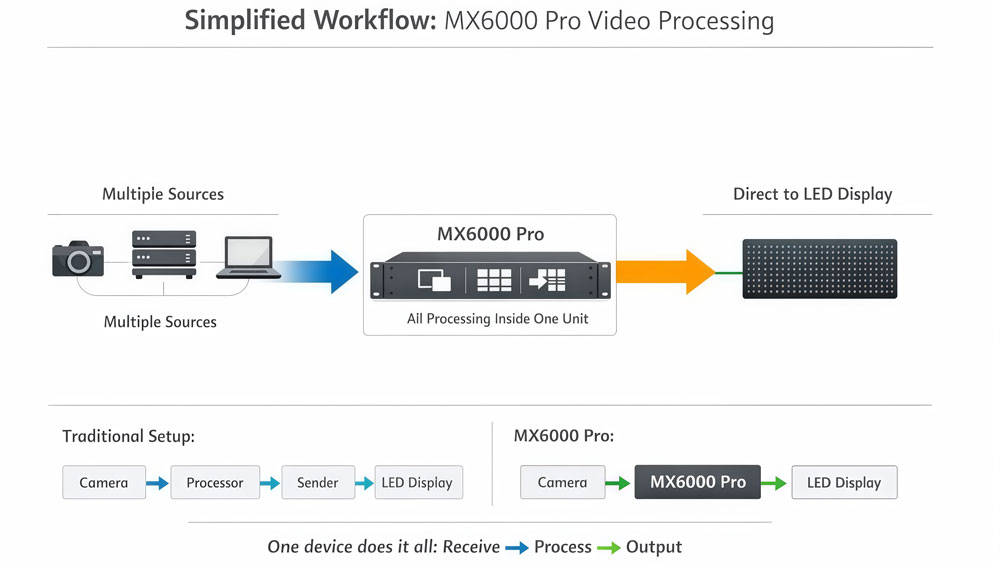
- Signal input
The workflow starts with video input. Depending on the installed cards, the controller can accept different signal sources such as media servers, cameras, or playback systems. Multiple inputs allow operators to switch sources without changing the system structure.
- Internal processing
Once signals enter the controller, they are processed internally. This includes scaling, layout adjustment, and signal management. Since LED screens often use custom resolutions, internal scaling is important for matching content to the LED canvas.
Instead of using an external processor, many adjustments can be handled directly inside the MX6000 Pro.
- Output to LED display
After processing, the controller maps the video signal to the LED layout and sends data to receiving cards through its output interfaces. Because processing and sending are combined, the signal path stays simple:
Input → Processing → Mapping → LED output
- Why this matters
This integrated architecture reduces the number of devices in the system. For larger or more complex projects, fewer devices usually mean easier setup and simpler troubleshooting.
5. Installation and Setup Overview
Setting up the NovaStar MX6000 Pro is usually straightforward once you understand the order of operations. Most problems during deployment happen because steps are done in the wrong sequence. So instead of jumping between hardware and software, follow a clear workflow from physical installation to final testing.
Step 1 – Install hardware and connect all cables
- Start with the physical setup.
- Mount the MX6000 Pro securely in a rack or stable installation position.
- Connect the power cable but do not power on yet.
- Connect video sources to the correct input interfaces based on your installed input cards (for example HDMI, DP, SDI, or other supported inputs).
- Connect LED output ports to receiving cards or fiber transmission modules.
- Connect the control network cable to your PC or control network switch.
- Before moving forward, double-check:
- input cables go into input ports (not output slots)
- output cables follow the planned LED cabinet wiring order
- network connection is active
This basic check avoids many early configuration errors.
Step 2 – Power on and verify signal detection
- Once connections are confirmed:
- Power on the controller.
- Wait for the system to complete startup.
- Check front panel indicators or software status to confirm that input signals are detected.
- If an input source is not recognized:
- verify the source is powered on
- confirm resolution and output format from the source device
- check cable integrity
At this stage, do not adjust mapping yet. First make sure signals are entering the system correctly.
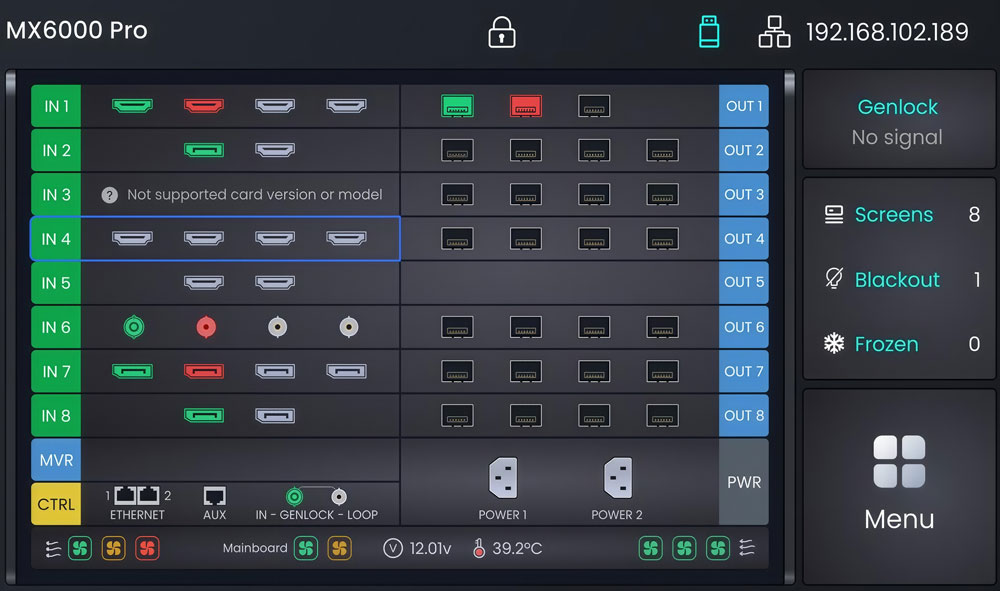
Step 3 – Open control software and create screen configuration
Launch the NovaStar control software on your computer and connect to the MX6000 Pro.
- Typical configuration steps include:
- Detect or manually add the controller in the software.
- Create a new screen configuration.
- Set the LED screen resolution based on cabinet layout.
- Define cabinet arrangement (rows, columns, orientation).
- Assign output ports to specific screen areas.
This step determines how image data is distributed across the LED display. If mapping is incorrect, the image may appear split or misaligned.
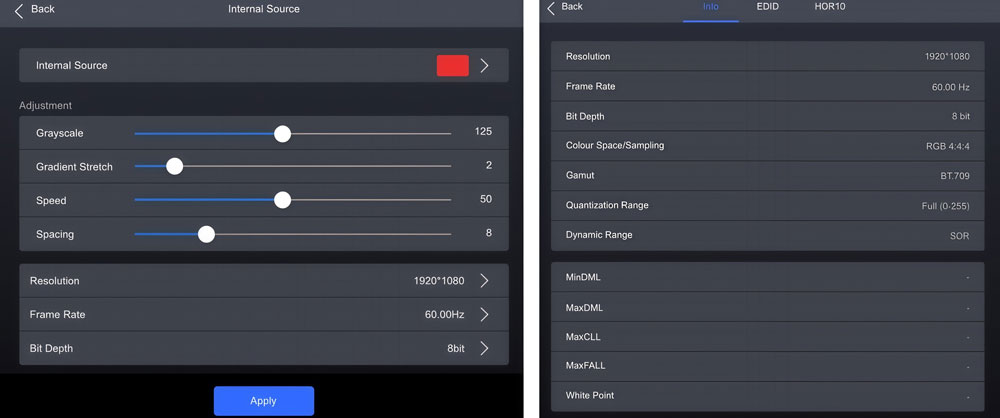
Step 4 – Configure input sources and scaling
- After the screen layout is ready:
- Select the active video input channel.
- Assign the input signal to the LED canvas.
- Adjust scaling so the content fits the screen resolution.
Because LED screens often use non-standard resolutions, scaling inside the MX6000 Pro is important. Instead of changing the source resolution, many operators adjust scaling within the controller.
Step 5 – Layout adjustment and multi-window setup (if required)
If the project uses multiple content windows or special layouts:
- Create layout regions within the software.
- Assign different input sources to each region.
- Adjust positioning and size directly on the canvas preview.
Take time here to confirm alignment visually.
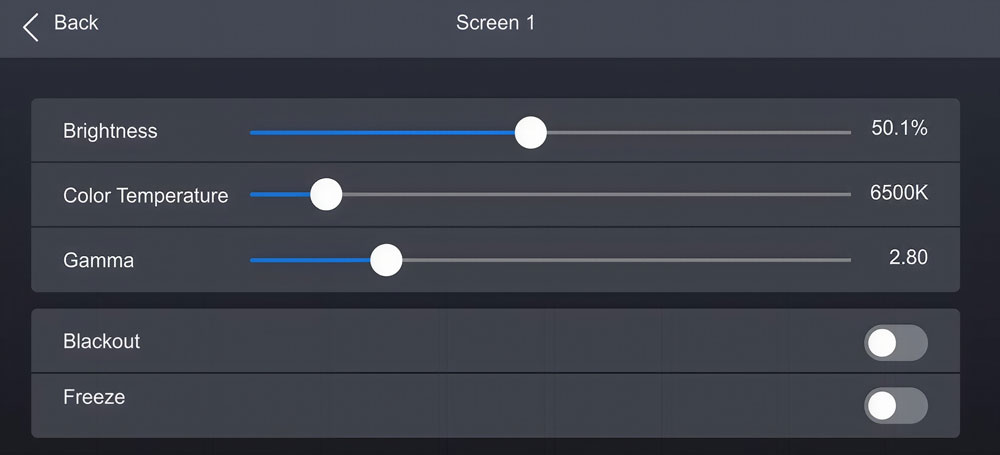
Step 6 – Output verification and signal test
Before going live:
- Check the LED screen for full image coverage.
- Switch between input sources to confirm stable transitions.
- Verify that brightness and color look consistent across cabinets.
- Monitor output status for any signal warnings.
A full signal test helps identify mapping errors or unstable inputs before actual operation.
6. Real Applications and Use Cases
The NovaStar MX6000 Pro is designed for LED projects that require higher processing capability and flexible signal management. While smaller installations may work with basic sending controllers, the MX6000 Pro is typically used in environments where multiple inputs, large resolutions, or complex layouts are involved.
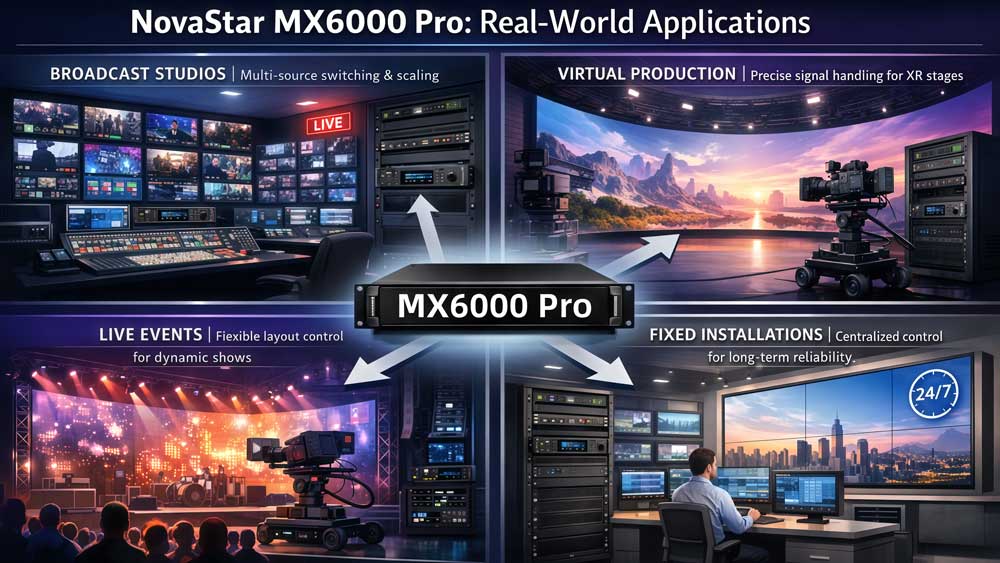
Some common application scenarios include:
✔ Broadcast studios: Broadcast environments often use multiple video sources such as cameras, graphics systems, or playback servers. Integrated processing allows easier switching and scaling without adding extra hardware.
✔ Virtual production and XR stages: These setups require precise signal handling and flexible layout control. An all-in-one controller simplifies configuration and helps manage large LED backgrounds.
✔ Live events and stage productions: Event systems frequently change layouts or content sources. Multiple inputs and internal processing make it easier to adapt quickly during rehearsals or live shows.
✔ Large fixed LED installations: Control rooms, exhibition displays, or permanent LED walls benefit from centralized control. Fewer devices can simplify long-term maintenance and system management.
7. NovaStar MX6000 Pro vs MX2000 Pro
Both the NovaStar MX6000 Pro and MX2000 Pro are all-in-one LED display controllers that combine video processing and sending functions. However, they target different project scales and system requirements. The comparison below highlights the main differences based on typical deployment needs.
| Feature | NovaStar MX6000 Pro | NovaStar MX2000 Pro |
| Product Positioning | High-end integrated LED controller | Mid-level integrated LED controller |
| System Architecture | Modular design with input/output cards | Integrated design focused on streamlined deployment |
| Processing Capability | Higher processing performance for complex workflows | Designed for moderate processing needs |
| Loading Capacity | Very high pixel loading capacity for large LED walls | Lower loading capacity compared to MX6000 Pro |
| Input Flexibility | Multiple modular input options depending on configuration | Fixed or simpler input configuration |
| Output Expansion | Flexible output expansion via modular cards | Standard output configuration |
| Typical Applications | Broadcast studios, virtual production, large events, high-resolution installations | Medium-size events, fixed installations, standard LED projects |
| System Complexity | Suitable for complex signal workflows | Better for simpler system structures |
- Which one should you choose?
In general, the MX6000 Pro is better suited for projects that involve larger LED resolutions or multiple signal sources. Its modular design allows more flexibility when system requirements change.
On the other hand, the MX2000 Pro works well for users who want an integrated controller without building a large or highly complex system. It provides processing and sending functions in a more compact solution.
8. Price & Resources Download
When researching the NovaStar MX6000 Pro, many users focus on two practical things: price and where to download reliable resources.
8.1 Price Information
The price of the NovaStar MX6000 Pro is not fixed. Different input cards, output modules, and system configurations can significantly change the final cost. Because of this, most projects require a configuration-based quotation rather than a standard retail price.
To make this easier, you can register on our LED Screen Cloud Platform and check pricing directly through the self-service system. After creating an account, users can:
- view available configurations
- submit project requirements
- request customized quotations
- compare different controller options
This approach helps avoid outdated price lists and gives more accurate project-based estimates.
8.2 MX6000 Pro Specs and Manual Downloads
You can download MX6000 Pro documentation and related files directly from the links below:
8.3 Other NovaStar Resources
For additional NovaStar software, firmware, or controller documents, visit our NovaStar Software. This section contains a broader resource library where you can search and download:
- control software
- firmware updates
- manuals for different NovaStar controllers
Using the central resource page makes it easier to find the latest versions instead of searching across multiple websites.
9. FAQ
Q1. Does the MX6000 Pro support backup or redundancy configuration?
Yes. In professional LED setups, users often configure signal or system redundancy to reduce downtime risk. The MX6000 Pro can be integrated into redundant architectures depending on the overall system design and connected devices.
Q2. Can different input resolutions be used at the same time?
Yes. The controller can accept various input resolutions and scale them to match the LED screen resolution. This is useful when mixing cameras, laptops, or media servers with different output formats.
Q3. How many receiving cards can be managed in one system?
There is no fixed number because it depends on the total pixel loading and system design. Users typically calculate based on screen resolution rather than receiving card quantity.
Q4. Is external scaling still needed for complex LED layouts?
In most standard projects, built-in processing is enough. However, large broadcast or XR environments may still use additional processors or media servers for advanced effects or workflow control.
Q5. Can the MX6000 Pro be remotely managed?
Yes. Remote management is possible through software depending on network configuration. This allows technicians to adjust layouts, monitor status, or troubleshoot without physical access to the device.
10. Conclusion
The NovaStar MX6000 Pro is designed for projects that need higher loading capacity and more flexible signal processing. Compared with entry-level controllers, it combines video processing and sending functions in one unit, which simplifies system structure and reduces extra hardware.
Before choosing, it is still important to match the controller with actual project needs. Screen resolution, signal sources, redundancy planning, and future expansion should all be considered.
If you want to check more information, you can register LedInCloud to view details and download related materials.