
A Closer Look at the NovaStar TB10 Plus Multimedia Player
If you’re looking for a multimedia player for your LED display, the NovaStar TB10 Plus shows up on a lot of shortlists.
It plays content. It sends to the screen. One device, done. For most commercial signage projects, that’s exactly what you need.
Table of Contents
1. What Is the NovaStar TB10 Plus?
The TB10 Plus is NovaStar Technology‘s multimedia player for full-color LED displays. You can push content and control your screen remotely, without being on-site.
The target market is: retail stores, chain storefronts, roadside displays, lamppost screens, and smart city installations. Basically, anything that needs reliable, manageable digital signage.
What makes it stand out from a basic player is the built-in sending function. You’re not buying a playback box and a separate sending card. It handles both. That alone simplifies a lot of installs.
2. Key Specs at a Glance
Here are the core numbers you need to know.
| Processor | Quad-core ARM A53 @ 1.4GHz |
| RAM | 2 GB |
| Storage | 32 GB |
| Loading Capacity | Up to 650,000 pixels |
| Max Resolution | 2048 × 2048 (standard), 8192 × 2048 (ultra-long screen) |
| Video Decoding | 4K hardware decoding |
| Input Voltage | DC 5V – 12V |
| Max Power | 15W |
| Operating Temp | –20°C to +60°C |
| Dimensions | 141.2 × 120.0 × 33.5 mm |
| Weight | 465.6 g |
| OS | Android 10 |
| Certifications | CE, FCC, IC, CQC, CB, NTRA |
Nothing too flashy on paper. But the specs line up well with what most mid-range commercial signage projects actually need. The 650,000-pixel loading capacity covers a wide range of screen sizes, and 4K hardware decoding means the processor isn’t struggling with high-res content.
3. Features and Performance
There’s more going on here than the specs sheet suggests. Let’s go through what the TB10 Plus actually does.
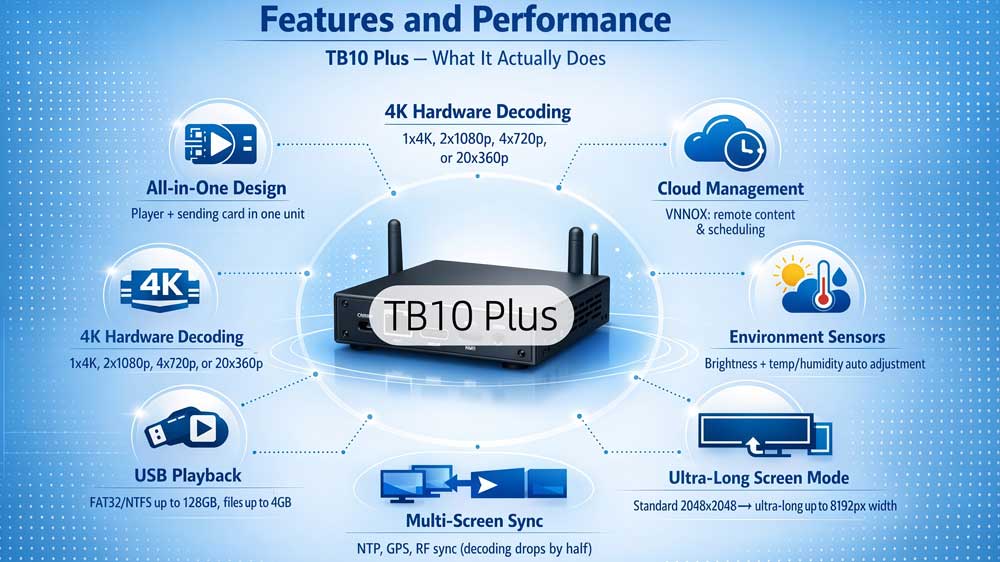
All-in-one playback and sending
Traditionally, you'd need a separate media player and a sending card to drive an LED screen. The TB10 Plus rolls both into one unit. That cuts down on cabling, reduces points of failure, and makes the whole install a lot cleaner.
4K hardware decoding
The built-in hardware decoder handles 4K without breaking a sweat. You can run one 4K stream, two 1080p, four 720p, or up to twenty 360p videos at the same time. For a single commercial display, that's more than you'll likely need.
USB playback
Stick in a USB drive and it plays. No network required. It reads FAT32 and NTFS drives up to 128GB, and individual files up to 4GB. Good fallback option for sites with unreliable internet.
Ultra-long screen mode
Standard output maxes out at 2048 × 2048. Switch to ultra-long mode and the width goes up to 8192 pixels. That's specifically for stretched or ribbon-style displays where a normal aspect ratio doesn't apply.
Environmental Sensor Support
Plug in a brightness sensor and the screen dims or brightens based on the light around it. You can also add a temperature and humidity sensor — handy for outdoor installs where conditions shift throughout the day.
Content security
The device uses terminal authentication and playback verification before anything goes to screen. It's a small detail, but it matters when you're running public-facing displays and don't want unauthorized content showing up.
Multi-screen synchronization
Running several screens that need to stay in sync? The TB10 Plus supports NTP, GPS, and RF time sync. NTP works straight away over the internet. GPS and RF need their respective modules installed. Just worth knowing — turn on sync and your decoding capacity drops by half.
Three ways to connect
Wired Ethernet, Wi-Fi, or 4G — pick what works for your site. If you have all three available, the device decides automatically: wired takes priority, then Wi-Fi, then 4G. And unlike most players, the Wi-Fi here runs AP and Station mode together, so it stays on your network while still hosting its own hotspot.
Cloud management via VNNOX
Connect the device to VNNOX and you can push content, adjust schedules, and check on your screens without leaving your desk. It works across multiple locations too — useful if you're managing signage for a chain of stores spread across different cities.
4. Installation and Setup
Getting the TB10 Plus up and running is pretty straightforward. Here’s how to go about it.
4.1 Hardware installation
The device mounts on a rack using four M3×5 Phillips countersunk head screws. Torque should be around 3N·m — not too tight, not too loose. Make sure the rack can handle at least 1.9kg before you mount it.
4.2 Connecting the ports
Once it’s mounted, here’s how the connections work:
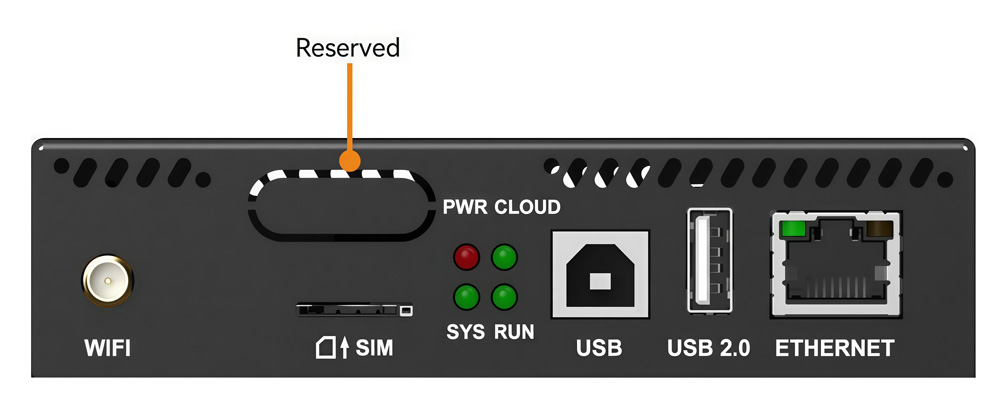
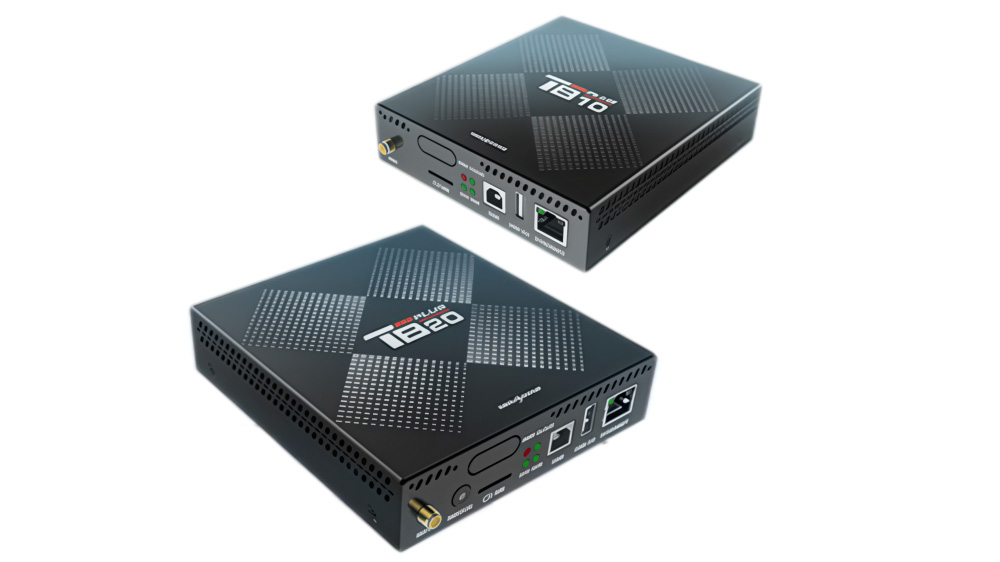
On the front panel — plug the USB Type-B port into your control computer. That’s your main link for content publishing and screen control. The Fast Ethernet port does the same job if you prefer a network connection over USB. The USB 2.0 Type-A port is for USB drive playback or firmware upgrades.
On the rear panel — the LED OUT port connects to your LED screen via a standard RJ45 cable. That’s the Gigabit Ethernet output that actually drives the display. The AUDIO OUT is a 3.5mm jack if you need sound. Power goes into the 12V connector, and the included adapter handles that.
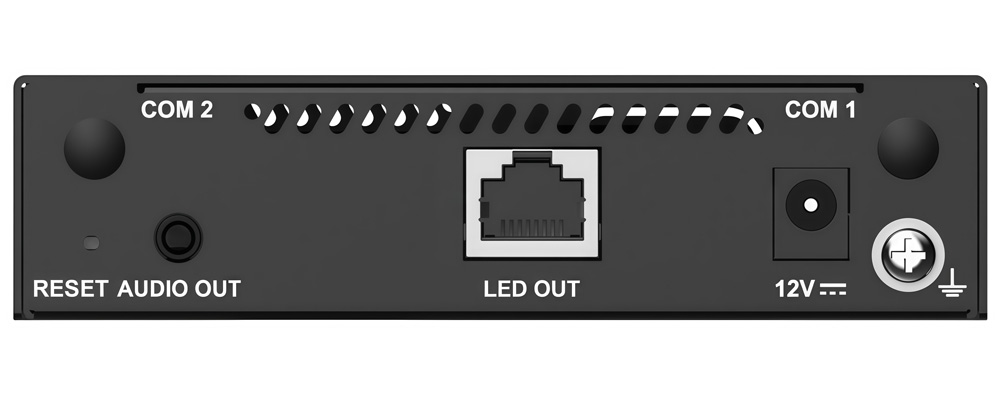
If you’re adding a 4G module, the SIM card slot is on the front panel. The 4G antenna connects to COM 1 on the rear. GPS antenna goes to COM 2.
4.3 Getting started
Power it on and check the indicators. The PWR light should go red — that means the power supply is fine. The SYS light flashes green once every two seconds when the system is running normally. Once the CLOUD light turns on or starts flashing, the device has an internet connection.
From there, connect to NovaStar VNNOX or ViPlex from your computer or phone, register the device, and you’re ready to start publishing content.
5. NovaStar TB10 Plus vs TB20 Plus
Both players share the same hardware foundation, so the differences come down to a few specific features. Here’s a side-by-side breakdown.
| TB10 Plus | TB20 Plus | |
| Processor | Quad-core ARM A53 @1.4GHz | Quad-core ARM A53 @1.4GHz |
| RAM / Storage | 2GB / 32GB | 2GB / 32GB |
| Loading Capacity | 650,000 pixels | 650,000 pixels |
| Max Resolution | 2048 × 2048 | 2048 × 2048 |
| Ultra-long Screen | 8192 × 2048 | 8192 × 2048 |
| HDMI Input | ✗ | ✓ HDMI 1.3 (max 2048×1024@60Hz) |
| Sync / Async Switch | ✗ | ✓ Physical button on front panel |
| Playback Mode | Synchronous playback supported | Synchronous + Asynchronous |
| Wi-Fi AP + Sta | ✓ | ✓ |
| 4G Support | Optional module | Optional module |
| Sensor Support | ✓ | ✓ |
| Multi-screen Sync | NTP / GPS / RF | NTP / GPS / RF |
| OS | Android 10 | Android 10 |
| Power | DC 5V–12V / 15W max | DC 5V–12V / 15W max |
| Net Weight | 465.6g | 470.3g |
| Dimensions | 141.2 × 120.0 × 33.5 mm | 141.2 × 120.0 × 33.5 mm |
If your project only needs scheduled content playback with cloud management, the TB10 Plus does the job. But if you need live HDMI input or want to switch modes without touching software settings, the TB20 Plus is the one to go with.
6. How Much Does the TB10 Plus Cost?
Pricing for the TB10 Plus starts at around $82, but the final price depends on your order quantity and specific requirements. For an accurate quote, you can register LED Screen Cloud Platform and check pricing directly — it only takes a few minutes to get started.
7. Downloads and Resources
Here are the official resources for the NovaStar TB10 Plus.
For additional NovaStar software — including ViPlex, VNNOX, and firmware updates — you can find everything on LedInCloud.
8. Conclusion
The NovaStar TB10 Plus does what most commercial signage projects actually need — reliable playback, cloud management, and flexible connectivity, all in one compact device.
It’s not the most powerful player in NovaStar’s lineup, but for retail stores, chain displays, lamppost screens, and similar applications, the tb10 plus novastar hits the right balance between performance and cost.
Ready to get started? Register on our LED Screen Cloud Platform for pricing, or grab the spec sheet above.