NovaStar V-Can is more than just video wall control software—it’s a practical tool built for real-world LED setups. Whether you’re running a live show, managing content across multiple screens, or switching layers during an event, V-Can helps you keep everything smooth and under control.
If you’ve worked with NovaStar processors like the VX1000, J6, or N9, you’ve likely heard of it. But a lot of people don’t fully understand what V-Can does—or why it matters.
This article breaks it down in plain language. We’ll walk you through what NovaStar V-Can is.
1. What Is NovaStar V-Can?
NovaStar V-Can is video control software for managing NovaStar processors like the NovaStar VX1000, VX600, J6, and N9. It gives you a clear visual interface to organize video inputs, adjust layouts, and switch between sources—live and in real time.
This isn’t just about setting screen size or resolution. V-Can is built for moments when things change on the fly—concerts, conferences, live events. You can drag and drop video layers, create presets, and preview everything before it goes live.
Compared to NovaStar’s other tools, V-Can is the one you use when you need flexibility and fast control. It works well across devices, handles complex setups, and doesn’t require a technical background to get started.
2. Main Features You Should Know
NovaStar V-Can isn’t overloaded with flashy extras—it’s focused on doing the core things well. Here’s what makes it useful in real-world projects:
Visual Layer Control
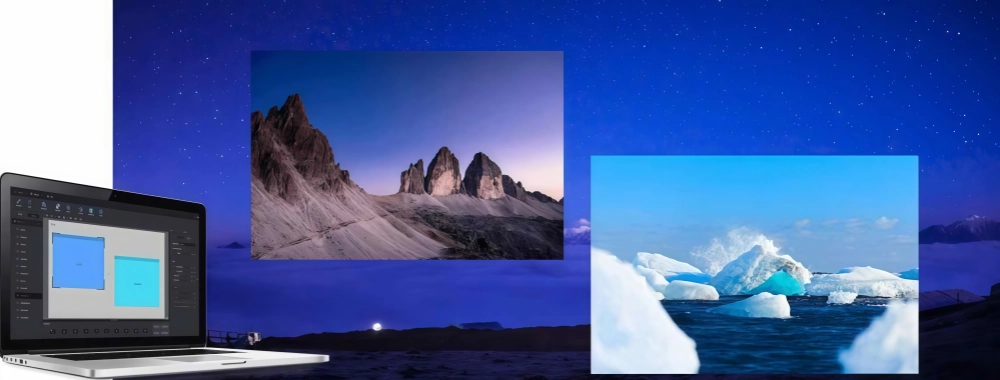
You can stack multiple video sources as layers—just like in video editing software. Each layer can be resized, cropped, moved, or hidden. You control exactly what appears on screen and where it goes.
Real-Time Switching
Need to switch to a new layout mid-show? No problem. V-Can lets you preview your setup (PVW), then push it live (PGM) with a single click. It’s fast and doesn’t interrupt the output.
Preset Management
You can save different layouts as presets and switch between them instantly. This is especially useful for events where the screen content changes frequently.
You can also import/export presets between devices or share setups across projects.
Multi-Device Support
V-Can can manage multiple processors at once. If you’re running a wide LED screen with several sending cards, or handling different zones on one stage, V-Can keeps them in sync.
Input and Output Settings
Set resolutions, adjust color, manage EDID, and assign sources—all from one interface. You can also build output mosaics like 1×2 or 2×2 across processors.
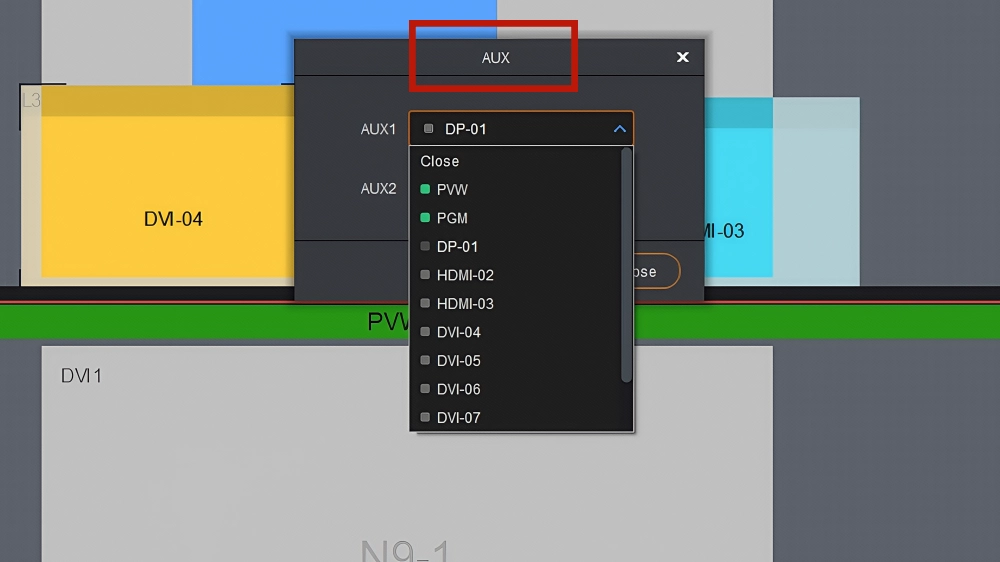
AUX Outputs and Backgrounds
Assign separate content to AUX ports, such as timer screens or logos. Add static backgrounds or color fills beneath all layers if needed.
Cross-Platform Compatibility
V-Can works on both Windows and macOS. The interface stays consistent, no matter the system.
These features aren’t just technical—they’re practical. V-Can helps you deal with real setups, not just ideal ones. Whether you’re switching camera feeds, layering sponsor videos, or syncing content across zones, it gives you control without complexity.
3. Download NovaStar V-Can Software
You can download NovaStar V-Can for free. It’s available on LedInCloud NovaStar Software Page, where you’ll find manuals and firmware updates.
Make sure you pick the version that matches your hardware. For example, if you’re using the VX1000 or J6, check your processor firmware version first. V-Can updates often include changes for compatibility or UI improvements.
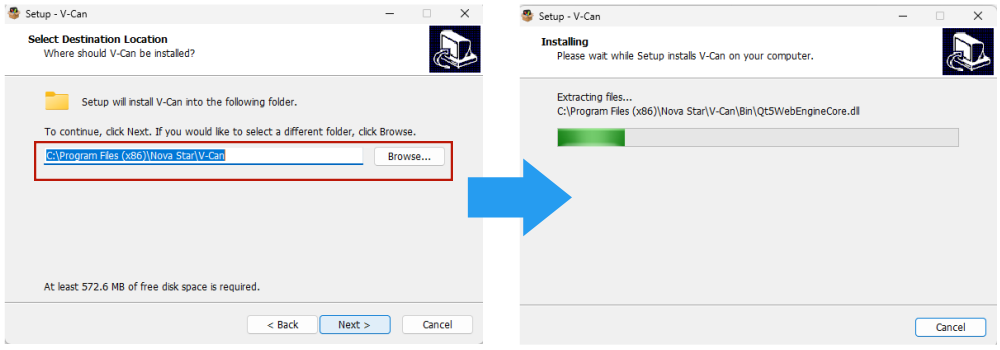
Downloads also include a PDF user manual. If you’re on macOS, you might need to allow the app in your system settings after installation.
4. How to Use V-Can? (Step by Step Guide)
Once you’ve installed NovaStar V-Can, getting started isn’t difficult—but it helps to know how the layout works. This section will walk you through the basics: connecting your device, adding video sources, creating layers, and building your first preset.
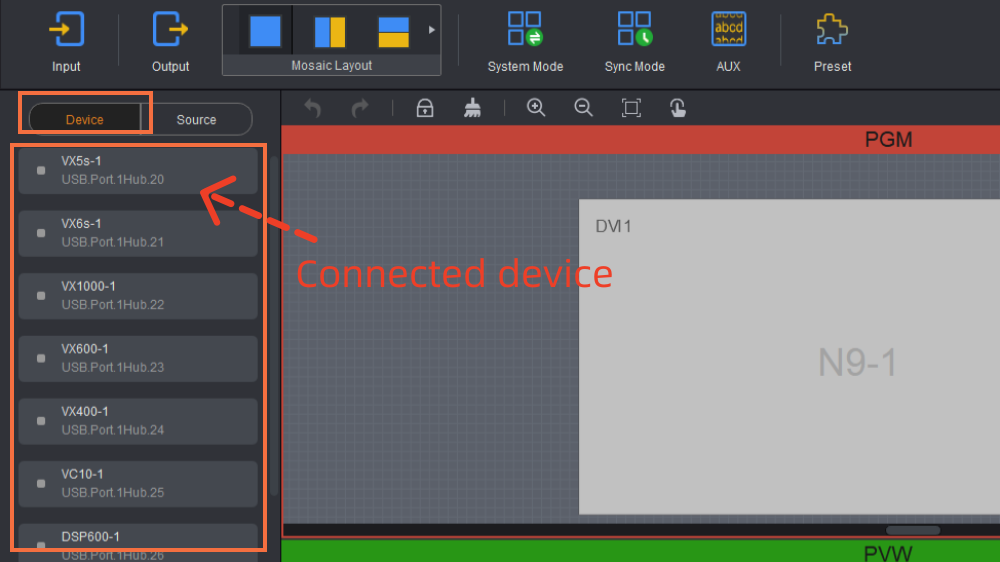
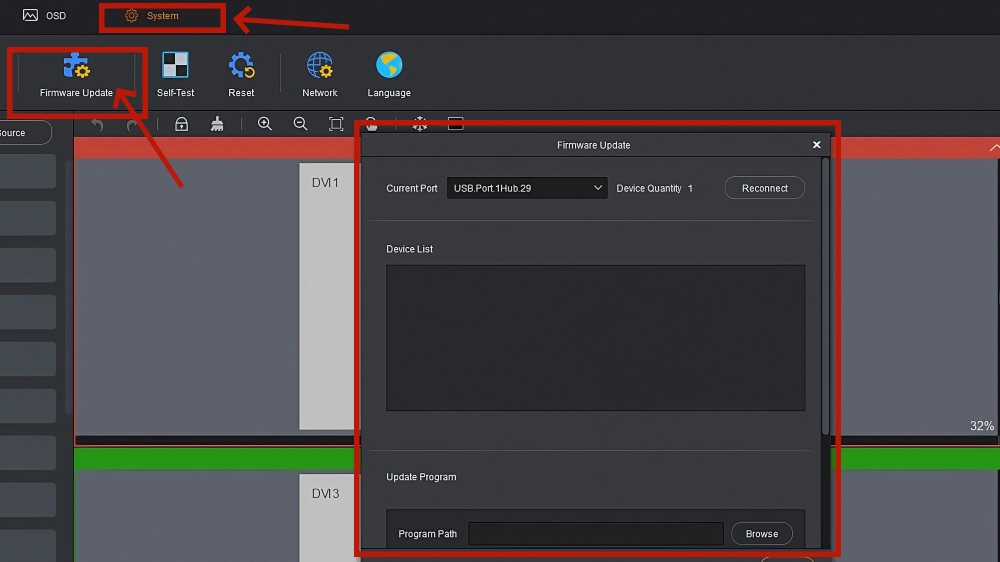
① Connect Your Device
Before anything else, power on your NovaStar processor (like the NovaStar VX600 or J6) and connect it to your computer via USB or LAN. Open V-Can, and it should automatically detect your device.
Screenshot of V-Can startup screen with a connected VX1000 showing up in the device list.
If the device doesn’t appear, check:
- Your USB cable or network connection
- Whether the processor is powered on
- If your firewall is blocking the software
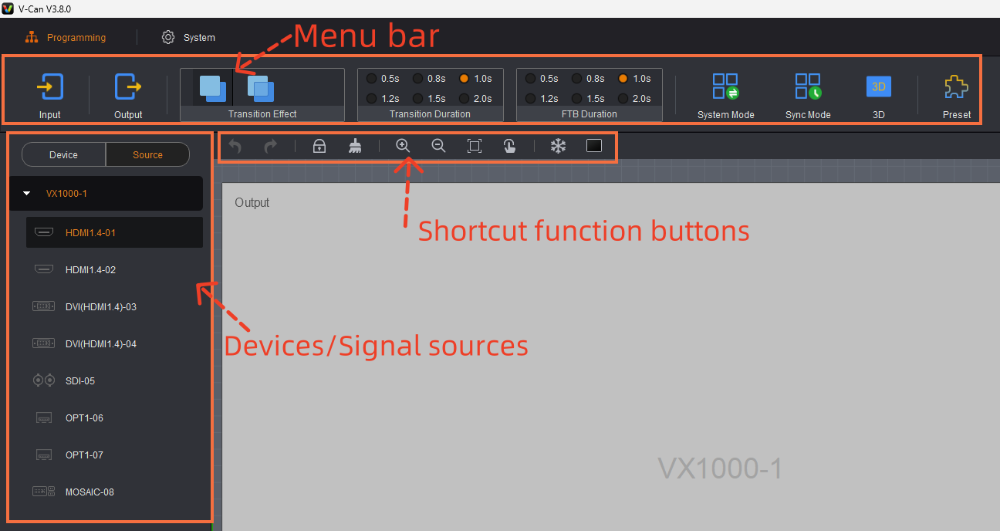
② Understand the Interface
The V-Can workspace is divided into several sections. Here’s a quick overview of what each part does:
- Device List – shows connected controllers
- Layer Workspace – where you arrange video content
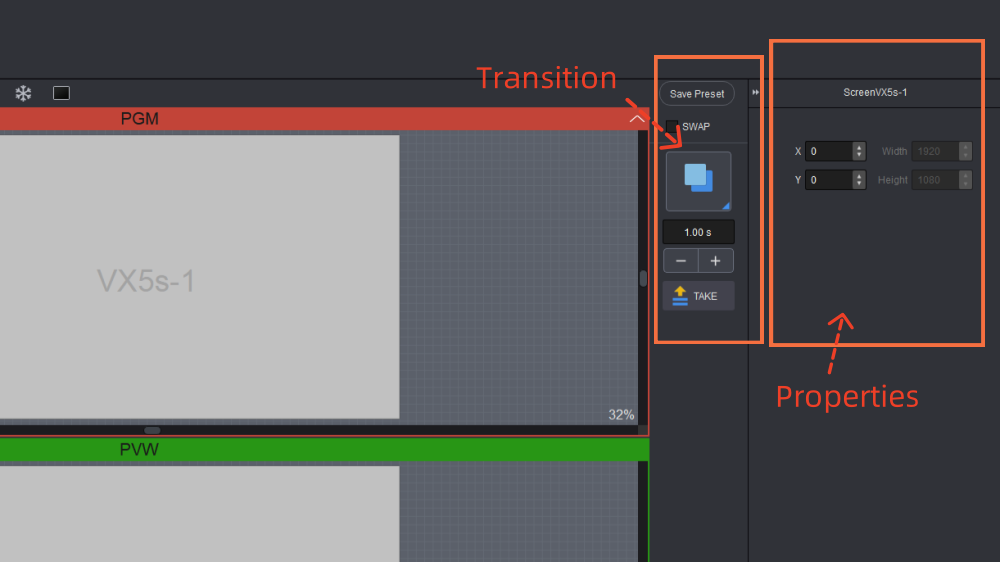
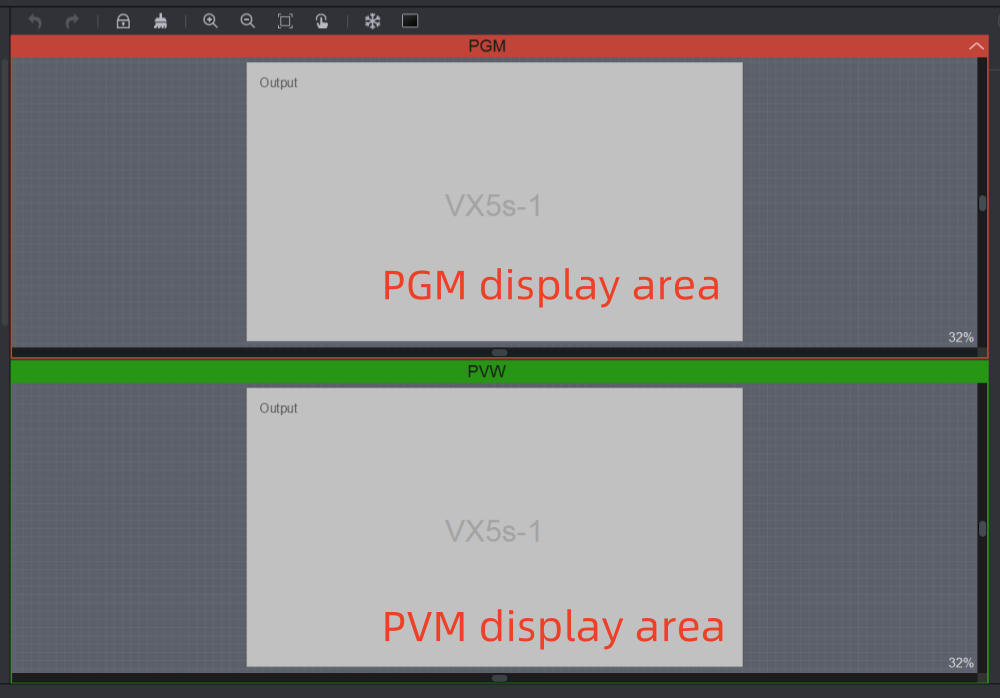
- Preview (PVW) and Program (PGM) – preview edits and send live output
- Input/Output Configs – manage signal resolutions and EDID
- Layer Properties Panel – adjust size, position, effects
Tip: Use the “Zoom In/Out” tools if your layout feels too small.
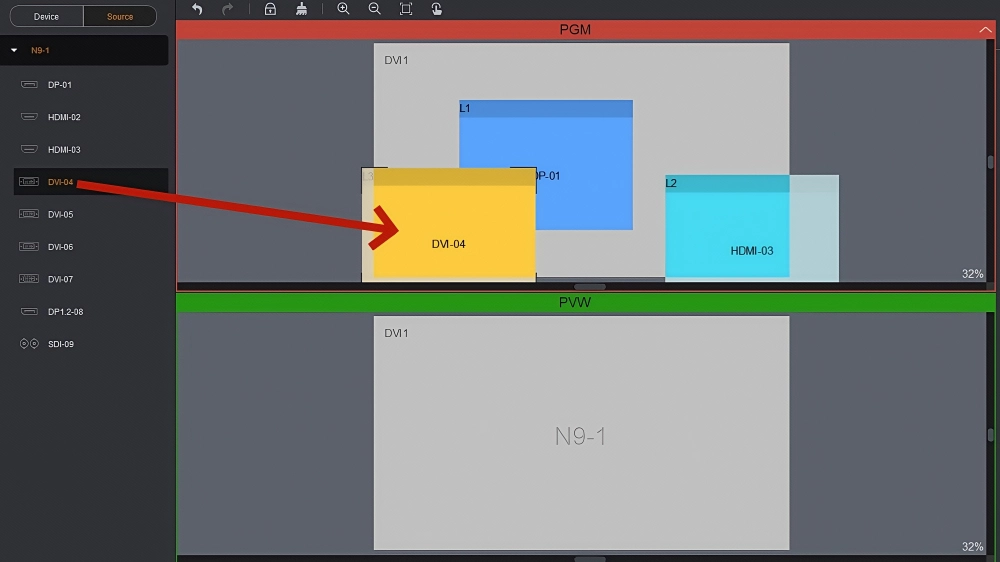
③ Add Your Video Inputs
Click the “+” icon in the Input area to add a video source. This can be a live camera feed, media player, or HDMI input.
You’ll see the input appear in the source list. From there, you can assign it to any layer on screen.
Make sure to set the correct resolution. You can manually adjust it, or import EDID from the connected device.

④ Create and Edit Layers
Layers are the heart of V-Can. Each one represents a video window on your screen. Here’s how to use them:
- Drag a source from the input list to the workspace
- Resize the layer by dragging its corners
- Move it freely with your mouse
- Crop content using the layer’s settings panel
- Add multiple layers for picture-in-picture or split-screen views
- Adjust transparency, brightness, or borders from the right-side properties panel
You can also lock layers to prevent accidental movement or hide them temporarily.
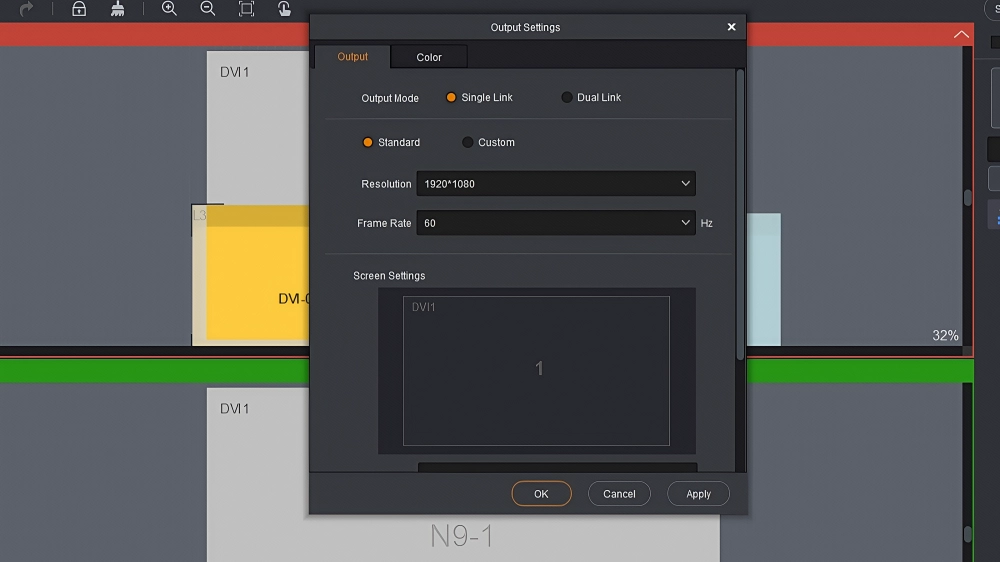
⑤ Manage Outputs
Under the Output tab, you can:
- Set screen resolution
- Adjust color parameters
- Route audio
- Enable backup channels in case of signal failure
Set up a mosaic if you’re using multiple processors (e.g., 2×2 video wall)
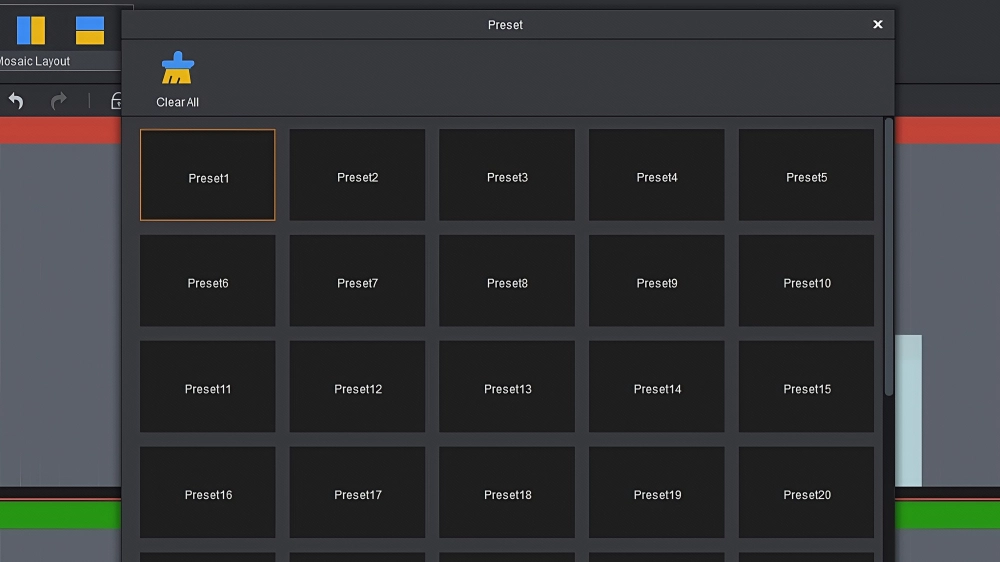
⑥ Build and Save Presets
Once you’ve created a layout, save it as a Preset. This lets you:
- Instantly switch between different screen configurations
- Recall scenes for live events
- Create transitions for smoother playback
- Click “Add Preset,” name it, and it’s saved. You can preview changes in PVW and push them to PGM when ready.
Presets can be exported and shared with other devices using the same software.
⑦ Optional Features Worth Trying
- Background Settings – Add a static image or color beneath all layers

- AUX Output – Send different content to a secondary screen
- Freeze/Blackout – Temporarily pause or hide output
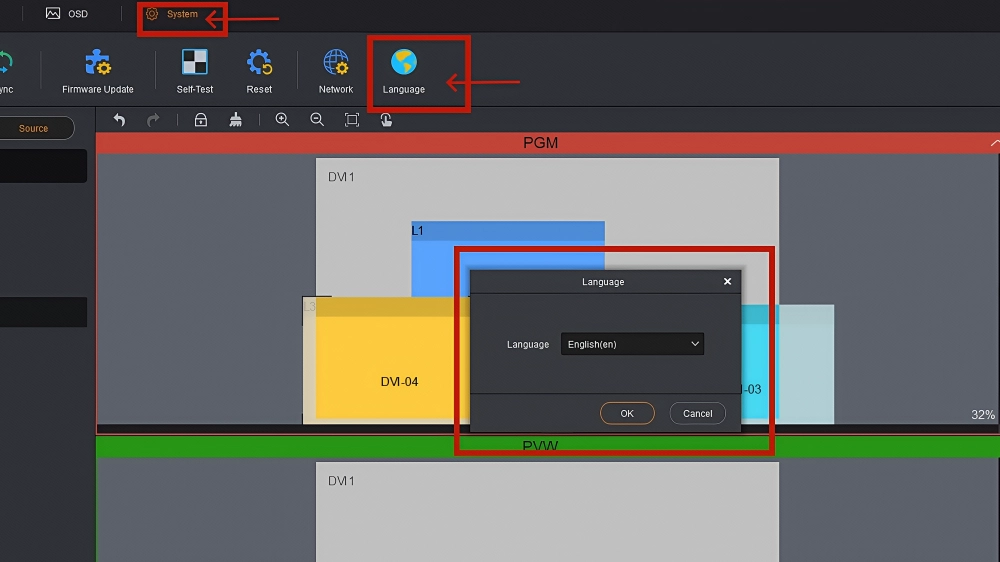
- Language, Firmware, and Reset – Found under Settings
⑧ When Something Doesn’t Work
Don’t panic. A few things to check if you run into trouble:
- Is your input device powered on and connected properly?
- Does the resolution match your processor’s supported range?
- Are you using the right version of V-Can for your hardware?
NovaStar V-Can isn’t complicated once you get used to the layout. The key is understanding layers, knowing where to find inputs/outputs, and saving presets to make your job easier the next time around.
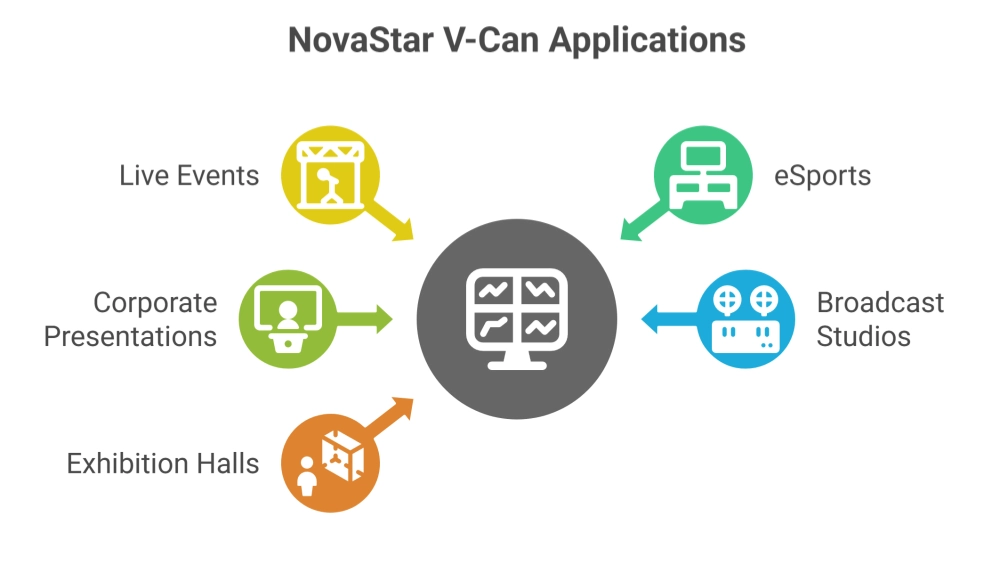
5. Real-World Applications
NovaStar V-Can isn’t just for testing or configuration. It’s built for real shows, real screens, and real people under pressure. You’ll find it in places where content needs to move fast, look clean, and stay in sync.
Here are some of the most common ways it’s used today:
5.1 Live Events and Concerts
V-Can is often used at concerts, music festivals, and award shows. These events usually involve multiple video sources—live camera feeds, animated backgrounds, sponsor videos—all layered on massive LED walls.
With V-Can, operators can:
- Switch layouts between songs
- Overlay countdowns or artist names
- Adjust content per venue size
5.2 eSports and Gaming Events
In eSports arenas, you’re dealing with game feeds, live player cams, stats overlays, and audience screens—all at once.
V-Can helps teams:
- Assign each feed to different zones
- Create layered views with gameplay + caster cams
- Save presets for different match formats
5.3 Corporate Presentations and LED Signage
In large meeting rooms or stage-based keynotes, LED walls are replacing projectors.
V-Can is used here to:
- Build clean layouts for speaker video + slides
- Switch between presentation modes
- Control multiple zones (main screen, side walls, lobby signage)
5.4 Broadcast Studios and Control Rooms
Some TV stations and control rooms use V-Can to manage complex LED backdrops or live feeds across panels.
You’ll often see it used for:
- Dynamic backgrounds during news or talk shows
- Managing AUX outputs for backstage monitors
- Adjusting layouts based on daily programming
5.5 Exhibition Halls and LED Booths
Trade shows, airports, and exhibition booths use LED screens for eye-catching content. But the layout changes often—depending on the product, time of day, or live interactions.
V-Can allows:
- Fast source switching
- Content layering (product video + live demo)
- Flexible control from a laptop without dedicated media servers
6. V-Can vs. Other NovaStar Softwares
NovaStar offers several software tools, but they each serve a different purpose. V-Can is built for real-time control, while NovaLCT and SmartLCT focus more on screen configuration and hardware setup.
The table below breaks down the key differences, so you can choose the right tool for your project:
| Feature / Software | V-Can | NovaLCT | SmartLCT |
| Main Use | Real-time video display control | LED screen hardware configuration | Visual screen layout & mapping |
| Typical Users | Live event operators, AV crews | LED technicians, support engineers | Designers, screen planners |
| Layout Design | Basic preset zones and layers | Manual cabinet-level layout | Drag-and-drop screen building |
| Content Switching | ✅ One-click presets, fast switching | ❌ Not built for real-time switching | ❌ Not built for content switching |
| Control Layers | ✅ Supports multiple layers | ❌ Basic test pattern only | ❌ Mostly structural |
| Scene Presets | ✅ Save and load scene setups | ❌ | ❌ |
| Pixel-level Control | ❌ | ✅ Brightness, gamma, calibration | ✅ Rotation, offsets, test images |
| Real-Time Output Monitoring | ✅ Monitor outputs & layers | ✅ With monitoring card only | ❌ |
| Hardware Compatibility | NovaPro UHD Jr, VX series, H-series | All NovaStar cards & controllers | VX, MCTRL, NovaPro, etc. |
| Offline Operation | ✅ Limited, preset-based | ✅ Full support | ✅ Full visual editor |
| Interface Style | Panel-style UI for quick control | Technical, multi-tabbed | Graphic-based drag-and-drop |
| Skill Level Needed | Low to medium | Medium to high | Low to medium |
| Ideal Scenarios | Concerts, eSports, exhibitions | Factory setup, module repair | Trade shows, corporate installs |
In short:
V-Can is made for hands-on control. Great for live shows, media switching, and layered layouts.
NovaLCT focuses on hardware-level settings—like brightness, calibration, and screen diagnostics.
SmartLCT download helps you plan and map out screen structures before anything goes live.
7. Tips from the Field
Reading the manual is one thing. Running a real show is another. Here are a few tips collected from actual V-Can users—people who’ve used it on-site at concerts, trade shows, and installations.
(1) Start Simple. Don’t Overbuild
When you’re new to V-Can, it’s tempting to build complex layouts with too many layers. Don’t. Start with one or two layers, get your workflow stable, then build up. The more layers you use, the more pressure you put on the processor. Keep it clean and lean unless you really need complexity.
(2) Save Presets Often—With Versions
If you’re building a show layout, save versions as you go: “MainStage_v1,” “MainStage_v2,” etc. That way, if something breaks or needs to revert, you’re covered.
(3) Use PVW and PGM Properly
V-Can gives you a preview window (PVW) and a program window (PGM). Always test changes in PVW first. Only push to PGM when you’re sure. It’s your safety net in live settings.
(4) Bring a Backup Laptop (Just in Case)
Even if V-Can runs fine, events are unpredictable. A second machine with the software and presets loaded can save your day if something crashes or a port fails.
(5) Match Firmware and Software Versions
Some bugs come from mismatched versions. Always check that your V-Can version works well with your processor firmware. LedInCloud’s download page usually keeps them in sync.
(6) Name Your Inputs and Presets Clearly
Instead of sticking with “HDMI 1” or “Preset 3,” rename them to things like “Camera Left” or “Break Time Loop.” When the pressure’s on, clear labels save you from clicking the wrong thing.
These aren’t just technical tips—they’re habits that save time and avoid mistakes. V-Can is stable, but only if you use it smart.
8. FAQs about V-Can NovaStar
Can I use V-Can to control multiple processors at once?
Yes. V-Can supports multi-device management. You can connect and control multiple VX or J series processors together—great for ultra-wide setups or multi-zone screens.

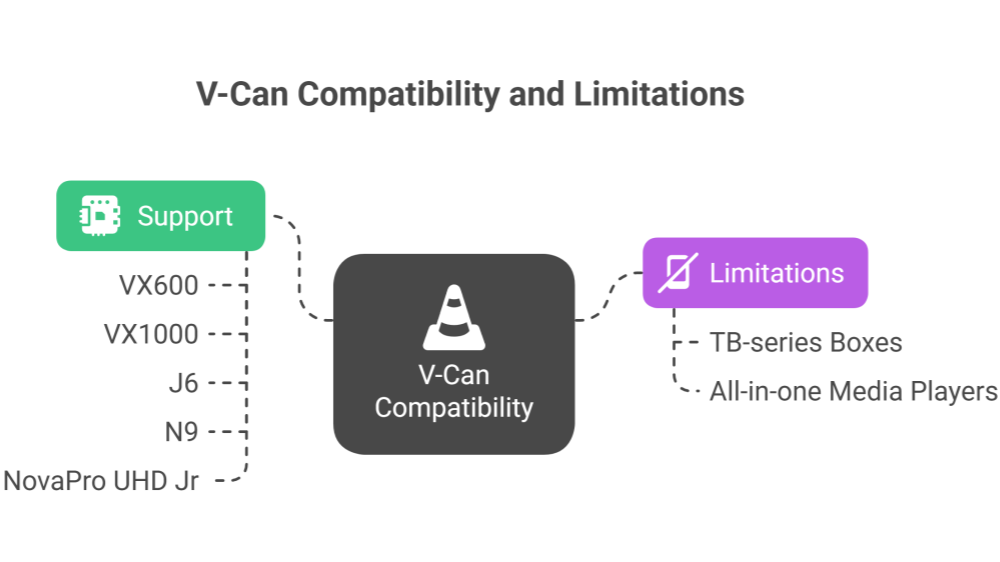
What devices does V-Can support?
V-Can works with most NovaStar processors that support video control and layer functions. This includes: VX600, VX1000, J6, N9, NovaPro UHD Jr.
Check your device model before installing. V-Can doesn’t work with all-in-one media players like TB-series boxes.
Is NovaStar V-Can free to use?
Yes. V-Can is completely free. You can download it from NovaStar’s official site or from trusted partners like LedInCloud – LED Screen Cloud Platform. There’s no license fee or activation required.
Does V-Can work on macOS?
Yes, it works on both Windows and macOS. On macOS, you might need to allow the app under System Settings → Privacy & Security after your first launch. Some drivers may also require manual approval.
Can I use V-Can without connecting a processor?
Yes. V-Can has an offline mode. You can open the software, build layouts, and test presets even if no hardware is connected. Just keep in mind you won’t see live outputs without a processor.
9. Conclusion
V-Can isn’t a big, flashy piece of software. It’s not complicated either. But in the hands of someone managing live content, it becomes essential.
If you haven’t tried it yet, download it, open it in offline mode, and just play around. You’ll see how much you can do—without writing a single line of code.