
NovaStar ViPlex Express: Free Download, Manual & Tutorial 2026
NovaStar ViPlex Express is a Windows-based LED display content management software. It lets you create, schedule, and publish content directly to LED screens — no complicated setup required.
This guide covers everything: free software download, user manual, installation steps, working modes, and a step-by-step tutorial to get your screen up and running.
Table of Contents
1. What Is NovaStar ViPlex Express?
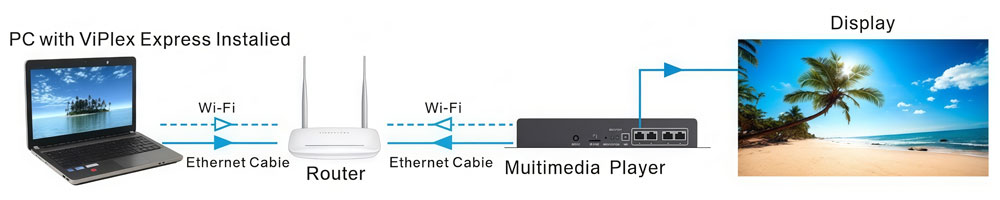
ViPlex Express is a display content publishing and management system developed by NovaStar Technology. It runs on Windows and connects to LED displays through your local network — either via Ethernet cable or Wi-Fi.
The software supports two working modes: Studio Mode for real-time synchronous playback, and Async Mode for sending content to multimedia players that run independently. We’ll cover both in detail below.
ViPlex Express is designed for daily content operators — people who manage what plays on screen. It’s not a hardware configuration tool. If you need to configure LED cabinets or set up a new display from scratch, that’s what NovaLCT is for. ViPlex Express takes over once the hardware is ready.
In practice, most users need both. Engineers use NovaLCT once to configure the hardware. Then ViPlex Express takes care of everything after that — uploading content, scheduling playlists, adjusting brightness, and monitoring playback.
✔ Key Features
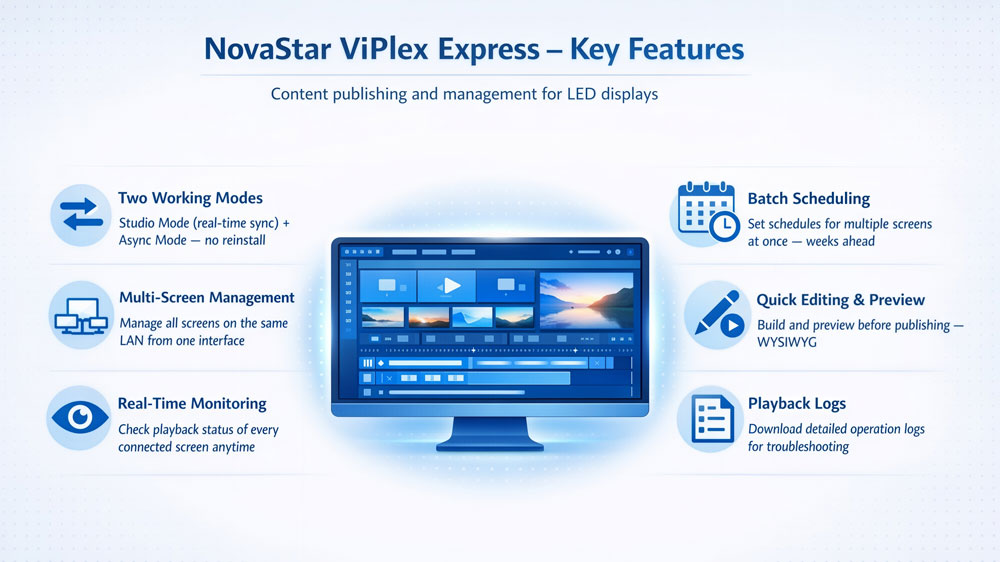
• Two working modes
switch between Studio Mode and Async Mode within the same software, no reinstall needed
• Multi-screen management
manage multiple displays on the same LAN from one interface, publish content to all screens at once
• Real-time monitoring
check the playback status of every connected screen at any time
• Batch scheduling
set playback schedules for multiple screens in one go, plan content weeks or months ahead
• Quick editing and preview
build a solution and preview it before publishing, what you see is what you get
• Playback logs
download detailed operation logs from any device, useful for troubleshooting or reporting
2. ViPlex Express Free Download
All ViPlex Express software downloads on this page are free. No registration, no paid license — just pick the version you need and download it directly to your PC.
2.1 ViPlex Express for Windows (All Versions)
Download NovaStar ViPlex Express software below. We host the official installer files directly — all versions are available in NovaStar Software.
| Version | 64-bit Download |
| V4.0.0 (Latest) | ViPlex Express V4.0.0.4401 X64 Download |
| V3.0.5 | ViPlex Express V3.0.5.1501 X64 Download |
| V3.0.4 | ViPlex Express V3.0.4.0801 X64 Download |
| V3.0.0 | ViPlex Express V3.0.0.2601 X64 Download |
All downloads are 64-bit. Most Windows 10 and Windows 11 systems are 64-bit, so this covers the vast majority of users.
Not sure if your system is 64-bit? Go to Settings → System → About and check under “System type.”
2.2 ViPlex Express for Mac
ViPlex Express is a Windows-only application. There is no native version of ViPlex Express for Mac.
If you’re on a Mac, the most reliable option is to run Windows through a virtual machine. Both Parallels Desktop and VMware Fusion work well for this. Once Windows is running, install ViPlex Express the same way as on any Windows PC.
2.3 Viplex Express User Manual
| Version | Mode | Download |
| V4.0.0 | Async Mode User Manual | Download PDF |
| V3.0.5 | Async Mode User Manual | Download PDF |
| Studio Mode User Manual | Download PDF | |
| V2.27.0 | Async Mode User Manual | Download PDF |
| Studio Mode User Manual | Download PDF |
Not sure which ViPlex Express user manual to start with? If your display runs on a multimedia player like the TB20 Plus or TB40, go with the Async Mode manual. If your PC connects directly to the display through a sending card, use the Studio Mode manual.
3. Installation Guide
Before you install ViPlex Express NovaStar, there are two things to sort out first — system requirements and prerequisites. Skip either one and the installation will fail or the software won’t open.
3.1 System Requirements
ViPlex Express V4.0.0 runs on Window 10 64-bit. Below are the minimum hardware requirements:
| Component | Minimum Requirement |
| OS | Windows 10 64-bit |
| CPU | Intel Core i5 |
| RAM | 4 GB |
| Storage | 60 GB HDD |
| Integrated GPU | Intel HD Graphics 4000 or equivalent |
| Dedicated GPU | NVIDIA GeForce 8 series / AMD Radeon HD 5000 series or higher |
| Video Memory | 512 MB or more |
| OpenGL | 2.1 or later |
Before installing, make sure these two components are on your PC:
- Microsoft .NET Framework 4.6.x — required for the software to run. Download free from Microsoft’s website if missing.
- Visual C++ 2017 Runtime Components — also required. Download the official redistributable from Microsoft if missing.
Both are free. Most Windows 10 systems already have them. But if ViPlex Express fails to install or won’t launch, these two are almost always the cause.
3.2 How to Install ViPlex Express
(1) Download the installer from Section 2 above. The 64-bit version covers most Windows 10 systems.
(2) Double-click the installer file to launch the setup wizard.
(3) Follow the on-screen prompts — accept the license agreement, choose an install location, and click Install.
(4) Wait for setup to finish. Don’t close the window during this step.
(5) Once done, launch ViPlex Express LED display software from your desktop. On first launch, a Working Mode dialog appears. Select Async Mode for standard LED display use, or Demo Mode if you want to test the software without a physical device connected.
That’s it. The software is ready to use.
3.3 Viplex Express Troubleshooting
- "This application requires .NET Framework 4.6"
Download .NET Framework 4.6.x from Microsoft’s website, install it, then run the ViPlex Express installer again.
- "MSVCP140.dll was not found" or similar runtime error
The Visual C++ 2017 runtime is missing. Download the Visual C++ 2017 Redistributable from Microsoft, install it, then relaunch ViPlex Express.
- ViPlex Express installs but won't open
First confirm both .NET Framework 4.6.x and Visual C++ 2017 are installed. If both are present and the software still won’t launch, right-click the desktop shortcut and select Run as administrator.
4. Studio Mode vs Async Mode
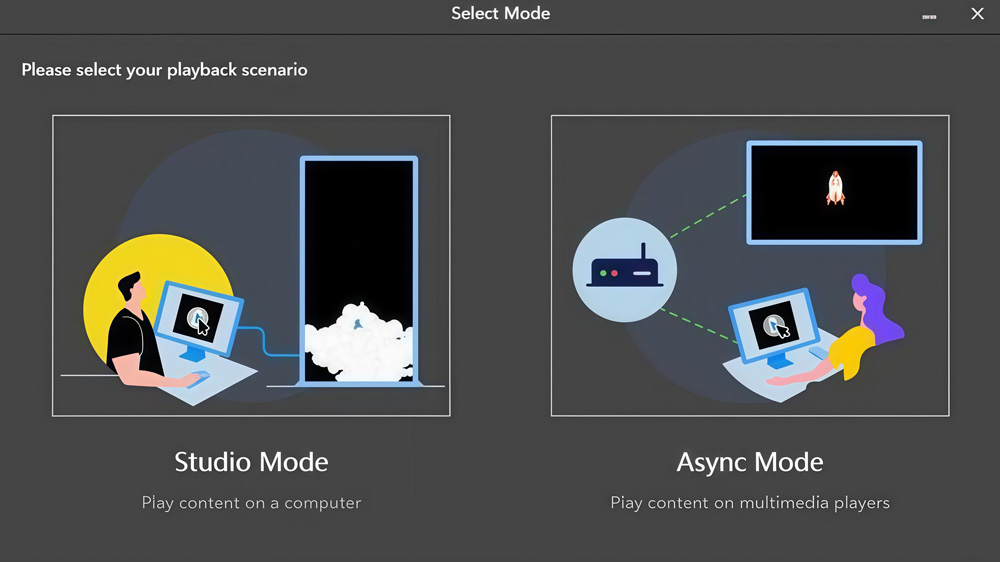
When you open ViPlex Express for the first time, a Select Mode dialog appears. This is the most important setting — it determines how the software connects to your display.
| Studio Mode | Async Mode | |
| How it works | PC drives the display in real time | Content is sent to a multimedia player, which runs it independently |
| PC required during playback | Yes, always | No |
| Best for | Live events, presentations, real-time control | Digital signage, advertising screens, retail displays |
| Hardware required | Sending card (e.g. MCTRL4K) | Multimedia player (e.g. TB20 Plus, TB40) |
| Connection | PC → Sending card → LED display | PC → LAN / Wi-Fi → Player → LED display |
Studio Mode is for real-time playback. Your PC is the video source — content plays on screen simultaneously as it plays on your computer. Use this for live events, conference rooms, or any setup where the display needs to mirror or extend your desktop.
Async Mode is the standard choice for most installations. You send content to a multimedia player once, and the player handles everything from there — no PC required during playback. Use this for retail screens, outdoor displays, digital signage networks, or any screen that runs on a fixed schedule.
Not sure which one to pick? Go with Async Mode. It covers the majority of ViPlex Express use cases.
To switch modes later: top-right corner → Settings → Working Mode → select the other mode → restart the software.
Note: Studio Mode is available in V3.x and earlier. As of V4.0.0, ViPlex Express only supports Async Mode.
5. Viplex Express Tutorial
This section walks you through This section walks you through the full workflow for ViPlex Express V4.0.0 in Async Mode: connecting your display, creating a playlist, and publishing it to the screen.
5.1 Connect Your Display
When you open ViPlex Express, it automatically scans your local network and lists any detected multimedia players under My Screens on the left. If your device appears, skip to the login step below.
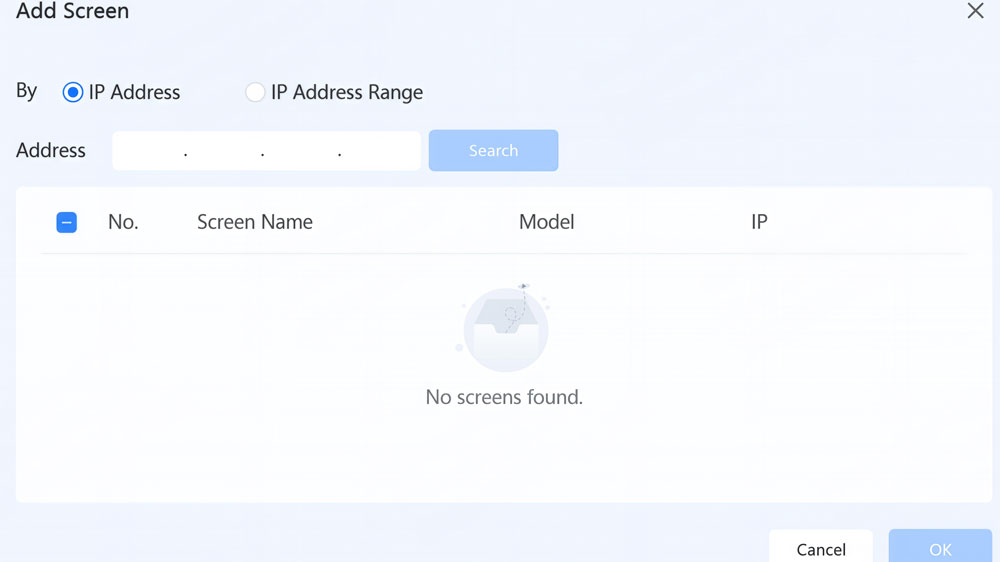
- If the device doesn't appear automatically, add it manually:
(1) In the My Screens panel, click the + icon → Add Screen.
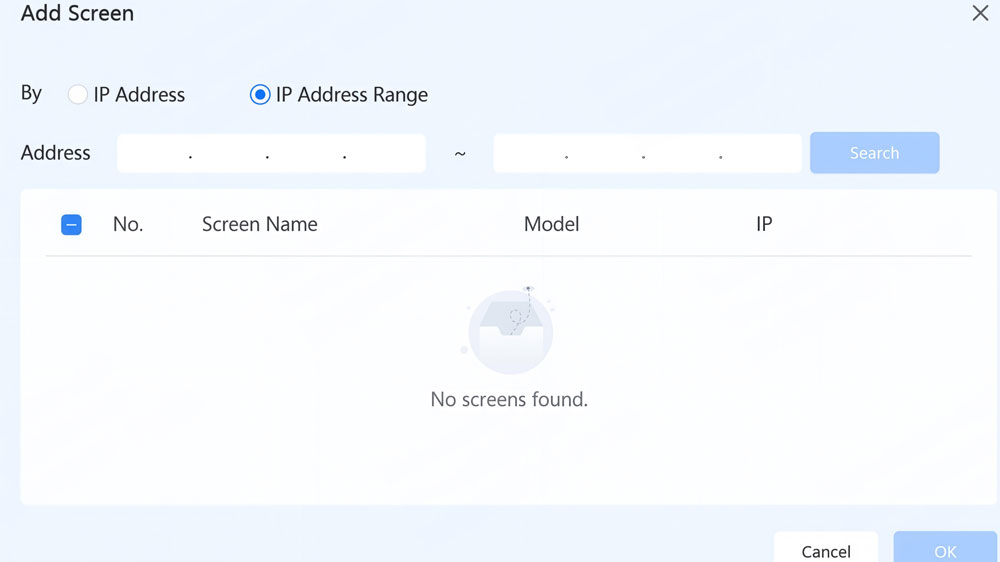
(2) In the Add Screen window, choose your method:
- IP Address — enter the device’s IP directly
- IP Range — enter a start and end IP to scan multiple devices at once
(3) Click Search, select your device from the results, and click OK.
- Log in to the device:
Click the device name in My Screens. Enter the login password when prompted. The default password is printed on the SSID label on the back of the device. Tick Auto Login if you don’t want to enter it every time.
Device status indicators in the panel:
- Orange dot — logged in and connected, ready to use
- Green dot — online but not yet logged in, click Connect to log in
- Grey dot — offline, check your network connection
If the device doesn’t show up at all, check these three things: confirm the device is powered on and the Wi-Fi antenna is installed; make sure your PC and the device are on the same LAN or connected to the device’s Wi-Fi AP hotspot; turn off any VPN; and check that your Windows Firewall isn’t blocking ViPlex Express.

5.2 Create and Publish a Playlist
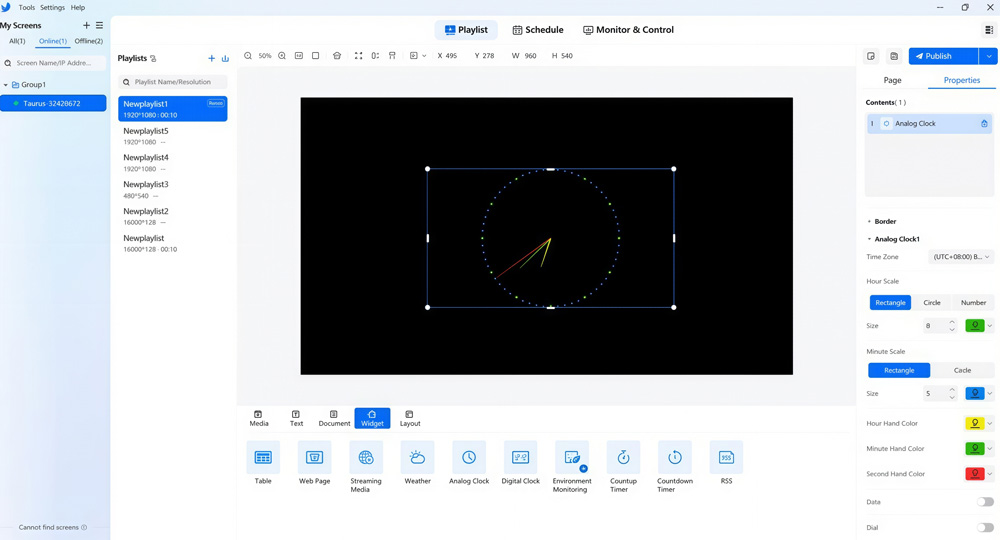
In ViPlex Express, content is organized into playlists. A playlist can contain multiple pages, and each page can hold different types of media — videos, images, text widgets, clocks, and more. Pages play in order from top to bottom.
Step 1: Create a new playlist
Select your screen under My Screens, then click Playlist in the top navigation. Next to the Playlists tab, click + to create a new playlist. Give it a name and set the resolution to match your LED screen.
Step 2: Add media
Click Import Media to add video or image files from your computer. You can also drag files directly into the editing area. To add widgets like a clock, weather display, or RSS feed, click the corresponding tab at the bottom of the editor.
Once media is added, resize or reposition it by dragging, or enter exact values (X, Y, W, H) in the properties panel on the right.
Step 3: Set page properties
Under the Properties tab on the right, set each page’s name, number of plays, and playback duration. You can also add background music for players on V4.7.4 or later.
To add more pages, click + in the Page panel. Drag pages to reorder them — the playback sequence follows top to bottom. If two pages have overlapping time slots, they play in order by their position in the list.
Step 4: Preview
Click the preview icon in the top-right corner to check how the playlist looks before sending it. The preview refreshes immediately when you switch between pages.
Step 5: Publish
Click Save first, then click Publish.
- To publish to a single screen, click the Publish button directly.
- To publish to multiple screens at once, click the dropdown arrow next to Publish → Batch Publish, select your target screens, and click Confirm & Publish.
You can check publish progress and results in the Publishing Center (the icon in the top-right corner). A green indicator means success; red means the publish failed and needs a retry.
5.3 Supported Media Types
ViPlex Express V4.0.0 supports the following content on a playlist page:
| Category | Supported Types | Notes |
| Video | MP4 (recommended), AVI, MOV and others | If a file won’t import, convert to MP4 first |
| Image | JPG, PNG, BMP, GIF | — |
| Document | Word, Excel, PowerPoint | Excel: max 600 rows, landscape A4 layout recommended |
| Text | Single-line text, multi-line text, colorful text (single/multi-line) | — |
| Clock | Analog clock, digital clock | — |
| Timer | Count-up timer, countdown timer | — |
| Data widgets | Weather, RSS feed, environmental monitoring | Require internet / sensor connection |
| Web content | Web page, streaming media | Require a valid URL |
| Table | Table widget | — |
| HDMI IN | External HDMI input source | TU40 Pro / TU4K Pro only |
Custom layouts: ViPlex Express includes preset layout templates — 1×2, 2×1, 1×3, 3×1, 2×2 — or you can build your own. Up to 20 custom layouts can be saved.
5.4 USB Offline Playback
If your display is in a location without network access, you can export a playlist to a USB drive and play it directly from there. ViPlex Express offers two playback methods:
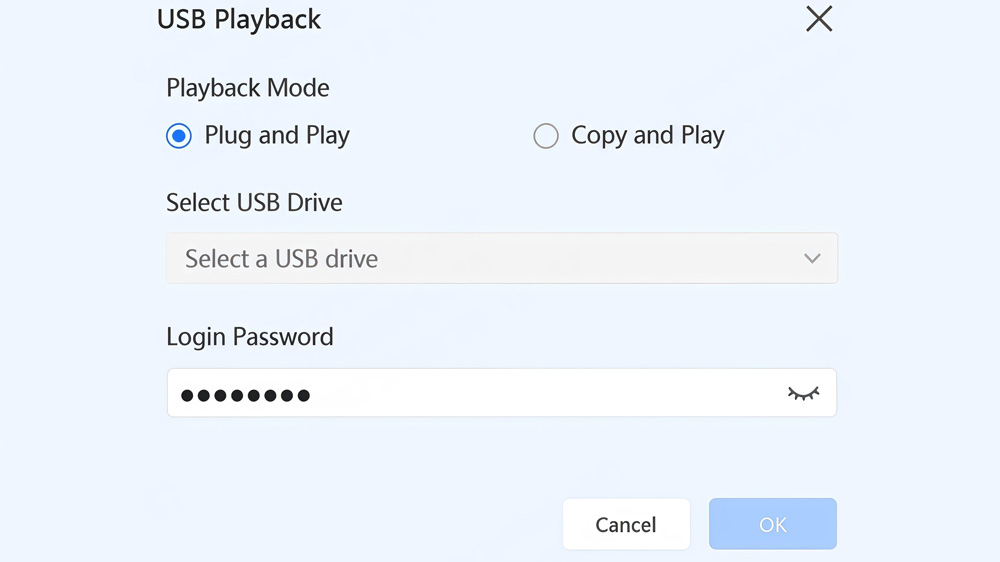
- Plug and Play — Insert the USB drive into the player and the playlist starts immediately. Keep the USB drive plugged in during playback.
- Copy and Play — The player copies the content from the USB drive to its internal storage, then plays from there. You can remove the USB drive once copying is done.
- How to export a playlist to USB:
(1) Under the Playlists tab, right-click the playlist name and select USB Playback.
(2) Choose your playback method: Plug and Play or Copy and Play.
(3) If using Copy and Play and a playlist with the same name already exists on the device, choose Keep Both or Replace.
(4) Select the USB drive as the save path.
(5) Enter the device login password. The player will verify this when the USB is inserted.
(6) Click OK.
For Simple USB Playback (no password required): Go to Monitor & Control → Playback Management → Playback Configuration and turn on Simple USB Playback. Then name your files in ascending 3-digit order — for example, 001-video.mp4, 002-image.jpg — and put them in the root directory of the USB drive. Insert the drive and the files play automatically.
5.5 How to Add a Terminal?
(1) Download and install the software, search for net4.5, and click to download.
(2) After the installation is complete, wait for the software CMD to inject the plug-in.
(3) After entering the operating system, you can directly import the video to be uploaded and manage the controlled LED screen.
5.6 Operation Guide Videos
For users who prefer a more visual and practical way to learn, the following introduction and operation videos demonstrate how ViPlex Express is used in real LED display control tasks.
Viplex Express Operation Guide


6. ViPlex Express vs ViPlex Handy
Both ViPlex Express and ViPlex Handy help you manage your LED screens. But they work on different devices. ViPlex Express is a Windows-based application. It is the best choice for office work and complex content editing. You can create detailed schedules and manage many screens at once from your desk.
On the other hand, ViPlex Handy is a mobile Viplex Express app for your smartphone. Because it is on your phone, it is very convenient for technicians on the move. You can use it to change the screen brightness or switch a playlist while standing right in front of the LED wall. It supports both LAN and Internet control, so you can even check your screen status from home.
However, ViPlex Handy is simpler than the PC version. It is perfect for quick updates, but it does not have the advanced “Studio Mode” that you find in the Express version.
- Comparison: ViPlex Express vs ViPlex Handy
| Feature | ViPlex Express | ViPlex Handy |
| Platform | Windows PC / Laptop | Android / iOS Smartphone |
| Best For | Professional Content Editing | Quick On-site Adjustments |
| Connection | LAN / Wi-Fi / USB | Wi-Fi / 4G / 5G |
| Editing | Multi-window & Complex Layouts | Single Window & Basic Text |
| Cost | Free Download | Free App |
7. ViPlex Express vs NovaLCT
Many beginners ask which software they should use: NovaLCT or ViPlex Express. The answer is that you usually need both, but for different stages of your project.
NovaLCT is a configuration tool. Its main job is to “light up” the screen. You use it to set the scan mode, upload the .rcfgx files, and arrange the screen connection. It talks directly to the sending cards and receiving cards. Without NovaLCT, your LED wall might not function at all. It is the foundation of your LED system.
In contrast, ViPlex Express is a content management system. Once the hardware is configured and the screen is “lit,” you use ViPlex Express to play your videos. It does not handle the pixel-level hardware settings. Instead, it focuses on what the audience sees.
So, remember this: Use NovaLCT to set up the screen, and use ViPlex Express to play the advertisements.
- Comparison: ViPlex Express vs NovaLCT
| Feature | ViPlex Express | NovaLCT |
| Primary Goal | Content & Ad Publishing | Hardware Configuration |
| User Role | Graphic Designers / Owners | LED Engineers / Technicians |
| When to Use | Daily Content Updates | Initial Setup & Repair |
| Key Function | Video Playback & Scheduling | Screen Connection & Calibration |
| Hardware Focus | Multimedia Players (Taurus) | Sending & Receiving Cards |
8. FAQ
What is the default password for ViPlex Express?
The default login password is printed on the SSID label on the back of your multimedia player. If the label is missing or the password has been changed and you don't know it, you'll need to reset the device to factory settings to restore the default.
What is the default device IP address?
When connecting via Ethernet cable directly, the default static IP is 192.168.0.10. Your PC must be on the same network segment — for example, set your PC's IP to 192.168.0.x with subnet mask 255.255.255.0.
What video format does ViPlex Express support?
MP4 is the recommended format. Most common video formats are supported, but if a file won't import or play correctly, convert it to MP4 first using any standard video converter.
Is ViPlex Express available for Mac?
There is no native Mac desktop version. If you're on a Mac, the most reliable option is to run Windows through a virtual machine — Parallels Desktop or VMware Fusion both work well. Install ViPlex Express inside the Windows environment as normal.
How do I connect ViPlex Express to a player via Ethernet?
Connect your PC and the multimedia player with an Ethernet cable. The player's default static IP is 192.168.0.10. Set your PC's IP to the same subnet, then open ViPlex Express — the device should appear automatically under My Screens. If it doesn't, use Add Screen → IP Address to search for it manually.
What NovaStar multimedia players work with ViPlex Express?
ViPlex Express V4.0.0 is compatible with NovaStar's Taurus series and TU series multimedia players, including TB20 Plus, TB30, TB40, TB50, TB60, TU15 Pro, TU20 Pro, TU40 Pro, TU4K Pro, and others. Some advanced features — such as HDMI IN, 4G network, and RF time synchronization — are only available on specific models.
What is ViPlex Express Cloud?
In ViPlex Express, you can bind your multimedia player to a cloud publishing platform via Monitor & Control → Cloud Server. This connects to NovaStar's VNNOX cloud, which lets you manage and push content to remote screens over the internet.
9. Conclusion
NovaStar ViPlex Express is the standard content management tool for LED display systems. It’s free, runs on any Windows 10 PC that meets the minimum requirements.
For teams managing multiple screens across different locations, the cloud binding feature in Monitor & Control lets you push content and monitor display status remotely — no on-site access needed.
Need help finding the right multimedia player or LED display for your project? At LedInCloud, we manufacture LED displays and provide free technical support — including configuration files and setup assistance through our LED Screen Cloud Platform.