
LED video processors don’t usually get much attention. They’re not the biggest, brightest part of your setup. But when something on your screen looks off—maybe the image doesn’t fit, the video lags, or the colors just feel wrong—it’s often the processor behind it.
This guide isn’t about theory. It’s built around real problems that people run into all the time—like a screen showing only half an image, or a signal that shifts out of place. We’ll look at what causes these issues and how to fix them without wasting hours guessing.
Table of Content:
1. What Is a LED Video Processor and Why It Matters?
2. Display Issues and How to Solve Them
2.1 LED Screen Cannot Display Full Image
2.2 LED Screen Only Shows Desktop Background
2.3 VGA Input Causes Image Shift or Misalignment
2.4 Image Appears in Center Only, Doesn’t Fill the Screen
2.5 No Sound from Computer After HDMI or DVI Connection
1. What Is a LED Video Processor and Why It Matters?
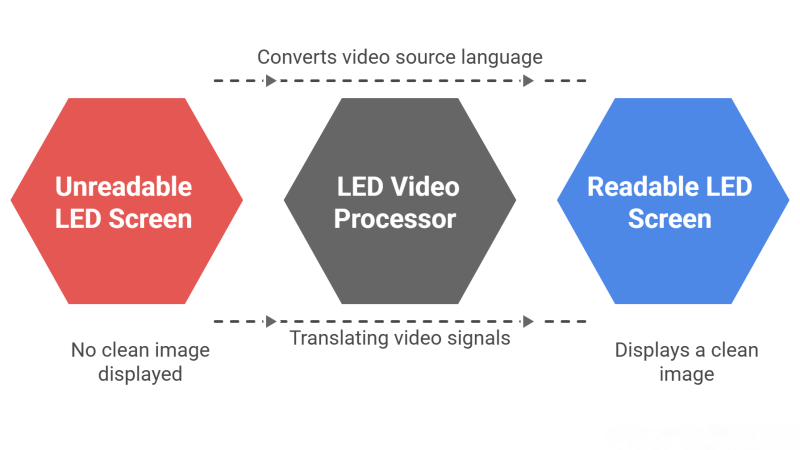
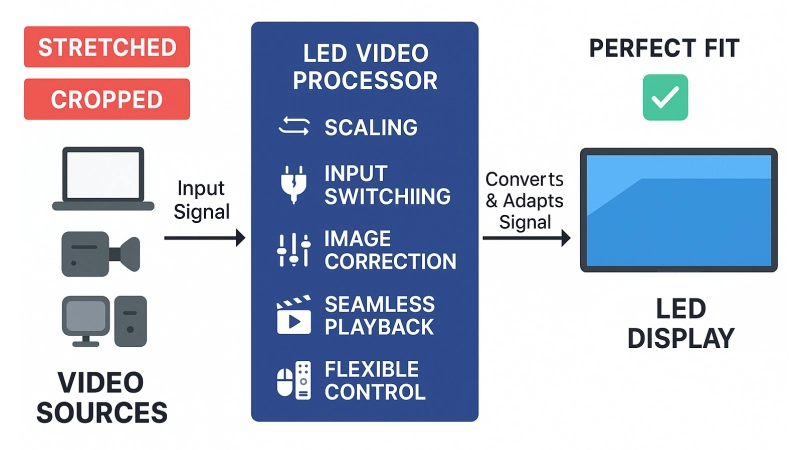
If you’ve ever connected a computer to an LED screen and the image looked stretched, cropped, or stuck in the middle, you’ve already met the problem. The LED screen isn’t broken. It’s just not getting the right kind of signal. That’s the job of the video processor.
A LED video processor sits between your video source and your LED screen. It takes the raw input—whether that’s from a laptop, camera, or switcher—and converts it into something the screen can understand. It adjusts the resolution, corrects the aspect ratio, and cleans up the image so it fits perfectly.
It’s more than a signal adapter.
This box handles multiple tasks at once:
✔ Scaling: It resizes input signals to match the screen’s pixel resolution. If your screen is 1024×768 but your input is 1920×1080, the processor scales it down. If the screen is 4K but the input isn’t, it scales it up.
✔ Input switching: Most processors support multiple inputs—HDMI, DVI, VGA, SDI, even USB or CVBS. You can switch between them in real time without plugging and unplugging cables.
✔ Image correction: Many processors can adjust brightness, contrast, sharpness, and color temperature. This is especially useful for outdoor LED walls or rental setups where lighting conditions change.
✔ Seamless playback: Some LED video wall processors offer frame synchronization, so your content plays smoothly without screen tearing or stutter—critical for live events.
✔ Flexible control: Whether you use hardware buttons, a remote, or software via USB/LAN, the processor gives you precise control over what appears on screen.
In simple terms: it translates the language of your video source into the language your LED screen speaks. Without it, even the best screen can’t show a clean image.
Real-world importance:
You’ll find LED video processors in concerts, shopping malls, stadiums, churches, and corporate lobbies. They’re essential for anyone using large-format LED displays.
A good processor doesn’t just make the image “fit”—it makes it look right. Smooth motion. Clear edges. True colors. Brands like NovaStar, Brompton, Linsn, Colorlight LED, and Huidu all specialize in this kind of equipment. Each one has its own software, features, and control style, but the goal is the same: give your LED wall a clean, stable picture.
If you’re planning a permanent installation or managing rentals, knowing how a processor works—and how to deal with issues when things go wrong—can save you time, money, and stress.
2. Display Issues and How to Solve Them
When something looks wrong on the LED screen—like the image not filling the screen, shifting to one side, or showing the desktop only—it usually comes down to how the video processor is set up. These aren’t hardware failures. They’re configuration mismatches. Below are the real-world problems users face and how to solve them correctly.
2.1 LED Screen Cannot Display Full Image
- Problem
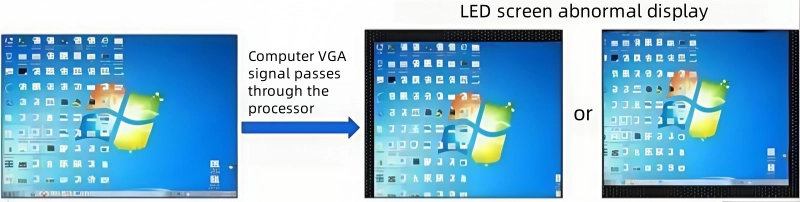
The LED screen only shows part of the input. The image is cropped or doesn’t fill the screen completely.
- Reason
The processor’s output resolution is not aligned with the LED screen’s physical pixel size. If the values don’t match, part of the image gets cut off.
- Solution
Set the output width and height in the video processor to exactly match your LED screen’s pixel dimensions.
If the source is a computer, set the processor to Full Screen Mode. Without this, it may only show part of the signal.
- Note
This issue happens often during initial setup or signal switching. Many processors (e.g., from NovaStar, Linsn) require manual confirmation of output resolution for custom LED sizes.
2.2 LED Screen Only Shows Desktop Background
- Problem
The LED screen shows the computer desktop, but not the actual windows or content.
- Reason
The video processor is likely in Local Display Mode, which only mirrors the primary screen, usually showing the desktop background. Also, the output resolution might be too low or mismatched.
- Solution
Set the processor to Local Display mode.
On your PC, go to display settings. Make sure the output resolution is equal to or greater than the LED screen’s resolution.
In some cases, the PC’s resolution must match the processor’s output resolution, not just the screen.
- Note
This issue is common when using processors from brands like Huidu, or when users connect laptops without adjusting extended display settings.
2.3 VGA Input Causes Image Shift or Misalignment
- Problem
After switching to VGA input, the image is shifted or not centered.
- Reason
VGA is analog and depends on accurate signal timing. If the signal isn’t correctly synced, the image position can drift.
- Solution
Select VGA input on the processor.
Press the VGA AUTO key to trigger automatic alignment.
On some models, press VGA, then AUTO.
- Check
Make sure the incoming VGA signal is stable and clean.
The signal width (timing) must be within acceptable limits.
- Note
This fix applies to various models from RGBlink, Amoonsky, or older processors still supporting VGA.
2.4 Image Appears in Center Only, Doesn’t Fill the Screen
- Problem
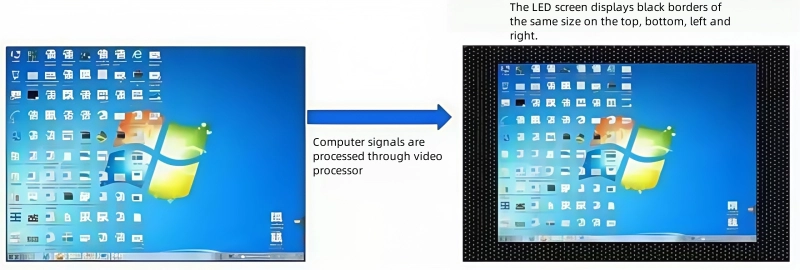
The screen shows the image in the center, surrounded by black borders. It doesn’t expand to full screen.

- Reason
This is caused by how the graphics card interacts with EDID data from the processor. The graphics card chooses the “preferred resolution” based on what the processor reports. But it may not match the LED display’s resolution.
- Technical Detail
The EDID (Extended Display Identification Data) tells the computer what resolutions the display supports. Sometimes, it defaults to 2048×1152 or another fixed size.
- Solution
You need to adjust the scaling settings in your graphics card panel. The goal is to stretch the image to full screen without changing resolution.
- Examples
Windows 7 with Intel/NVIDIA dual graphics:
Right-click desktop → Graphics Options → Scaling → Full Screen
(On Intel panels: set scaling to 100% width and 100% height)
Windows XP with ATI card:
ATI Control Panel → Digital Panel (DVI) → Scaling Options → Set to “0% overscan”
Windows 7 with ATI card:
Go to “My Digital Flat Panels” → “Scaling Options (Digital Flat Panel)” → Set scan to “0% or more”
- Note
This problem often appears in systems using NovaStar 4K processors, Colorlight LED processors, or any setup where the processor EDID and the graphics card default settings don’t match up.
2.5 No Sound from Computer After HDMI or DVI Connection
- Problem
You connect your PC to the processor using HDMI or DVI. Now your speakers stop working, even though they were fine before.
- Reason
Both HDMI and DVI can carry audio. When connected, the computer may switch the default audio output from your internal sound card to the graphics card’s HDMI audio.
- Solution
Set your sound card back as the default output device.
Steps for different systems:
Windows 7 / Vista:
Right-click speaker icon → “Playback Devices” → Set “Speakers” or “Realtek Audio” as default
Windows XP:
Right-click speaker icon → “Adjust Audio Properties” → Under “Audio” tab, choose default playback device as “Realtek HD Audio”
- Note
This issue often comes up with HDMI-connected processors such as NovaStar, Colorlight, or Huidu models. It’s not a fault—it’s just how the system prioritizes audio output.
3. Recommended LED Video Wall Processor Brands and Products
Choosing the right video processor depends on your project’s size, image quality requirements, and control needs. Here are three professional-grade options worth considering:
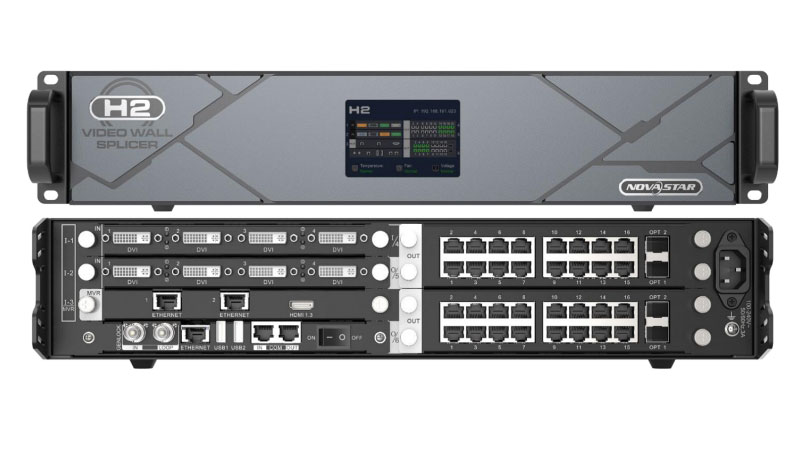
(1) NovaStar H Series Video Processor
A flagship all-in-one video processor and controller. The H Series supports true 4K@60Hz, multi-layer splicing, and seamless switching. Its modular design simplifies system integration and improves long-term stability.
Ideal for fine-pitch LED walls, high-end installations, and demanding visual environments.

(2) Huidu HD-VP8000M Video Processor
A scalable, card-based splicing processor designed for flexibility. It handles up to 4K input, multi-window display, and scene presets. Great for control rooms, conference centers, and commercial video walls that require real-time switching.
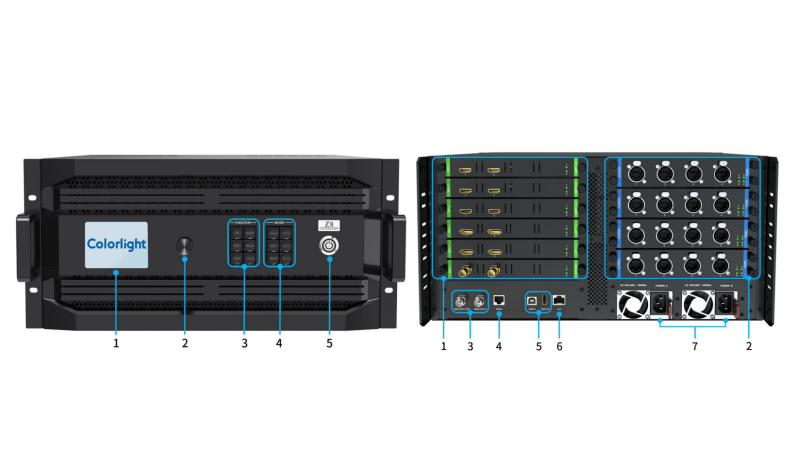
(3) Colorlight Z8 LED Processor
An 8K controller with advanced color management, HDR support, and up to 240Hz frame rate. Features like Color Replace and Curve Adjustment make it ideal for XR production, TV broadcasting, and premium live events.
4. LED Video Processor Price
Prices for LED video processors can vary a lot, depending on the features, resolution, and brand.
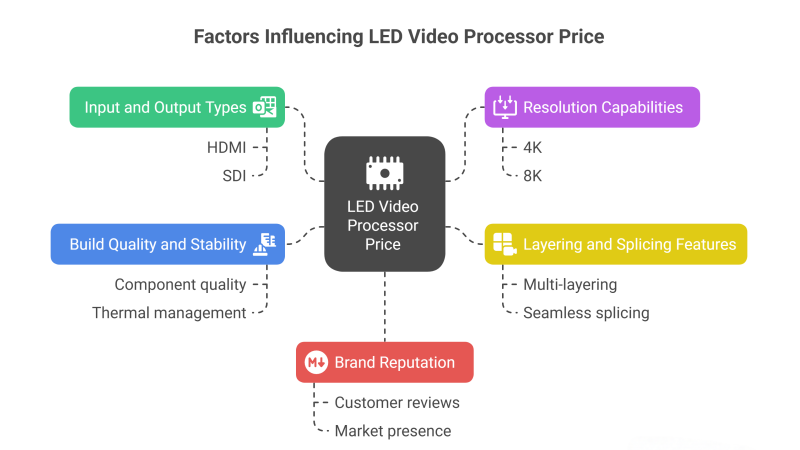
Here’s what affects the price:
- Input and output types: HDMI, SDI, DP, and 4K support usually cost more.
- Resolution: A processor that handles true 4K or even 8K content will be more expensive.
- Layering and splicing: The more layers, windows, or output areas a processor supports, the higher the cost.
- Build quality and stability: High-end models often have redundant power supplies, hot-swappable cards, and better heat control.
- Brand: Prices vary between brands like NovaStar, Colorlight, Linsn, and Huidu even with similar specs.
If you’re unsure where to start, or want to compare prices across brands, you can register LedInCloud. It allows you to:
- View and compare real-time prices for video processors from multiple manufacturers
- Download free resources and software (like NovaLCT, ViPlex, Huidu tools, etc.)
- Ask product questions directly to a professional support team
Whether you’re a first-time buyer or managing multiple projects, having price transparency and access to tools in one place can save a lot of time.
5. Final Tips: How to Avoid Future Problems
Most LED display issues aren’t caused by faulty hardware—they come from mismatched settings, rushed installations, or overlooked details. Here are a few tips that can help you avoid common headaches when using a video processor.
(1) Set the correct resolution from the start
Before connecting any source, make sure you know your LED screen’s actual pixel size. Set your video processor’s output resolution to match it exactly. A mismatch can cause part of the image to disappear or leave black borders around it.
(2) Use high-quality cables
Loose or low-grade HDMI, SDI, or VGA cables can cause signal instability—especially over long runs. If you’re getting screen flicker, color issues, or signal dropouts, check the cable first.
(3) Don’t rely on auto settings
Many processors offer “auto” modes for input recognition or scaling. These work sometimes, but not always. Manual setup—especially for full screen output and layer configuration—is usually more reliable.
(4) Learn the software, not just the hardware
Whether it’s NovaLCT, Colorlight X100, or Huidu’s management tools, spend time with the control software. It gives you more precise control over inputs, window positions, brightness, color, and presets.
You can download most of these tools for free on LedInCloud – LED Screen Cloud Platform, along with firmware, manuals, and setup guides.
(5) When in doubt, talk to someone who knows
If you’ve tried everything and still can’t get it to work, don’t waste hours guessing. Get support. On LedInCloud, you can ask experienced technicians about specific models or problems—whether it’s about a NovaStar processor, a Huidu 4K unit, or anything in between.
(6) In short: Think system, not just screen
An LED video processor isn’t a plug-and-play device. It’s part of a system. Take the time to understand how it interacts with your signal source and your screen, and you’ll save yourself a lot of stress later.