
The Complete NovaStar VX16s Guide: Specs, Setup & Comparison
The NovaStar VX16s is a versatile all-in-one controller that combines video processing, control, and LED screen configuration in one compact device.
In this article, we’ll cover the essential features, operations, and everything you should know about the NovaStar VX16s, including pricing details and access to resources and downloads.
1. NovaStar VX16s Video Processor Introduction
VX16s is NovaStar’s all-in-one controller that combines video processing, video control, and screen configuration into a single 2U box. No separate sending card, no separate video processor — one unit handles it all.
1.1 Key Features
Inputs and outputs built for scale. The VX16s covers 2x 3G-SDI, 1x HDMI 2.0, and 4x SL-DVI on the input side — enough to connect a camera, a laptop, and a media server at once without extra adapters. On the output side, 16 Ethernet ports load up to 10,400,000 pixels, which is why this controller shows up on large-format and fine-pitch projects rather than small storefront screens.
Three independent layers. One 4K×2K main layer plus two 2K×1K PIP windows let you run full-screen content while a camera feed or countdown timer sits on top, each with its own priority setting.
Mosaic functions for flexible setups. DVI Mosaic merges four DVI inputs into a single source, handy when your content comes off a multi-output graphics card. Image Mosaic works the other way — link up to four VX16s units together when one controller can’t cover the whole screen.
Frame rate and 3D support. Decimal rates like 23.98 Hz and 59.94 Hz keep film content judder-free, and pairing the VX16s with NovaStar’s EMT200 emitter adds 3D output (though this halves loading capacity while active).
Smart software control. V-Can lets you manage everything from a PC instead of the front panel, save up to 10 presets for one-click layout switching, and rely on EDID management to avoid handshake issues with tricky sources.
Built-in backup mode. If the primary unit loses signal or an Ethernet port fails, a backup VX16s takes over automatically — the screen stays live instead of going black mid-show.
1.2 Appearance
1.2.1 Front Panel
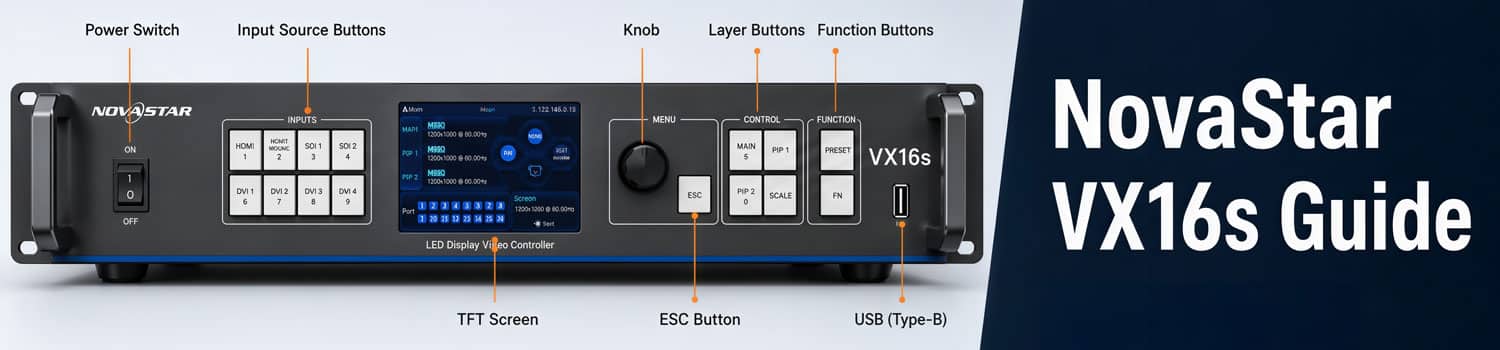
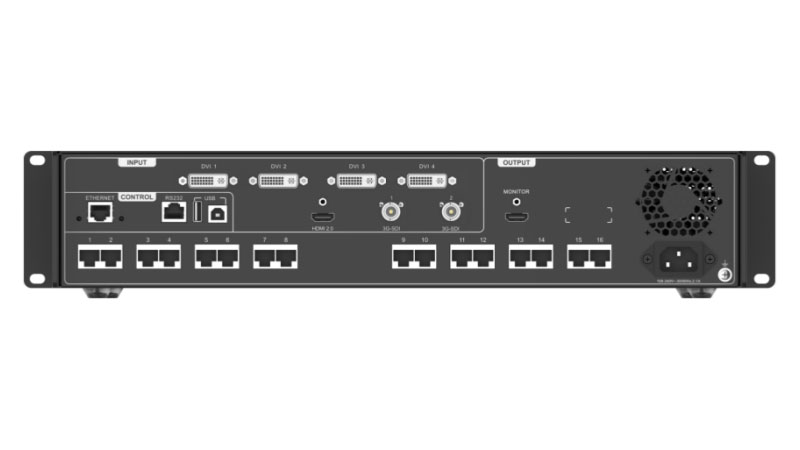
Everything you’d touch during a live show sits on the front: a power switch, a USB Type-B port for PC debugging, and input source buttons that double as status LEDs — dim, flashing, or solid orange tells you whether a source is connected, active, or just sitting idle. A knob handles menu navigation, the ESC button backs out, and dedicated MAIN / PIP1 / PIP2 buttons jump straight to each layer’s settings. A shortcut FN key can be set to whatever function you use most — sync, freeze, or quick configuration.
1.2.2 Rear Panel
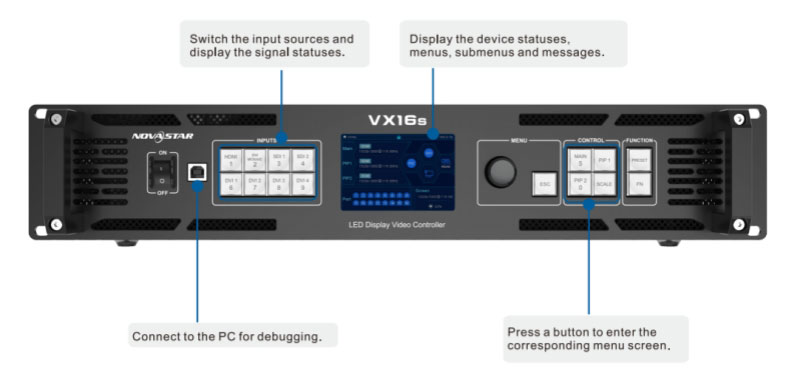
✔ Inputs: 2x 3G-SDI (max 1920×1080@60Hz, no interlaced signal), 4x DVI (standard input tops out at 1920×1200@60Hz, though custom resolutions can stretch to 3840 pixels wide or tall — and all four DVI ports can combine into one DVI Mosaic source), and 1x HDMI 2.0 (max 3840×2160@60Hz).
✔ Outputs: 16 Ethernet ports, 650,000 pixels per port and 10,400,000 pixels combined, plus one HDMI monitor port for local preview at up to 1920×1080@60Hz.
✔ Control: 1x Ethernet port, 2x USB (Type-B for debugging or linking, Type-A for output linking), and 1x RS232 for central control integration.
1.3 Price
NovaStar VX16s Controller, with its cutting-edge features and exceptional performance, is priced at approximately $2,716.7. This competitive price reflects the advanced technology and versatility the VX16s brings to professional LED display solutions.
For the most accurate and up-to-date pricing information, you can register and log in to our LED Screen Cloud Platform. This platform provides convenient self-service inquiries, enabling you to check prices of VX16s or other NovaStar Products by yourself and access additional professional details tailored to your needs.
2. NovaStar VX16s Specifications
Here’s what the VX16s offers on paper — useful for checking it fits your rack, your power circuit, and your install environment before you order.
| Category | Specification |
| Power input | 100–240V~, 50/60Hz, 2.1A |
| Power consumption | 70 W |
| Operating environment | 0°C to 50°C, 20%–85% RH (non-condensing) |
| Storage environment | -20°C to 60°C, 10%–85% RH (non-condensing) |
| Dimensions | 482.6 mm × 372.5 mm × 94.6 mm |
| Net weight / Gross weight | 6.22 kg / 9.78 kg |
| Included accessories | EU, US, and UK power cords; Cat5e Ethernet cable; USB cable; DVI cable; HDMI cable; Quick Start Guide; Certificate of Approval |
| Certifications | CE, FCC, IC, RoHS, UL, CB, KC |
| Noise level | 45 dB(A), typical at 25°C/77°F |
At 70 W, the VX16s draws less power than most people expect from a controller loading over 10 million pixels, and the 2U dimensions fit a standard rack without custom mounting. The power cords cover EU, US, and UK outlets, so you likely won’t need to source one separately.
3. Setup and Operation
Once the VX16s is wired up, getting it running comes down to six steps: brightness, screen configuration, layer setup, input settings, display control, and presets. Here’s how each one works.
3.1 Home Screen
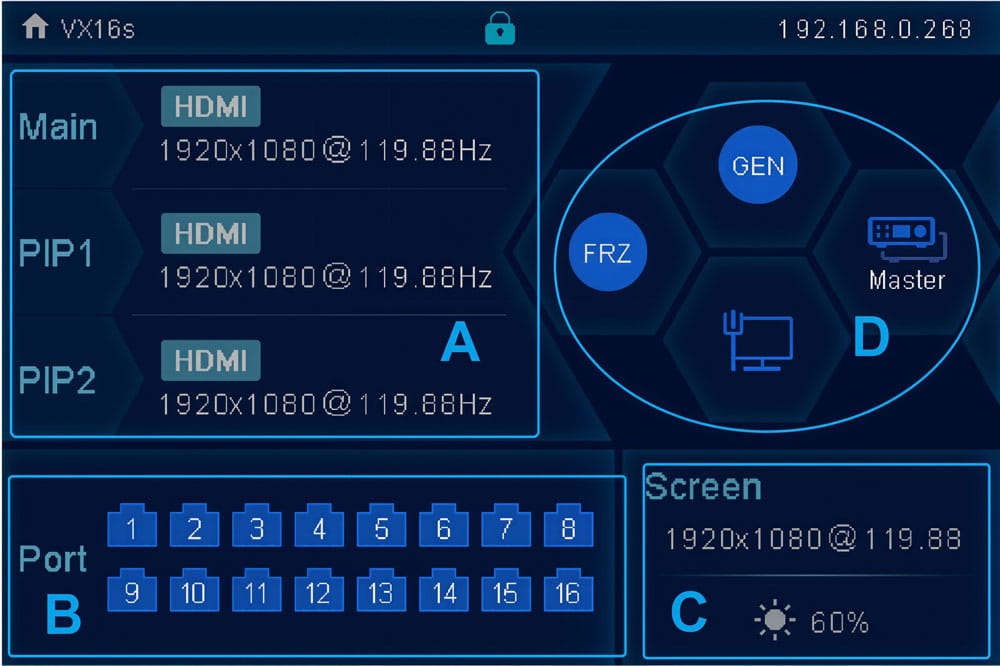
| Area | Icon | Meaning | |
| A |  | The layer is active, and the input source name along with its resolution is displayed. | |
 | The layer is inactive. | ||
| B |  | The VX16s is in video controller mode, and this Ethernet port is connected. | |
 | This Ethernet port is disconnected. | ||
 | This Ethernet port is connected and functions as the backup output. | ||
| C |  | Configured screen resolution and frame rate | |
 | Screen brightness level | ||
| D | Synchronization |  | Genlock function activated |
 | Genlock function deactivated | ||
 | Genlock function is in the process of being activated | ||
 | Failed to activate the Genlock function | ||
| Display control |  | LED screen is currently black | |
 | LED screen is displaying the chosen test pattern | ||
 | The LED screen is showing the current input source | ||
 | The output image is frozen. | ||
| BKG |  | The BKG function is enabled. | |
 | The BKG function is disabled. | ||
| Communication |  | The VX16s is communicating with the control PC through USB. | |
 | The VX16s is communicating with the control PC through LAN. | ||
| The VX16s is not connected to the control PC. | |||
3.2 Screen Brightness
You can adjust the screen brightness to match the surrounding light, making it easier on the eyes. Proper brightness adjustment can also help extend the lifespan of the LED screen.
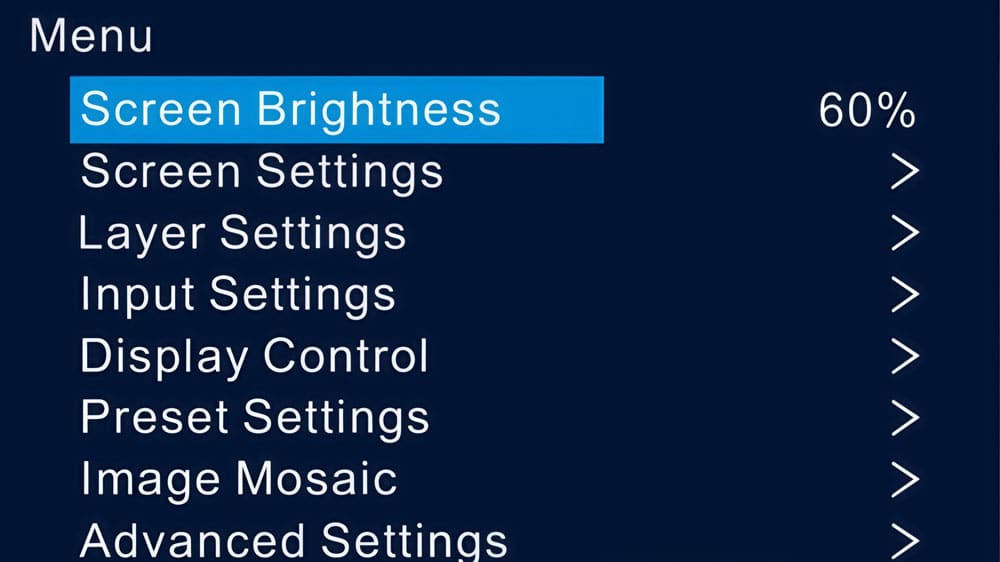
Step 1: On the home screen, press the knob to access the main menu.
Step 2: Select Screen Brightness and press the knob to confirm.
Step 3: Rotate the knob to adjust the brightness. The LED screen will display the changes in real time. Once satisfied, press the knob to apply the new brightness setting.
3.3 Layer Settings
Step 1: Press the knob to access the main menu.
Step 2: Rotate the knob to choose Layer Settings, then press to enter the layer settings screen, where you can configure the following:
- Main Layer
- PIP 1 and PIP 2
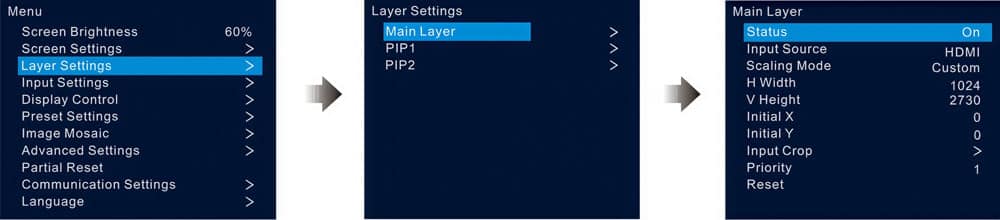
Main Layer and PIP:
| Menu | Description |
| Status | Open or close the current layer. Note: Press MAIN, PIP1, or PIP2 on the front panel to access the Layer Settings menu on the LCD screen. |
| Input Source | Select the input source for the current layer. Note: HDMI and DVI Mosaic sources are only for the main layer. |
| Scaling Mode | Choose from three options: Full Screen, Pixel to Pixel, or Custom. |
| H Width | Set the horizontal width of the layer, up to 32,768 pixels. |
| V Height | Set the vertical height of the layer, up to 32,768 pixels. |
| Initial X | Set the initial horizontal coordinate of the layer. |
| Initial Y | Set the initial vertical coordinate of the layer. |
| Input Crop | Crop the input source to fill the entire layer. Status: Enable or disable the input crop. H Width: Set the cropped width (64 to the input width). V Height: Set the cropped height (64 to the input height). Initial X: Horizontal start point of the crop. Initial Y: Vertical start point of the crop. |
| Priority | Set the display order of layers (1, 2, 3). 1: Send to the back. 2: Place in the middle. 3: Bring to the front. |
| Reset | Reset all layer settings to their default values. |
3.4 Quick Configuration
Requirement:
- The LED screen must be a standard screen.
- The cabinets must be uniform, with identical resolution across the screen.
- The following data flow patterns are supported. Each Ethernet port should follow the same direction, connecting downward to the next.
- Ethernet port 1 should always initiate the physical connection.
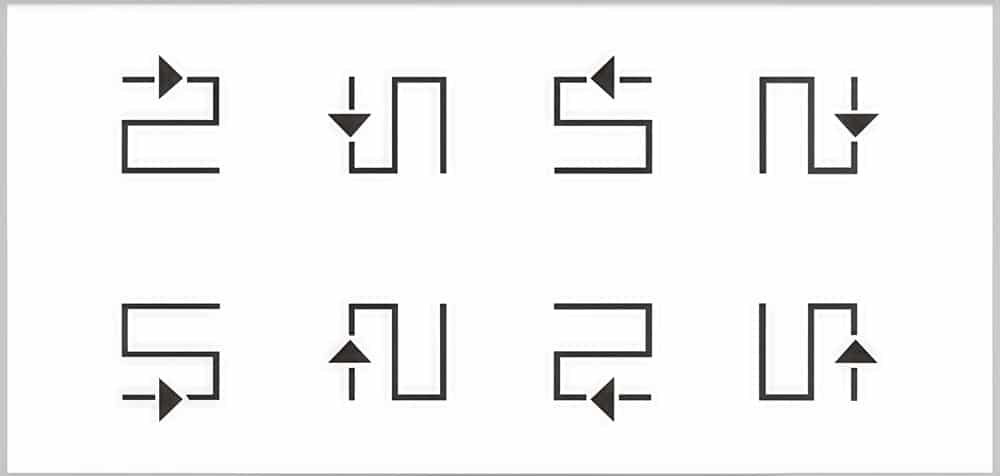
Steps:
Step 1: Power on the LED screen.
Step 2: From the home screen, press the knob to access the main menu. Rotate the knob to navigate to Screen Settings > Quick Configuration, then press the knob to enter.
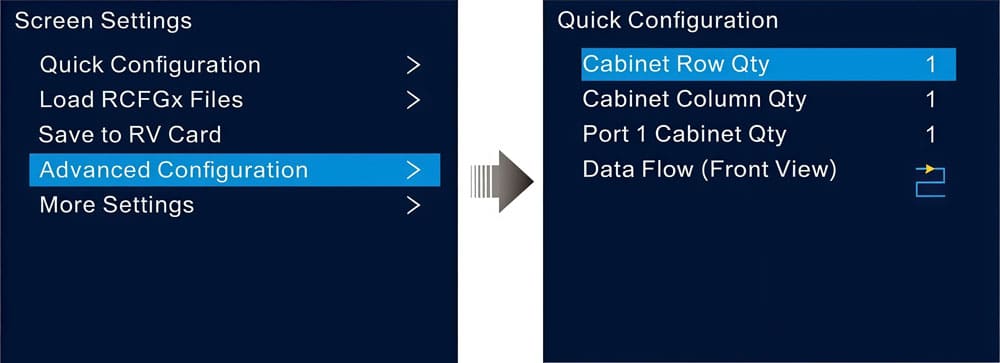
Step 3: Adjust Cabinet Row Qty and Cabinet Column Qty based on the actual number of rows and columns in the screen’s cabinet layout.
Step 4: Rotate the knob to select Port 1 Cabinet Qty and set the number of cabinets loaded through Ethernet port 1.
Step 5: Choose Data Flow (Front View) and press the knob. Then, select the appropriate data flow pattern for the cabinets.
As you set the data flow, the LED screen will display the results in real time. If the screen content appears correctly, with no overlap or repetition, press the knob to save your configuration.
3.5 Preset Settings
The VX16s supports up to 10 presets, allowing users to save, load, and clear configurations.
Step 1: Rotate the knob to navigate to Preset Settings and press to enter the preset settings screen.
Step 2: Select the desired preset by rotating the knob, then press it. A dialog box will appear with four options: Save, Load, Clear, and Copy To.
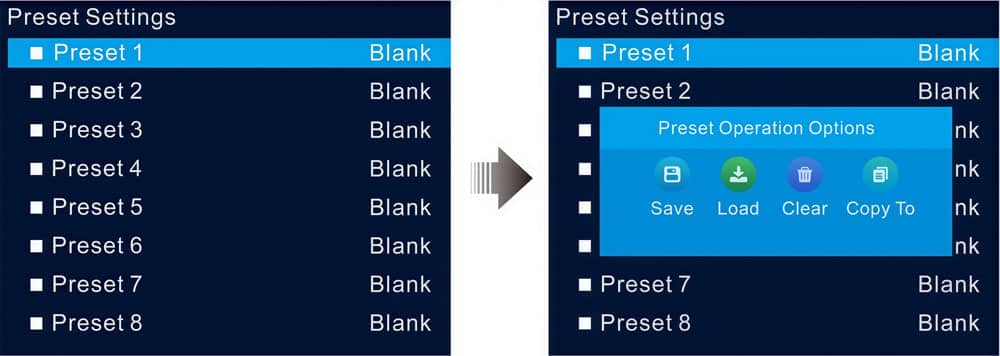
- Save: Store the current layer settings into the chosen preset.
- Load: Apply the selected preset’s layout to the current layer.
- Clear: Erase all contents from the chosen preset.
- Copy To: Duplicate the layout from the current preset to a different preset.
Note: If the target preset already contains data, using Copy To will replace the existing data with the new configuration.
3.6 Image Mosaic
The image mosaic function is essential when the resolution of an LED screen exceeds the capacity of a single VX16s unit. By linking multiple VX16s units, their combined loading capacity matches the total resolution of the screen.
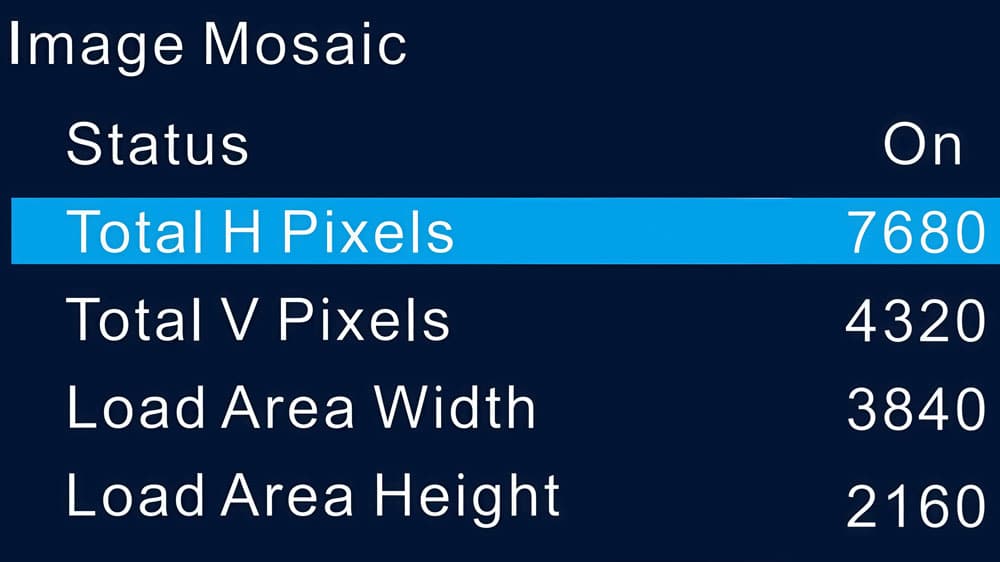
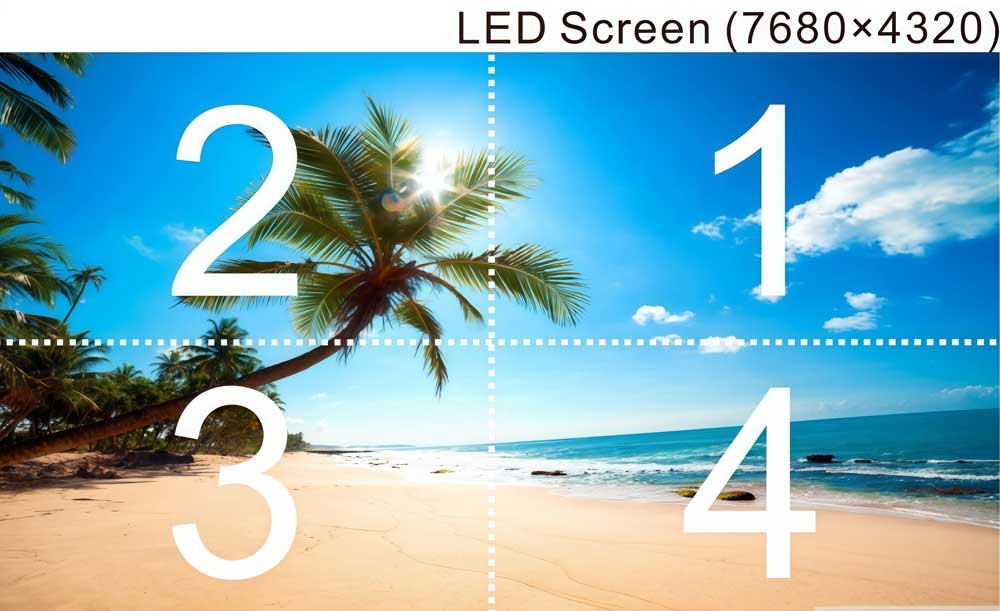
For example, if the LED screen resolution is 7680×4320, which is beyond the capacity of one VX16s unit, you would need four VX16s units to handle the full resolution through image mosaic. The size and position of each load area are shown as follows:
4. Comparison with Other Models
The VX16s isn’t NovaStar’s only all-in-one controller — VX1000, VX600, and VX400 cover smaller or mid-size setups at a lower cost. Here’s how they stack up, so you can pick based on screen size and input needs rather than guessing.
| Device Model | VX16s | VX1000 | VX600 | VX400 |
| Loading Capacity | 10.4 million pixels | 6.5 million pixels | 3.9 million pixels | 2.6 million pixels |
| Max Width & Height | Max width: 16384 pixels Max height: 8192 pixels | Max width: 10240 pixels Max height: 8192 pixels | ||
| Layers | 1x 4K×2K main layer 2x 2K×1K PIP | 3x 4K×1K | 3x 2K×1K | 2x 2K×1K |
| Input Connectors | 2x 3G-SDI 1x HDMI 2.0 4x SL-DVI | 1x 3G-SDI 2x HDMI 1.4 2x DVI(HDMI 1.4) 1x OPT1 | 1x 3G-SDI 2x HDMI 1.3 1x DVI 1x OPT1 | 1x 3G-SDI 2x HDMI 1.3 1x DVI 1x OPT1 |
| Output Connectors | 16x Ethernet ports 1x Monitor | 10x Ethernet Ports 1x HDMI1.3 1x HDMI1.4 LOOP 1x DVI LOOP 1x 3G-SDI LOOP 2x OPT | 6x Ethernet Ports 1x HDMI1.3 1x HDMI1.3 LOOP 1x DVI LOOP 1x 3G-SDI LOOP 2x OPT | 4x Ethernet Ports 1x HDMI1.3 1x HDMI1.3 LOOP 1x DVI LOOP 1x 3G-SDI LOOP 2x OPT |
| Presets | 10 | |||
| Control Connectors | 1x Ethernet Port 2x USB (input & output) 1x RS232 | 1x Ethernet Port 2x USB (input & output) 1x GENLOCK (IN & LOOP) | 1x Ethernet Port 2x USB (input & output) 1x GENLOCK (IN & LOOP) | 1x Ethernet Port 2x USB (input & output) 1x Light Sensor |
Bottom line: pick the VX16s for serious pixel count or ultra-wide screens. The VX400 or VX600 cover smaller budgets without paying for capacity you won’t use.
5. VX16s Controller Applications
The VX16s shows up most often in stage control systems, conferences, live events, exhibitions, high-end rental, and fine-pitch displays. What ties these together is scale and reliability — these are settings where a screen going dark mid-show isn’t an option, and where a single controller handling multiple sources beats juggling several boxes.
A typical setup looks like this: an SDI camera, a DVI source (like a laptop or PC), and an HDMI device all feed into the VX16s at once. The controller processes and routes all three to the LED wall through its Ethernet outputs, while a separate HDMI monitor gives you a local preview, and a control PC manages everything over the network.
Rental and touring shows lean on the backup mode and presets here — swap venues without rebuilding layer setups from scratch, and let a backup unit take over if something drops mid-performance.
Conferences and exhibitions benefit more from the PIP layers — slides on the main layer, a speaker camera or countdown timer running in a corner window.
Fine-pitch and stadium screens push the loading capacity and image mosaic features the hardest, since these are exactly the projects where 10.4 million pixels of headroom actually gets used.
One installation note worth flagging: the VX16s is built to run horizontally only. Wall mounting isn’t supported, so factor that into your rack or cabinet planning before installation.
6. NovaStar VX16s User Manual and Firmware Download
If you’re troubleshooting a specific menu or setting, the manual is the faster reference — it walks through every screen step by step, right down to what each front-panel LED color means. For a first-time setup, though, start with the Quick Start Guide instead — it skips straight to getting the screen running.
Before updating firmware, it’s worth checking the change history in the manual or on the download page first, so you know what’s actually changing before you install it.
For free NovaStar products user manuals, firmware updates, and other NovaStar resources, simply visit our NovaStar Software Download page.
7. Nova VX16s FAQs
Does the VX16s replace a sending card, or do I still need one separately?
It replaces it. The VX16s combines video processing, video control, and screen configuration functions, including the sending card function, into one device. No separate sending card is required.
Can the VX16s be wall-mounted?
No. The VX16s is designed for horizontal placement only. Wall mounting is not supported, so make sure your rack, cabinet, or installation space provides a suitable horizontal surface.
Do I need NovaLCT, V-Can, or both to run the VX16s?
Both software tools are used for different purposes. NovaLCT is mainly used for LED screen configuration, such as receiving card settings and loading RCFGx files. V-Can is used for daily video control, including layer management and input switching. Most setups are configured in NovaLCT first and operated through V-Can afterward.
What's the difference between DVI Mosaic and Image Mosaic?
DVI Mosaic combines multiple DVI inputs into a single video source on the input side, which is useful when working with multi-output graphics cards. Image Mosaic works on the output side by linking multiple VX16s units together to control LED screens larger than one unit's loading capacity.
Can the VX16s run without a control PC?
Yes. The VX16s can operate independently using the front panel knob and menu system for functions such as brightness adjustment, layer control, input selection, and preset switching. A PC running V-Can is mainly useful for more complex setups with multiple layers or advanced show control.
8. Conclusion
The NovaStar VX16s earns its place among NovaStar’s controllers by handling video processing, video control, and screen configuration in one box — no separate sending card required. Between the 10.4 million pixel loading capacity, three independent layers, and backup mode for live shows, it’s built for projects where scale and uptime both matter.
If your screen falls on the smaller side, the VX400 or VX600 might cover what you need without paying for headroom you won’t use. But for large-format walls, fine-pitch installs, or anything running live where a blackout isn’t an option, the VX16s is the one worth planning around.